Jan 1, 2021 | Blogging

“‘The time has come,'” as Lewis Carroll wrote, “‘To talk of many things.'”
And so, at last, it is time.
It’s been over 12 years since I started blogging, and I’ve reached the end.
Many things have played into this decision – which has not been an easy one to make.
For one thing, I’ve changed. I no longer spend hours poring over fashion magazines, following the trends, looking for the cutest, chic-est clothing…and thinking up ideas for how to knock it off.
I no longer have the time to indulge in elaborate projects that take over my living room or dining room table.
I no longer enjoy laboring over puncturing spikes into my heels, adding embellishments to a top, or remaking a man’s shirt into something for me.
I guess I’ve aged out of it, and my time is now spent with my family, on home improvement projects, in my garden, and new entrepreneurial endeavors. My interests have shifted as I’ve gotten older.
When I sent a survey to my readers earlier this year, I was pretty surprised at the results.
My readers wanted to see far more home DIYs than I had expected, as well as clothing and jewelry tutorials.
I realized that so little of my life now is spent in DIY’ing anymore…that after thinking about it I realized I couldn’t really deliver on what my readers wanted. I don’t makeover things in my home enough to make it into something to blog about, and I’ve done progressively fewer clothing and jewelry DIYs over the years as I’ve gotten happier with my closet and what I have.
I need new things rarely, I don’t desire things I see other people wearing, and the amount of stuff that running a DIY blog creates – as a side effect – has been bothering me for some time.
Creating DIY tutorials also takes a huge amount of time, materials, money, and editing – much more than an average blog about digital marketing or traveling, for example.
Finally, blogging as an industry has changed in the last 12 years.
To run a profitable blog nowadays takes an enormous amount of time and creative input. You have to run an excessive amount of ads and popups, that I believe have negatively impacted the user experience as a whole.
I don’t spend much time reading blogs anymore because the user experience has gone so downhill from what it used to be. Plus, paid sponsors and everything a blogger has to do in order to generate income (partnerships, plugging product, features) has begun to dilute the authentic, creative voices.
I definitely succumbed to that in trying to keep this blog profitable and growing, year over year.
It’s been a wild ride, though – and I have certainly learned a lot.
I want to thank all of you, dear readers, for this journey.
I am onto the next one already.
If you want to follow along in my next endeavor, I am founding a marketing and sales consultancy with a business partner.
Just us two women, sparking business growth for SaaS and tech companies, for startups to mid-stage organizations. $0MM-$15MM ARR. Playing in the boys’ pool and hoping we emerge swimming.
I’d be so thrilled if you followed along!

ElleSpark Website | ElleSpark on Facebook | ElleSpark on LinkedIn
Thank you for coming on this ride with me, over more than a decade.
I’ll be leaving this site up for the foreseeable future as a resource and archive for those looking for a little DIY or fun ideas to bring creativity and joy into their lives.
Goodbye, Chic Creative Life and all of you, my amazing readers. You were awesome, creative, and one-of-a-kind.
Don’t buy, DIY!
xo
Carly
Leave Comment
Jun 26, 2020 | Blogging
Hi friends!
Last week I sent out a survey to my email subscribers to find out what you wanted to see on Chic Creative Life.
I’ve been trying to figure out what content resonates, and what would be really helpful to my audience now. This blog has gone through many iterations, and I wanted to make sure it is aligned with what my readers want!
….And when I saw the results, boy was I surprised! Check them out below:
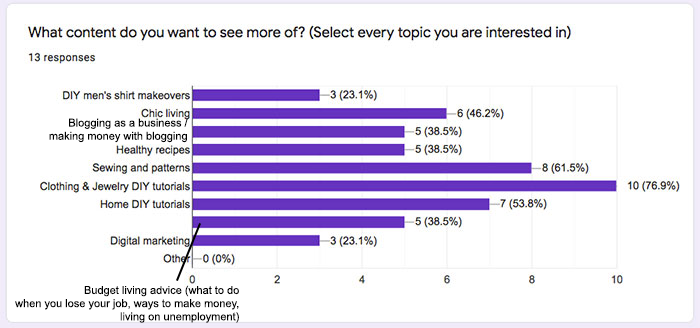

So it seems people want to read about, in order of number of votes, 1. Clothing & Jewelry DIY Tutorials, 2. Sewing and Patterns, 3. Home DIY Tutorials, and 4. Chic Living. Followed closely by Budget Living, Healthy Recipes, and Blogging as a Business topics. I was actually not surprised there were more requests for home DIY’s and chic living advice (since so many of us are home right now)…but I was definitely surprised there wasn’t more interest in DIY men’s shirt makeovers! Considering I’ve been putting a ton of time into it…these results are definitely eye-opening.
I want to thank everyone who took the survey, this is really helpful!
I’m going to work to shift my content more towards what the majority of my readers are wanting.
If you haven’t taken the survey yet and would like to weigh in, you can still do so here:
xo
Carly
Leave Comment
Jun 1, 2020 | DIY
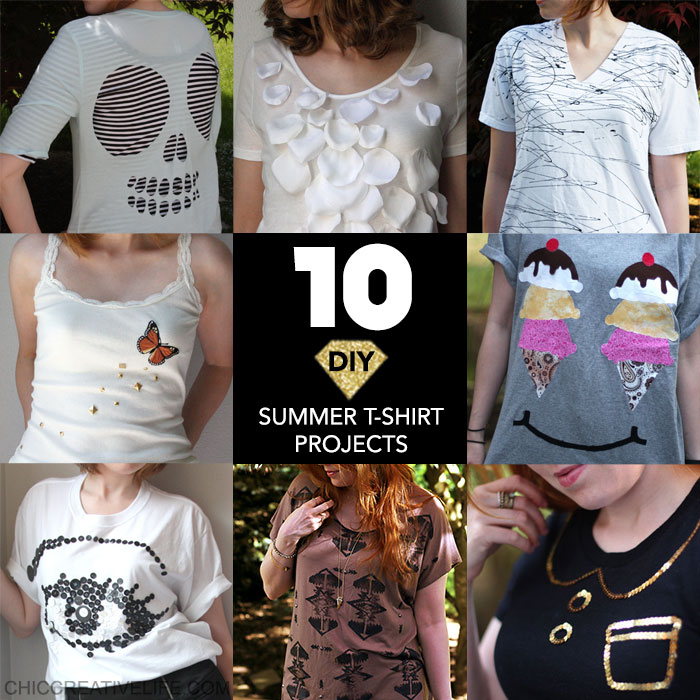
It’s June and Summer is coming! For many, hot weather is already here. I’m dipping into my archives today to share with you 10 no-sew DIY Summer projects for t-shirts and tank tops – so you can look cool, calm, and collected despite the rising temperatures.
10 Easy No-Sew DIY Summer Projects for T-Shirts and Tank Tops
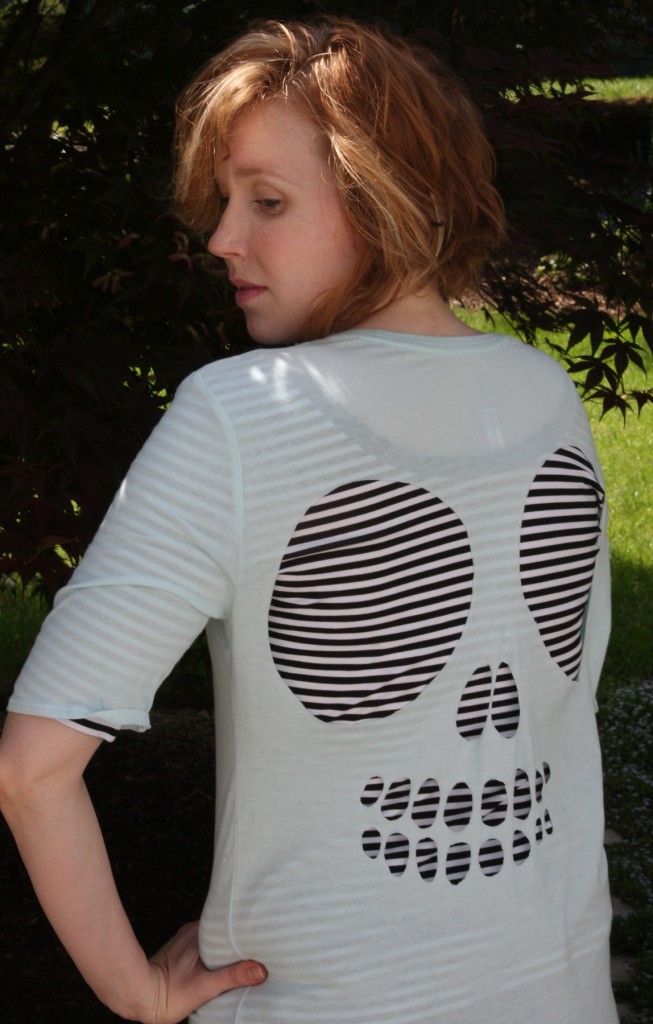
1. Cut Out Skully T-shirt
Although the skull-back style is a little dated by now, you can accomplish the same things with just a pair of scissors and your imagination – butterfly and ladder shapes are always popular! Choose a t-shirt or tank top made of thin, stretchy fabric so the cut edges don’t unravel.
2. Petal-Front Top
This is one of my most popular projects – it’s so charming and ladylike! All you need is a fabric flower (or two) and fabric glue to recreate the look. So pretty peeking out from under a cardigan!
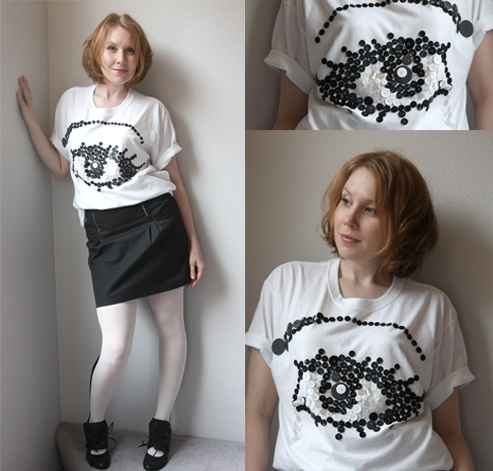
3. Avant-Garde Artistic Button Embellished T-Shirt
This is a time-consuming project that packs a ton of visual punch with buttons and fabric glue again. Try different images (a rainbow, a flower) to make out of buttons – and choose colorful ones from your button stash! Also a fun project to make with kids.
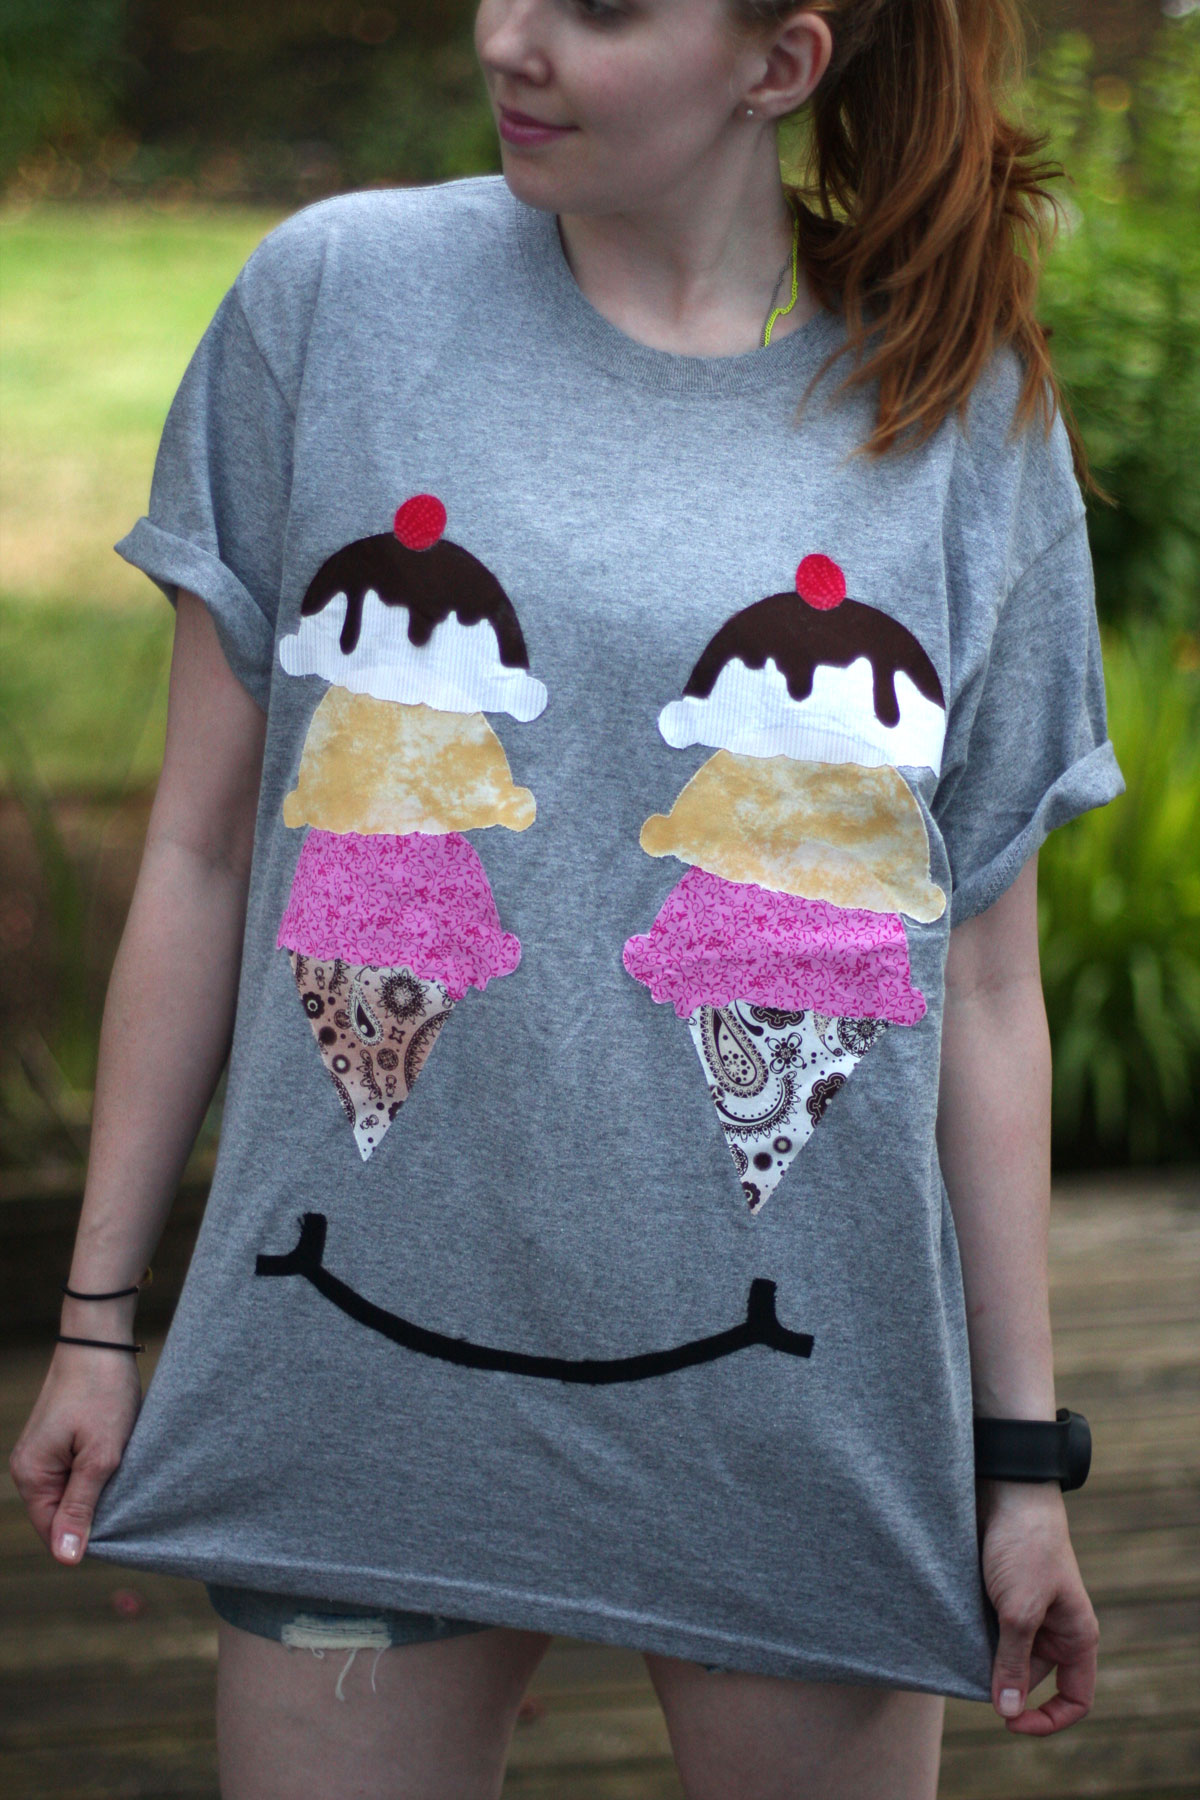
4. Happy Ice Cream Face Applique T-shirt
If you have some fabric scraps on hand that you love and want to showcase – this applique t-shirt project is for you! All it requires is iron-on fusible web and an iron to attach.

5. Patriotic Punky Iron-On Tank
For a punk look you can go old school, slash a tank and safety-pin it back together. I had a military-style iron-on that was begging to be used for this project!

6. Butterfly-Embellished Tanktop
A cute applique like a butterfly or other insect is made more adult by adding a studded trail behind it…you could do rhinestones instead and a unicorn applique for complete over-the-top girliness!
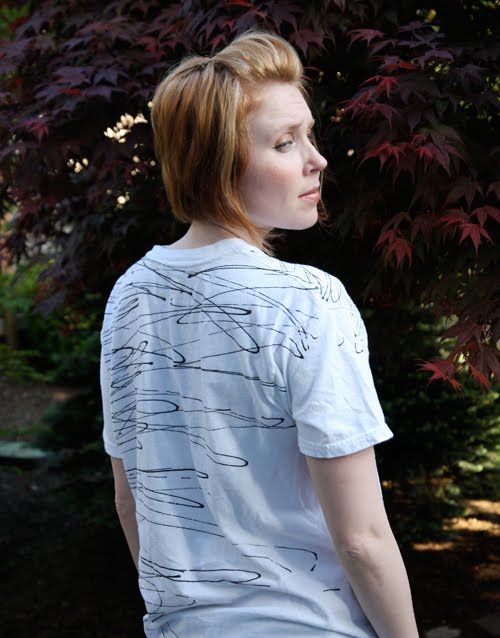
7. Scribble Tee
This was one of my first T-shirt makeover projects – super-easy and hides the flaws on an old dingy T-shirt pretty well!

8. Corseted T-Shirt

9. Tribal-Print Festival T-Shirt
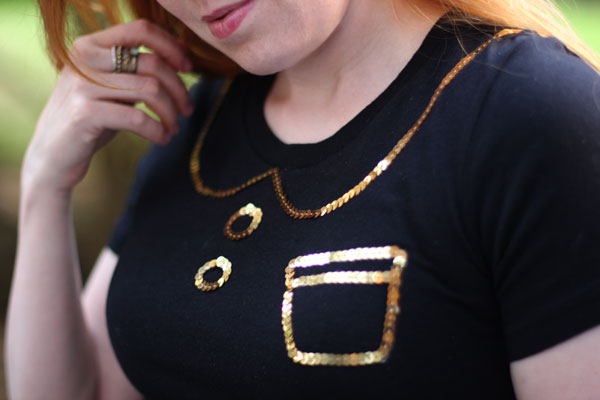
10. Sequin Trompe L’oeil Peter Pan Collar T-Shirt
Hope that gives you some ideas for your next Summer T-shirt or tank top makeover!
xo
Carly
Leave Comment
May 29, 2020 | Fashion, Score!

This post contains affiliate links – and I receive a small commission on sales from readers clicking through these links. My full
Disclosure Policy is here.
Cutting your clothing budget down is something that many of us are faced with when our discretionary spending takes a hit. (I definitely have had to in the past!) Whether it’s a job loss or life circumstance change, a re-shifting in our priorities, or even a forced statewide stay-at-home order, there are times when we need to take measures to tighten up our finances. The clothing budget is often one of the first places to find some wiggle room, but there is still a way to get the clothes you need for HALF (or less) of what you are currently spending. When times are tough, here are 5 painless ways to cut your clothing budget in half:
How to Cut Your Clothing Budget in Half
1. Do a clothing swap with friends, family, or neighbors
Right now many people are unable to sell their extra clothes, as garage sales and other outlets have dried up (though I’m still having some luck on Poshmark – get $10 when you sign up using my referral code CARLYJCAIS). A great way to increase your wardrobe options and help others get rid of their unwanted items is to organize a clothing swap amongst friends, neighbors, or family members (who are not ill or immuno-compromised). You can have everyone drop off a bag of unwanted items at a location at a designated time, lay out the items, and have people return to look through what’s available (in small groups or in staggered times to be safe). Observe social distancing and group gathering protocols, or even snap photos of the items and share them to the group. Decide what you will do with unwanted items and you have yourself a clothing swap!
Also: Here’s a great article about treating clothes that may have coronavirus on them, and how to be safe handling them. (There’s still a lot we don’t know though experts say the risk of contamination is low.) A good precaution is to wear gloves when handling someone else’s clothing, and
2. Shop at thrift stores and used clothing shops instead of buying new
Deemed essential businesses in many states, many thrift stores and used clothing stores are still open to the public (though many have suspended taking in new donations at this time). As stores reopen, do your part to shop (still being careful of course). So many of the raw materials for my shirt makeovers have come from the local Goodwill! (Goodwill is my absolute favorite thrift store hands-down, partially because of their global supply chain and that they ensure every donated piece of clothing is not wasted. It completely blew my mind when I researched how extensive their organization is and the amazing things they do. Check out my article on Goodwill’s ability to keep clothing out of the landfill and their sustainable practices for more information.)
3. Style your pieces differently to create a whole new look
Sometimes it just takes fresh eyes to breathe new life into your wardrobe – which is why it can be fun to share outfit ideas with a friend remotely. But if you’re looking for styling ideas by yourself, you can always search on Pinterest for the specific piece you have in your closest that you want to style differently (“striped shirt” or “outfit ideas” for example). I also keep a ton of old clippings from magazines – cool pieces, clothing I’d love to make, DIY ideas for this site…as well as whole outfits. One source of inspiration that I love is The Uniform Project – even though it’s more than a decade old now – because Sheena Matheiken’s sense of style and different ideas she came up with for that little black dress were amazing and so versatile! It always starts me thinking about similar pieces I have in my closet – and the cool stuff I could do with them that are a little outside my normal go-to.
4. Purchase just the tops
With the proliferation of Zoom and online meetings as a part of everyday life, many of us are having to appear on camera…but only from the waist up. A great way to keep costs down is to only purchase from the waist up! Instead of a whole dress, buy a top only (and wear sweatpants below…shh! no one will know!). A pretty pair of earrings or nice necklace and you’re done – for only a fraction of the cost of your normal shopping budget.
5. DIY and makeover clothing you already have!
Of course, this one is nearest and dearest to my heart! You can find hundreds of tutorials for clothing makeovers on my site, the DIY Men’s Shirt Makeovers System, or on Pinterest. Refashioning, upcycling, and giving clothing a new life is what allows your closet to survive fashion trends, and ensures you squeeze every last drop of usefulness out of your wardrobe. Hope to see your DIY projects – with your own personal stamp on them – soon!
xo
Carly
Leave Comment
May 28, 2020 | DIY

If you follow me on Instagram, you would have seen the DIY No-Sew Face Mask I posted a quick video tutorial for the other week. Even though some states are lifting stay-at-home restrictions and people are beginning to venture out again, I figure better late than never! And it’s another way to use up shirt scraps from any DIY men’s shirt makeover you do. This tutorial is super-easy and makes a double-layered mask, and although I find it difficult to breathe through for long periods of time, it’s great in a pinch. Plus – no sewing required! Just a pair of scissors…and a shirt sleeve. It should take you less than 5 minutes to make!
How to Make Your Own DIY No-Sew Face Mask from a Men’s Shirt
You Need:
scissors / top of a shirt sleeve
How To:

1. Start by cutting the shirt sleeve from the body of the shirt around the armscye.

You’ll want to cut around the armscye seam so it is a loop.

2. Cut another loop of fabric around the circumference of the top of the sleeve.

Now you have 2 fabric loops.
Trim any raw or ragged edges around the edges of the loops.

3. Place the sleeve on a flat surface, and your palm on top of it with fingers outstretched along the sleeve seam. Measure the distance from your outstretched thumb tip (at the top of the sleeve seam) to your outstretched pinky tip, and cut the sleeve at that point.

4. (Optional) Tuck the raw edges of this piece of fabric inside to hide them.
5. Cut the loops you made in Step 2. open.

Tie one pair of their ends together in a square knot.

6. Thread this long tie in a U-shape into the large piece of fabric cut from the sleeve in Step 3, so the bottom of the U extends below the large fabric piece.
When you go to wear the mask, place the bottom of the U at the back of your neck and the fabric piece at the front of your face. Pull on the end of each tie to tighten the mask placement on the bottom of your face. Then tie the ties in a bow over your ears and at the back (top) of your head. Scrunch the mask fabric so it sits properly on the bottom of your face and covers your nose and mouth.

And you’re done! Simple, right??
Check out my video below on Instagram and follow me there!
Also…this article here has a lot of great information about how to keep your mask clean, so definitely check it out too!
xo
Carly
Leave Comment
May 27, 2020 | DIY

This post contains affiliate links – and I receive a small commission on sales from readers clicking through these links. My full
Disclosure Policy is here.
Quick Links from Photo: 1 / 2 / 3 / 4 / 5 / 6 / 7 / 8 / 9 / 10 / 11 / 12
So far on this site I’ve shared my Must-Have DIY Tools for Sewing, Embellishing, and Jewelry-Making. Here is my roundup of the must-have tools for DIY Shirt Makeovers:
Tools for DIY Shirt Makeovers
1. Seam Ripper
You.Must.Have.A.Seam.Ripper. You need it to remove buttons and take apart shirts to be cannibalized, to fix stitches…this is vital to prepping your shirt for a successful makeover.
2. Awl
Though not completely necessary (I often use my nail scissors or metal rod from my Turn-It-All ), an awl is a very helpful tool for creating perfect holes, and using as an extra finger to keep fabric down as you feed it under a moving machine needle. I’ve saved many a finger with this!
3. Chalk Pencil
This marking pencil is my absolute favorite since it makes super-precise lines and works just like a mechanical pencil. LOVE.
4. Tape Measure
Or is it “measuring tape…?” I never can settle on how to refer to it! In any case, having a flexible measuring tool is essential for measuring yourself and ensuring a perfect fit as you makeover your shirt. I don’t recommend the cheap paper kind – get yourself a nice one made out of soft vinyl that will not get twisted with use.
5. Sharp, Sharp Sewing Scissors
El-cheapo scissors won’t cut it (literally)! Prepare to spend around $30+ for an excellent pair of Gingher or Singer scissors, and they will last you a lifetime. (Just never, ever, EVER cut anything else besides fabric with them [especially paper]…which will dull them like nobody’s business.
6. Sharp, Sharp Pins + Emery-filled Pincushion (or strawberry)
I’ve found that certain “decorative”-style pins aren’t all that sharp, and the round-headed ones tend to cause bumps when pinning a pattern to fabric in order to cut. I prefer the extra-sharp flower-headed pins so the pattern isn’t puckering and lifting, and they don’t get in the way of the machine foot so much. Plus an emery-filled pincushion/emery strawberry to keep them all corralled and sharpen them is a must!
7. Sewing Machine
I use a Kenmore 16231, and it’s a real workhorse! I had a Kenmore my mom and I used while I was growing up, and I just stuck with the brand. Even with the amount of sewing I do, it really wasn’t necessary to get anything super-expensive! – and it’s held up great since 2009.
8. Iron
This is another MUST in creating successful projects – the iron will turn hems, set seams, and give everything a crisp and professional look. You don’t need anything fancy, just a basic off-brand one will do.
9. Ironing Mat
Though I have an ironing board that I photograph on, I find myself using my ironing mat on a hard surface far more. It’s portable, light, heat reflective, and it’s much less clunky and space-consuming than a standard ironing board.
10. Curved Nail Scissors
I love love love these scissors! (They also appear on my Must-Have Tools for Jewelry DIY’ing list…that’s how much I love them!) They work great as thread snips if you don’t feel like investing in those, and help you poke holes and cut perfect buttonholes (just be careful of the curved edges).
11. Poly-Cotton Mercerized Thread
This is the stuff sold everywhere, that you want to use to sew your shirt makeovers with. Make sure you get poly-cotton mercerized (even though your shirts will likely be cotton), as poly-cotton is stronger and less prone to breakage and fraying. “Mercerized” means it’s been treated to be stronger and have a slightly shiny appearance.
12. Sewing Machine Needle Pack
A standard 90/14 needle will do just fine for the majority of shirt makeover projects, but for different fabrics I like to have a needle variety pack on hand just in case.
And check out my DIY Resources page for more lists of resources to up your DIY game!
xo
Carly
Leave Comment
May 26, 2020 | Courses & eBooks

Hello friends!
As I‘d teased a little while ago…
The beta launch for the DIY Men’s Shirt Makeovers System is open!
YAY!! *Throws confetti*
This is the ONLY system for at-home clothing makeovers out there, and I’m thrilled to make this available to all of you at this super low price.
With this system, you will:
- Find inspiration in your closet – or your guy’s closet – as the starting point for raw materials.
- Hit up Goodwill or another thrift store and get some great shirts for cheap (and do some good for charity at the same time!).
- Never overpay for piles of fabric from the fabric store (hello $12.99/yd pricetags!) again.
- Make finished shirts, dresses, and skirts without even having to step foot in the craft store.
- Make clothing that fits correctly, each time, without patterns.
- Give old clothing a new life, rather than selling it or giving it away.
- Create a gift for someone special in your life, from a shirt that has meaning or importance – made over into something she can use and enjoy.
- Whip up projects quickly, because you’re starting with materials that are already made – and you are reconstructing them and making them over from that point.
- Make cute clothing for yourself, friends, family, kids, or even stuffed animals – from shirts you already have.
- Put your own personal stamp on your pieces – and get creative!
And more!
Included in the system are:

- DIY Sewing Secrets: Fast & Easy Shortcuts to Finished PDF ebook (25 secret tricks, hacks, and shortcuts to creating perfect projects every time)

- 7 DIY Men’s Shirt Makeovers PDF ebook (the core of the System, with 8 tutorials for intermediate shirt makeovers)

- Sewing Basics Decoded: What Every DIYer Should Know PDF ebook (covers beginning sewing techniques and setting up your space and equipment)

- Select the Right Shirt! 8 Rules for DIY Success checklist (how to find the best shirts for your DIY makeovers)

- DIY Project Planner calendar (assists in planning out the projects from my core book)
AND along with the system I have a couple awesome upgrades as well…

- DIY Cute Summer Shirtdress video tutorial (for all of you who’ve been asking for the video tutorial, here it finally is!)

- DIY Men’s Shirt Makeovers Private Facebook Group (we hang out and chat about shirt makeovers, sewing, creativity, and all sorts of fun things!)
- DIY Project SOS Live Help (2 weekly 1-hour Facebook Live sessions where we work through projects together and you get your questions answered)
- 8 No-Sew DIY Shirt Scrap Makeovers PDF ebook (finally, projects using up all the shirt scraps from your DIY shirt makeovers!)
All this is available now, for a limited time at this current price – since it’s a beta launch and I am collecting feedback to make sure it’s the best system out there for you!
xo
Carly
Leave Comment
May 13, 2020 | Courses & eBooks
Hello friends!
Today I’m sharing this huge secret I’ve been working on for awhile…
In TWO WEEKS (Tuesday 5/26) I am going to open up the beta launch of the DIY Men’s Shirt Makeovers System!
I am so excited to share this with you all…and am just now putting the finishing touches on it.
I’ve been working on this for a total of…well…2 YEARS now, and I’m thrilled to finally be able to share it with you.
So why did I create this?
- SO many people have asked me over the years for photographs for some of my most sought-after tutorials, that I’d posted early on the blog but that never had a clear step-by-step.
- SO many people had questions about project steps that were confusing from my old tutorials.
- SO many people wanted to level up their sewing skills to tackle tutorials I’d posted, but it was hard to help them.
- And SO many people wanted MORE shirt makeover tutorials in general!
So I put together this comprehensive system to answer all that…and more!
So what will this system do for YOU?!
It will:
- provide you with new shirt makeover tutorials – some of which I’ve never shared anywhere else (including on this site!)
- create a comprehensive step-by-step photographed walkthrough of some of my most-requested shirt makeovers
- share sewing tips, tricks, and hacks that I’ve amassed over the last 12+ years
- help you choose the best shirts to make over for your DIY projects
- and more…
…for less than the cost of a store-bought pattern and store-bought fabric (because seriously, who needs to buy stuff like that these days??)
The beta launch will open in two weeks (Tuesday, May 26) – and I can’t wait to see you there!
xo
Carly
Leave Comment
May 11, 2020 | DIY
This post contains affiliate links – and I receive a small commission on sales from readers clicking through these links. My full
Disclosure Policy is here.

After 12 years of running my own sewing, crafting, and DIY blog, a lot of people ask me how they can improve their sewing skills. Many people want to know where to start, what to do next, what skills are essential, what skill do they need to add to their repertoire, etc. (Even after all this time there are some things I STILL don’t do well when it comes to sewing, and I’d prefer to focus on the essential skills that can make me a nice-looking outfit day in, day out.)
The cool thing is that ANYONE can get good at sewing through progressive practice – and it doesn’t take a lot of practice to sew a sturdy, good-looking garment! It’s a good idea to start simple and build your skills by tackling projects that, in succession, will teach you a new skill with each project, so you can build on your knowledge and abilities.
Here is my recommended sequence for anyone to improve your sewing skills:
7 Projects to Improving Your Sewing Skills
- A Pillow (New Skills: Measuring fabric, sewing in a straight line, trimming seam allowances, making perfect square corners, hand-stitching a seam closed)
- Simple Pull-On Top (New Skills: Taking your measurements, cutting pattern pieces, finishing seams for wearables)
- Simple Pull-On Elastic Skirt (New Skills: Cutting an elastic waistband, creating a fabric casing, sewing an elastic waistband)
- Keyhole Top with Gathered Sleeves
 (New skills: Creating bust darts, setting a ruffled sleeve, creating a keyhole closure, adding a button)
- Lined Skirt with Zipper (New skills: Creating darts, setting an invisible zipper, creating a lining)
- Pocket Sheath Dress with Zipper (New skills: Finishing a blind hem, creating side pockets, adding a hook and eye closure)
- Pants with Waistband (New skills: Creating a curved crotch, notching curves, creating a front zipper with placket, interfacing a waistband)
Though we don’t get into jackets (and jacket linings!) just yet, the above is a solid way to flex your sewing abilities, polish those skills, and brush up on your construction techniques. Let me know if this helps you improve your sewing skills in the comments!
xo
Carly
Leave Comment
Apr 22, 2020 | DIY
This post contains affiliate links – and I receive a small commission on sales from readers clicking through these links. My full
Disclosure Policy is here.
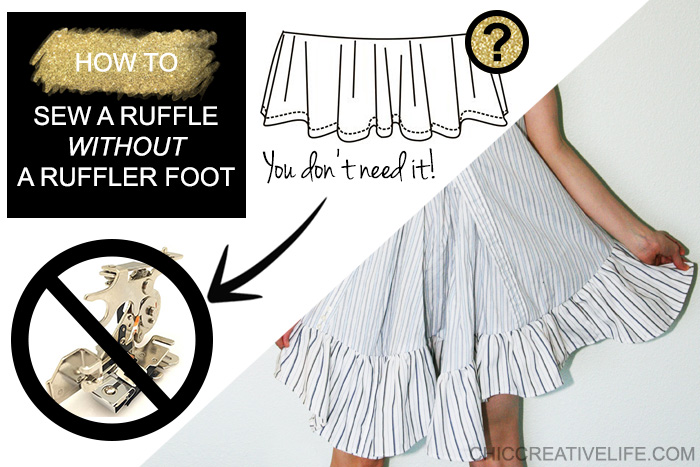
I just LOVE ruffles – and always struggled how to sew a ruffle since I didn’t have a ruffler foot for my sewing machine. (Those things are expensive and complicated, man!) Though I eventually made the plunge and bought a ruffler foot sewing machine attachment, I can seriously count the number of times I’ve used it since then on one hand! I simply prefer a quicker, easier way to make picture-perfect ruffles – that is completely adjustable to my garment – and comes out great every time. Plus, ruffles are so IN this Spring & Summer for 2020 – check out the pattern trends for McCall’s Patterns for example – and a lot of my DIY’s use this method, so I figured it was high time to walk you through how to make them! Ruffles look so pretty especially using shirting fabric – and they’re amazingly simple to make using this method.
How To Sew a Ruffle Without a Ruffler Foot
You Need: sewing machine zigzag foot / long length of elastic cord (doesn’t matter what color) / pins
How To:
1. Switch your sewing machine foot to a zigzag foot, and change the machine settings to as wide and long a zigzag as it will go, with a looser tension.
2. Place the straight edge of a piece of fabric you are wanting to create ruffles in, wrong side facing up, under the machine foot.
3. Knot a long piece of elastic cord at the end, and place it on top of the fabric, about ⅜” from the edge.
4. Lower the zigzag foot down in front of the knot, backstitch a few times over the cord (do not go through the cord), and proceed to stitch in a zigzag over the cord down the length of the straight edge.
5. When you stitch all the way around and are nearing the knot in the elastic cord, go as far as you can without hitting the knot, and backstitch a few times over the cord.
6. Remove the ruffle piece from the machine. Pull on the un-knotted end of the cord, gathering the fabric underneath it.
7. Gather the ruffle piece until it is basically the same length of circumference as what you want to attach to, pin it to the other piece, right sides together.
8. Stitch ruffle below the elastic cord to secure it to the other piece, and remove the elastic cord by pulling it out from under the zigzag stitching from the knotted end.
And that’s all there is to it, friends! I’ve created the graphic below for easy pinning so you can save this post and come back to it.
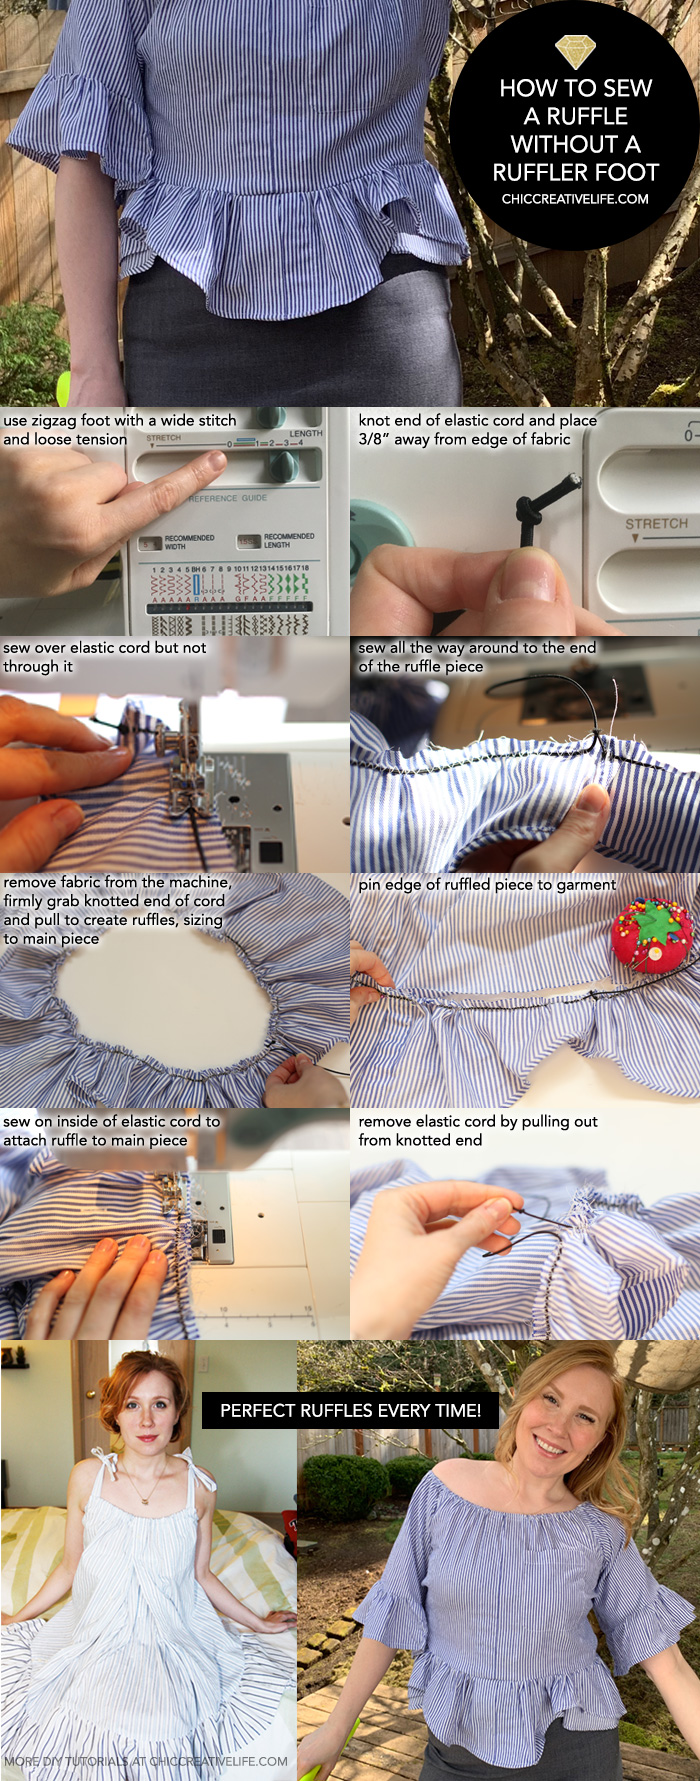
By the way, elastic cord is hard to come by lately – but I’ve had really good luck with searching for elastic cord sold by Etsy sellers. Try them instead of Amazon or the local craft store!
As long as you can sew in a zigzag – you can create a ruffle. Hopefully this will ease any worries you might have about creating the perfect ruffle – and next time when it comes to it, you will know EXACTLY how to sew a ruffle the easy way!
xo
Carly
Leave Comment


