 I LOVE mixed-media accessories: they totally appeal to my bi-polar personality. 😉 Want a little rope? Sure, let’s start with that. And how about rhinestones? You can never have enough bling. And chain? Yup, got that. How about some ribbon, netting, embroidery thread, beads, and wire? OF COURSE!
 I love that this piece is totally over-the top and such an eye-catching statement. (I wore it in this outfit here if you want to see how it stands out against other pieces.) It’s fairly simple to make since it’s really just a lot of gluing. Don’t be intimidated by the amount of materials…you can vary what you use for your own personal style statement! Here’s how:
You Need (for the necklace part):
3 short lengths of climbing rope* / bright-colored embroidery thread / 4 geometric beads / 4 rhinestone headpins / 2 large sew-on net-covered rhinestones / various types of chain (I used rhinestone, small link, and curb chains) / smaller brightly-colored sew-on rhinestones / black grosgrain ribbon (1/4″ wide) / wire-cutting pliers / glue gun / scissors / open flame
Note: You can get short pieces of climbing rope cut to your desired length at R.E.I. if you have one near you!
How To:

1. First prep your parts: snip short lengths of grosgrain ribbon and glue on the backs of the netted rhinestones, fanning out from the center.


2. Thread the headpins through your geometric beads.

3. Cut your two thickest ropes to your desired length: the thickest will be choker-length, and the medium-size needs to be about 3″ shorter. Heat-seal the ends with an open flame.

4. Create the 2-rope necklace base: Glue-gun the medium rope to the inside of the thickest rope, creating the curve of the necklace.

4. Glue-gun one end of the embroidery thread to the underside of the rope. Loop around the ropes multiple times until you’ve hidden the end of the medium rope. Then glue down the end on the underside, and spread glue the end of the medium rope so it won’t unravel.
5. Repeat for the other raw end of the medium rope piece.
6. Create the center wrapped rope: glue down one end of the thinnest rope to the underside of the 2 ropes, in the center of the necklace.
7. Wrap around a few times, cut and heat-seal at the length you want it, and spread glue on it to hold the end down. (I found I had to also spread glue across the loops of this rope in order to hold it in place.)
8. Attach the beads: pierce the thickest rope on its underside with one of the headpins, to the right of the center wrapped small rope. Use pliers to twist the headpin around on itself several times, cut to desire length, and clamp down so there’s no scratchy end sticking out.
9. Repeat for the other headpins with beads, spacing them out to the right and left of the center wrapped small rope.
10. Add the decorations by hot-gluing short chain lengths into the well between the ropes, and covering up their ends with the grosgrain-adorned rhinestones and smaller rhinestones.
Now it’s time to create the closure of the necklace.
You Need (for the closure part):
lobster clasp + large jumpring / 2 smaller heavy-duty jumprings / dead-soft jewelry wire in matching color** / 2 copper plumbing caps with holes drilled into them** / pliers / E6000 glue
**If you can find end caps with loops attached, that fit this size of rope – then use them!! I had a horrible time finding ANYTHING above 12mm (I checked at all my usual jewelry supply places: Rings-Things.com, FireMountainGems.com, PandaHall.com, RioGrande.com, Etsy.com, and Ebay) and couldn’t find a single end cap that was made for rope this big (which is like 25mm diameter). So I compromised by swiping some pipe caps from the plumbing section at Home Depot, and drilling holes in the center with my electric drill. Not ideal, but it works in a pinch.

11. Since all I have are end caps with holes in them, I have to create the wire loop to attach jumprings. Cut the wire into two short pieces.
12. Thread a piece through the end of the thick rope, fold over, and twist together several times like a twist-tie.
13. Repeat for the other end of the thick rope.
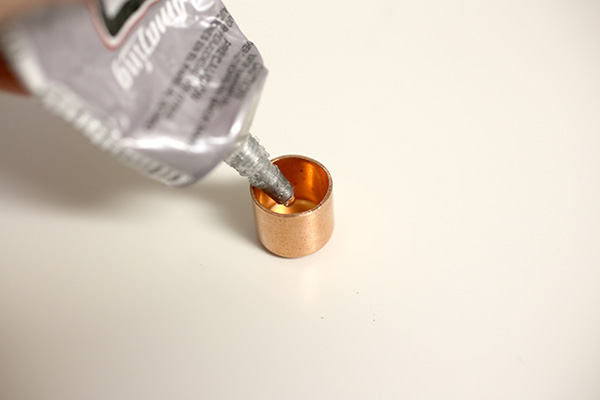
14. Spread a liberal amount of glue inside an end cap.
15. Thread the end cap onto the wire, and push onto the end of rope.
16. Spread the wire ends apart to push the end cap all the way down.
 17. Twist the wire ends around a heavy-duty jumpring several times, pulling tight with the help of the pliers. Cut off any sharp ends.
18. Repeat for the other rope end.

19. Attach the lobster clasp and large jumpring to both hevcy-duty jumprings.

And you are done!


Multi-step, a bit fiddly, but a really, really cool outcome. Chunky, fun, and colorful – and perfect for Summer!
 Happy DIY’ing!
xo
Carly


I found this tutorial on the Art Fire Facebook page. This necklace is awesome!! Thank you for sharing it.
Thanks so much for your comment, Kathy! I had no idea my necklace was shared on their Facebook. I shall have to check it out. Thanks for the heads-up!
j’ai trouvé que c’était charmant et simple et ces très bien expliqué je vais essayer de m’en faire un semblable au tient encore merci de ces belles images et explications. ces la première fois que je répond au sujet des bijoux a faire soi même. merci espérant que tu comprends le Français .Car je ne comprend pas l’Anglais.
Merci beaucoup! 🙂