May 11, 2015 | DIY
 Sometimes you’re feeling a little ladylike…and a little edgy at the same time. This pearl and chain choker pairs so well with both demure outfits and darker streetwear easily. All you need is aluminum chain, glass beads, jumprings, and a closure.
  And of course some hematite spike beads for that necessary wild child. Here’s how to make your own with some affordable supplies from PandaHall: (and a brush up on How to Use Crimp Beads, below)
You Need:
aluminum twisted curb chain (5 mm wide) // silver color aluminum twisted curb chain (5 mm wide) // 6mm white glass imitation pearl beads // non-magnetic hematite rectangle beads / matching jumprings (6 medium, can all be the same size) // 2 crimp beads // 2 (two) 3-strand necklace ends // Beadalon nylon stringing cord // chain cutting pliers // crimp pliers // jump ring tool (or another set of pliers)
How To:
1. Attach one end of the chain to one of the necklace ends with a jumpring.
2. Hold the flat curb chain against your neck and decide how long you want it (mine was 14″). Use the chain cutting pliers to cut it at that point.
3. Attach that end to the other necklace end, being careful to keep the chain flat.
4. Attach the next oval link chain in the same way, making a little longer than the first so it will drape lower and lay flat.
How to Finish a Necklace Using Crimp Beads
5. Crimp beads are an easy, clean way to finish a cord necklace, and they look really great. Thread one crimp bead onto the end of your Beadalon cord, leaving about 1″.
6. Thread a jumpring onto the end.
7. Curve the cord around the jumpring and back into the crimp bead. Make sure the loop around the jump ring is small.
8. Use crimping pliers to first smash the crimp bead flat (in the grooves closest to the plier center), then bend the flattened ends towards each other (in the hole closest to the plier tips). You’ll make the crimp bead into a flattened hot dog shape.

Voila!
9. Attach the jumpring onto the final loop of the necklace clasp, below the chains.
10. Estimate how long you need and cut the wire a little longer than the length of the longest chain.
11. Start threadiing pearls onto the wire. Use the first pearl/s to hide the end of the wire.
12. When you are close to where the center of the wire would be, start adding hematite spike beads.
13. Add a spike bead, a pearl, and another spike bead in a graduated manner.
14. Continue adding pearls once the center spikes are finished. Once your strand of pearls is as long as you want it (slightly longer than the bottom chain so it hangs below it), add a crimp bead.
15. Be careful to hold the crimp bead close to the last pearl, and finish the end of the wire as before. Tuck the long end into the last pearl bead/s.
16. Use a jumpring to attach to the remaining open loop in the necklace closure.
And that’s it! 
It’s a little fiddly and something you’ll want to do while watching your fave TV show to pass the time…but once done this 3-strand sophisticated choker has maximum impact.
You can make your own just by checking out PandaHall.com for the best beading supplies!
Happy DIY’ing!
xo
Carly
FTC Disclosure: Pandall.com provided me with the craft supplies featured in this post for me to make a fun DIY with. I have received no other compensation. The opinions above are my own. For my full Disclosure Policy, click here.
Save
Leave Comment
Apr 9, 2015 | DIY
 Hi friends! It’s been awhile since I’ve shared a DIY here, for many reasons.
Life took over for awhile.
But I’m back – with a fun and easy DIY for you all to try out!
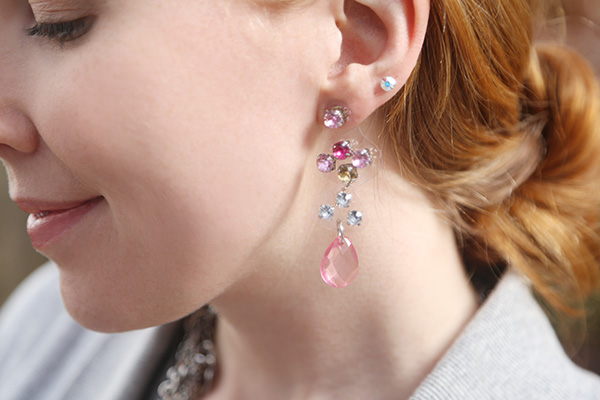
Big, bejeweled pendant chandelier earrings have been on-trend for awhile now…but unless you’re planning on whipping out that soldering torch and applying to your rhinestones…they’re a little hard to make.  Enter translucent vinyl PVC as a backing – plus some strong glue – and you don’t ever need to pick up that pesky torch. Here’s how to make your own designer-style illusion jeweled chandelier-style dangle earrings:
You Need:
PandaHall Acrylic Beads (I used the Mixed Color Transparent Acrylic Faceted Drop Pendants in light pink / PandaHall Mixed Acrylic Rhinestone Montee Beads in light pink, hot pink, and champagne / earring pads with backs / large jumprings (I actually used 2 per earring so 4 total) / transparent PVC vinyl / pliers and jumpring tool / glue for plastics and metals (I recommend Loctite but had run out when I made this project!) / awl or needle / scissors (smaller scissors are better I found, like nail scissors)
How To:  1. Lay out the beads on a flat surface to determine placement of the rhinestones.
 2. Use a generous dab of glue on the back of each rhinestone to glue it onto the transparent PVC vinyl. Space your rhinestones apart to allow for cutting them into separate pieces if you desire.
3. Once dry, use scissors to cut around the rhinestones. (I chose to cut around some clusters of rhinestones separately so I could join them with jumprings for more dangle.) Make sure to round your corners.
 4. Glue the earring pad onto the back of the earrings, and allow to dry.
5. Use an awl to pierce the vinyl for each separate rhinestone cluster that you want to connect, and at the middle of the bottommost rhinestone cluster, near the edge.
6. Connect a Drop Pendant to the bottom of the earring with a large jumpring.
7. Connect all the pieces with jumprings to complete your earrings.

And that’s it! They’re surprisingly stable and will withstand some wear (though I wouldn’t recommend running obstacle courses in them).
I also made some alternate-colored ones in the trendy asymmetrical earring style.

I love how they look disconnected – almost floating – above your shoulders – utterly utterly chic with a backswept ‘do and a pretty necklace for Spring.
 Happy DIY’ing!
xo
Carly
Save
Leave Comment
Sep 18, 2014 | DIY
 This DIY tutorial has likely been done already hundreds of times in the aftermath of Tom Binns releasing his neon cameo collection in Spring 2012 – but what’s once more? I love the juxtaposition of elegant, old-world cameos harkening back to the times of daguerrotypes and intaglio portraits…rendered in full-on neon for the modern age. You can make your own easily, with some paint, rhinestone chain, and a soft embossing metal as backing – with no one the wiser as to how your unique creation came about. Here’s how:
Materials:
1 cameo (and this place has the best selection!) / rhinestone cup chain / gold embossing metal / scissors / jump ring / pliers / wire-cutting pliers / jewelry glue (not pictured) / pin or awl (not pictured) / paint in 2 neon colors / primer or white paint / pen / paintbrush / matte sealant (optional, not pictured)
How To: 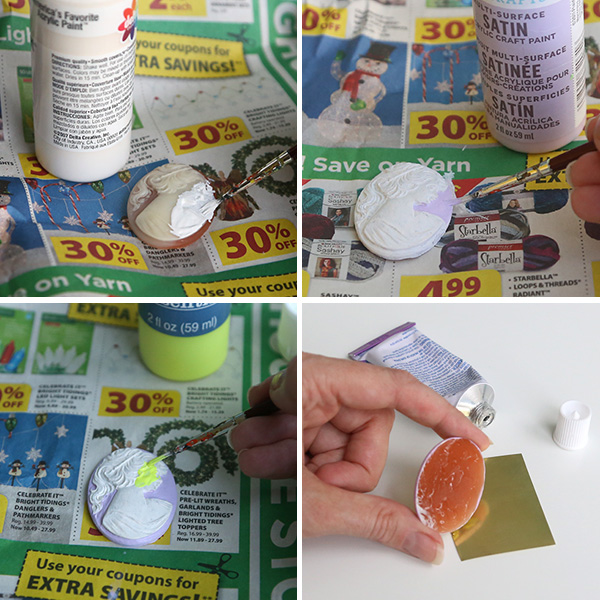 1. Since cameo colors are usually fairly opaque, you may want to prime your cameo first with a coat of primer, or just a coat of white paint. Allow to dry.
2. Paint the cameo. Usually it’s easiest to paint the lighter color first, than the brighter or darker color next. You may have to do a couple coats of each color to fully hide the color of the original cameo.
3. (optional) Paint a coat of sealant on he cameo to hide brushstrokes and prevent paint chipping. Allow to dry.
4. Glue the cameo onto a small piece of embossing metal.
5. Place the rhinestone chain around the cameo, and cut to desired length.
 6. Spread glue on the back of the rhinestone chain, and glue to the metal backing around the cameo.
7. When dry, poke a hole in the embossing metal with a pin or awl.
8. Trim the metal close around the chain, and use the side of the scissors to fold it to cup the chain so no sharp edges stick out.
 9. Thread a jumping through the hole you made, onto a necklace.
And you’re done!

Wear with something dark and modern for contrast, or pair with a pastel frilly corset for your best Marie Antoinette impression!
 Happy DIY’ing!
xo
Carly
Save
Leave Comment
Jul 12, 2014 | DIY, Score!
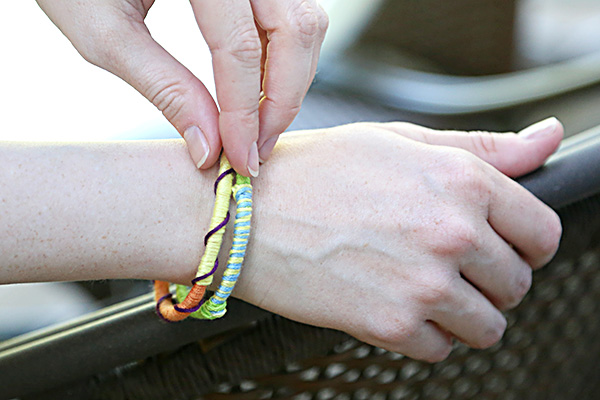
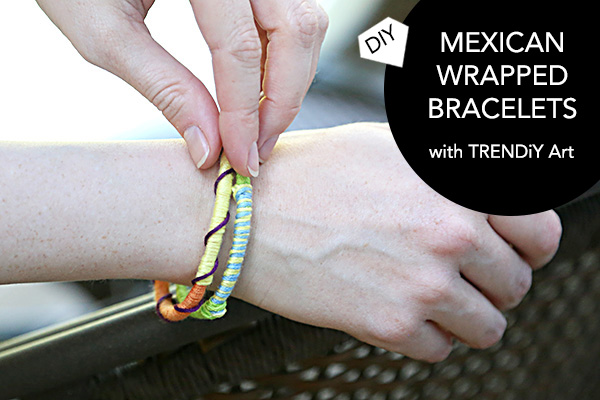 The brand-new Canadian line, TRENDiY Art, was recently kind enough to send me one of their fun DIY kits to review.
TRENDiY Art is a new line of art and craft activities for tweens and teens, and is all about making cool jewelry and fashionable accessories. They provide not only all the materials to make these projects in the kits, but also a full-length fashion magazine with styling ideas and DIY possibilities. 


 I decided to open up the Mexican Bracelets kit and try my hand at some embroidery thread-wrapped bracelets.
  They were super-easy to make and a cute, colorful addition to my stack of arm adornment. Here’s how to make them:
You Need:
 TRENDiY Art Mexican Bracelets Kit / scissors
How To:

 1. Start by double-knotting one thread around your bangle.
2. Wrap the thread around multiple times.
 3. Change color by tying a new thread to the old one with a double knot, then cutting off the old thread.
4. Wrap the second color around, covering up the end of the old color and the end of the new color.
5. Continue all the way around, until you reach the beginning of your wrapping.
6. Add a third contrasting color wrapped around your base colors for texture.
7. When done, tie your final thread to the tail of the thread you tied on in the beginning, and snip all extra ends.
 You can use 2 or 3 different colors rolled together for different looks, switch up the colors frequently, or tie many colors loosely around (even finishing your bracelet with a handmade tassel!) Plus you can hand-sew on some crystals, or even thread on some beads as you wrap for a totally different look.
 Make it your own, make it colorful, and make it fun!

These kits make it very easy to create your own DIY projects since they come pre-stocked with everything you need. Totally on-trend and fun, TRENDiY Art kits are a great gift or engaging activity for any avid DIY’er in your life.
Currently only available in the UK, you can get your hands on 3 of these exclusive kits by entering the giveaway below!
Giveaway
One lucky reader will win 3 TRENDiY Art Kits! Enter using the Rafflecopter widget below:
a Rafflecopter giveaway
Good luck!
xo
Carly
FTC Disclosure: I was sent 4 DIY kits to review from TRENDiY Art. I have received no other compensation for this post. The above opinions are my own. To read my full Disclosure Policy, click here.
Save
Leave Comment
Jul 3, 2014 | DIY
 Tassels, tassels, everywhere! I officially declare 2014 the Year of the Tassel. They’ve been having a HUGE moment again, and I love their undone, boho-chic feel. Casual and cool at the same time. It’s very easy to make your own tassels – or even better yet, make your own fun colorblocked tassel NECKLACE (just like this $128 Anthro Fanned Botanique Necklace [no longer available]). Here’s how:
You Need:
 embroidery thread in 4 colors (I chose cobalt blue, navy blue, goldenrod, and metallic gold) / 3/8″ diameter natural rope, 1 yard long / 1 1/4″ goldtone D-ring / scissors / tape / glue / toothpick (optional)
How To:  1. Start wrapping the embroidery thread around the bottom of the D-ring, using 2 fingers to create the right length. Wrap around many times until you get a thick bundle.
2. Slide your fingers out from the bundle.
3. Snip a short piece of thread and tie around the bundle, close to the D-ring.
 4. Wrap both ends of the thread multiple times around where you tied, and tie the ends together with a double knot. Leave the ends loose for now.
5. Use scissors to trim the bottom of the tassel flat.
 6. Fluff out the threads in the bottom of the tassel.
7. Repeat Steps 1-6 for 2 more tassels in your first color. Repeat for 3 tassels in your second color. Repeat for 3 tassels in your third color. For the third tassel in that color, I made it using half metallic threads (since the metallic thread frays easily but isn’t as “fluffy” as the regular embroidery thread).
8. Use a dab of glue on each double knot you made in Step 4.
 9. Snip off the ends of the threads close to those knots once dry.
10. Place the D-ring with the tassels in the center of your rope piece.
11. Use the metallic thread to wrap around each side of the straight part of the D-ring, many times, to secure the ring to the rope.
 12. Finish each wrap by double-knotting the thread at the back. Dab with glue, and snip off the ends.
13. Try on the necklace and decide how long you want it. Use a piece of tape wrapped around the rope pieces to secure it to the length you like.
14. Cut off the excess rope.
15. Use a contrasting thread color to wrap around the rope ends and completely conceal them. End using a double knot, dab on glue, and cut the threads.
 You’re done! A bright, bold accessory for breezy tops and easy dresses this season is only a couple wraps and snips away. You can you any combination of fun colors, and totally switch up the look of the piece by adding pompons, charms, or other accoutrements to make it all your own!


How will YOU wear your Colorful Tassel Necklace?
 Happy DIY’ing!
xo
Carly
Save
Leave Comment


