May 28, 2020 | DIY

If you follow me on Instagram, you would have seen the DIY No-Sew Face Mask I posted a quick video tutorial for the other week. Even though some states are lifting stay-at-home restrictions and people are beginning to venture out again, I figure better late than never! And it’s another way to use up shirt scraps from any DIY men’s shirt makeover you do. This tutorial is super-easy and makes a double-layered mask, and although I find it difficult to breathe through for long periods of time, it’s great in a pinch. Plus – no sewing required! Just a pair of scissors…and a shirt sleeve. It should take you less than 5 minutes to make!
How to Make Your Own DIY No-Sew Face Mask from a Men’s Shirt
You Need:
scissors / top of a shirt sleeve
How To:

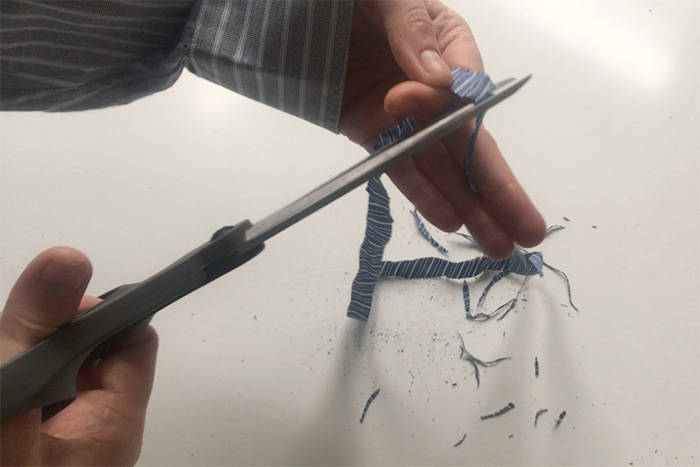
1. Start by cutting the shirt sleeve from the body of the shirt around the armscye.

You’ll want to cut around the armscye seam so it is a loop.

2. Cut another loop of fabric around the circumference of the top of the sleeve.

Now you have 2 fabric loops.
Trim any raw or ragged edges around the edges of the loops.

3. Place the sleeve on a flat surface, and your palm on top of it with fingers outstretched along the sleeve seam. Measure the distance from your outstretched thumb tip (at the top of the sleeve seam) to your outstretched pinky tip, and cut the sleeve at that point.

4. (Optional) Tuck the raw edges of this piece of fabric inside to hide them.
5. Cut the loops you made in Step 2. open.

Tie one pair of their ends together in a square knot.

6. Thread this long tie in a U-shape into the large piece of fabric cut from the sleeve in Step 3, so the bottom of the U extends below the large fabric piece.
When you go to wear the mask, place the bottom of the U at the back of your neck and the fabric piece at the front of your face. Pull on the end of each tie to tighten the mask placement on the bottom of your face. Then tie the ties in a bow over your ears and at the back (top) of your head. Scrunch the mask fabric so it sits properly on the bottom of your face and covers your nose and mouth.

And you’re done! Simple, right??
Check out my video below on Instagram and follow me there!
Also…this article here has a lot of great information about how to keep your mask clean, so definitely check it out too!
xo
Carly
Leave Comment
Dec 29, 2017 | DIY
It’s officially Party Season (TM) – and that means glittery, festive, fun, loud, joyful celebrations!
 I really love making my own party hats (or putting children to work making party hats 😉 ) because they’re easy, cheap, and I can make them to completely coordinate with the party theme. Plus I can make them from scraps lying around! Perhaps you’ve never tried making your own, maybe because you don’t have time or it seems like a pain. But you may find that once you get [that party] started…you can’t stop! Now, let’s all hum that tune as we head on down to the how to…
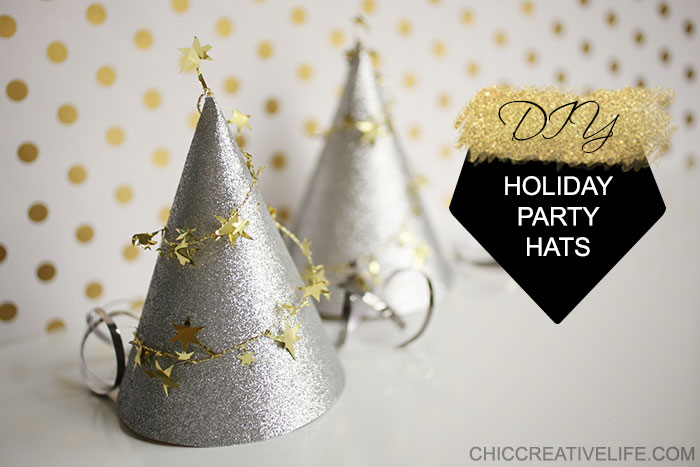
How to Make a DIY Party Hat from Cardstock and Ribbon
You Need:

8.5″ x 11″ cardstock // Party Hat Template (click to download the PDF) // tinsel garland (I found this star version at Michael’s) // ribbon (not pictured – I used silver curling foil wrapping ribbon) // pen // scissors // stapler // box cutter // tape (not pictured)
How To Make a DIY Shooting Stars Party Hat:

1. Trace Party Hat Template onto the back of your cardstock.

2. Cut out the template from the cardstock. Use the box cutter to slice where indicated.

3. Curl the cardstock into a cone shape, and slip the edge tab into the slit you cut. Secure with some tape on the inside.

4. Thread one end of the ribbon into one of the small slits at the base of the hat.

5. Secure with tape, and then cut to desired length. (Make sure that it’s long enough to tie under your chin!) Do the same for another piece of ribbon and the other side of the hat.

6. Now the fun part: decoration! Staple the garland to the bottom of the hat.

7. Twirl the garland around the cone hat, securing with staples if necessary. At the top, twist downwards and tuck into the hole at the top of the hat. Secure with more tape on the inside.

And that’s it! It will take you less than 5 minutes tops – with a fun and unique party hat!


Have a Happy New Year’s, everyone! I just love a glittery beginning!
xo
Carly
Leave Comment
Dec 29, 2017 | DIY


Interesting fact about me: I don’t drink alcohol. Period. I have many reasons why, though one of the simplest to explain is that I hate the taste. I think the last time I even tried a tiny sip of alcohol was back in 2012 (peer pressure: not wanting to disappoint a neighbor who was begging me to try some saké she had just bought and I just didn’t feel comfortable saying no). But it’s just not something that I enjoy, and as a result I have to be super-picky at parties when there are alcoholic beverages around. So I’ve started playing with my own versions of alcoholic drinks – mocktails so to speak – to see if I could come up with some fun, festive nonalcoholic drinks that are just as delish (and I would argue even more so) than their alcoholic counterparts.
What is a Mocktail?
A mocktail is a “mock” cocktail – i.e., a cocktail without the alcohol. Perfect for those who don’t or can’t drink (and kids too!) it’s a great way to celebrate special occasions without feeling “left out.”


This particular mocktail takes a cue from a Fuzzy Navel (which I’ve never had) – but instead of orange juice it uses guava juice for sugary sweetness, tempered by lemon-lime soda to add some sour depth. The kids will love this drink because the presentation of it will make them feel oh-so-grownup…and the mocktail I staged for all these photos was promptly snapped up by my 12-year-old son the moment I was done (whose mouth was watering the whole time as he watched!).
Recipe for Nonalcoholic Sparkling Mocktail Holiday Drink

How to make the sparkling mocktail:
1. Pour colored sprinkles onto a plate wider than the rim of your glass.
2. Wet a paper towel generously, and wipe around the rim of the glass to moisten. Make sure you wipe up any water drips before the next step.
3. Turn the glass upside-down onto the plate, coating the rim with sprinkles. Turn right-side-up again and shake gently to get rid of any sprinkles that aren’t attached to the rim.
4. Use a measuring cup to mix the Sprite and guava juice in the right ratio. It may fizz a lot – and you may need to taste test to make sure you like the mix! More guava = sweeter, more Sprite = tangy-er.
5. Place a stirrer stick on top of the glass as a festive topper. (The kids will also like dunking it in the glass and licking the sweet juice off it!)


Celebrate your special occasion in sparkling, nonalcoholic style!
xo
Carly
Leave Comment
Jun 13, 2017 | DIY

This post contains affiliate links, wherein I make a small commission if you click through and buy something. My FTC Disclosure is here.
Lately there’s been a plethora of crafty accessories all over the stores. Colorful tassels, fringe, pompons, and embroidery evoke a 70’s Summer with an 80’s pop flair. This means that any wily DIY’er can easily create the look for less and craft up accessories that look fresh, fun, fantastic, and on-trend this Summer without breaking the bank.
Take this Loeffler Randall Tassel Pouch – a big, trendy investment at $225. (And now totally sold out – for good reason! Similar in beige with silver tassels here.)
Why not be inspired to create your own fun version at a fraction of the cost?
BUY – Original
Loeffler Randall Tassel Pouch, $225 (similar here)
DIY – Your Own Version
YOUNA Small Leather Crossbody Purse, $15.99
1/10yd Custume DIY Craft Leather Fringe Tassel trims, $0.99 per 1 yard piece
Loctite Vinyl, Fabric, and Plastic Adhesive, $10.50 for 2
Pick up some suede tassel trim from your local crafts, notions, or leather working store – or from eBay here. (At $0.99/yard – plus a little wait for shipping – eBay is definitely the most affordable options_though if you can buy local, go for it!) If you’re buying on eBay I recommend these colors from the seller to truly recreate the Loeffler Randall look: Yellow, Watermelon Red, Blue, Orange, Purple, Dark Purple, Pink, and Beige.
Use a plain black zip pouch as your base (or try my DIY Leather Laptop Sleeve to make from scratch – just add a zipper closure to the top instead of an elastic!)
Roll up the tassel trims, spreading some Loctite Adhesive at the base to hold the rolls. When you feel the roll is full enough, cut off the remainder. Allow to dry, holding closed with a piece of tape.
One dry, fan out the pompons (you may need to trim the end of the tassels shorter) and use a generous dab of Loctite on the base to secure to the pouch. If you’re worried about adhesion, a hand-stitch using black polyester waxed thread and a leather hand-sewing needle will secure those suckers on there!
Pair with some natural wedges, some washed skinny jeans, and a wrap top make of striped shirting – and you have yourself a foolproof day-to-night Summer outfit!
Happy DIY’ing!
xo
Carly
Leave Comment
Apr 3, 2017 | DIY

I was beyond thrilled to be invited back to Oregon’s KATU Afternoon Live show last month – to demonstrate how to make these beautiful DIY gemstone-topped jewelry boxes (for Valentine’s Day…or any other gift-giving occasion really!)
Watch below as I demonstrate with host Tra-Renee how to make your own to rival those $45+ boxes you see at the home decor stores!
How to DIY Your Own Gemstone- (or Agate, or Geode) Topped Jewelry Box
DIY Supplies for Making Your Own Agate Jewelry Box That I Mentioned in the Video:
Gold Calligraphy Pen: this is the type I used for painting the raw edges of the boxes; it creates a lovely metallic finish
2-Part Epoxy: you can use any kind as long as it’s clear, I used
this one and it’s never EVER coming off that box!
Mod Podge Dimensional Magic (for a glossy, resin-like finish): Michael’s, Jo-Ann Crafts, or
online here
Happy DIY’ing!
xo
Carly
Save

Leave Comment


