Feb 10, 2017 | DIY

This project is in collaboration with
Paper Mart. I was provided supplies to create a Valentine’s Day tutorial. All opinions are my own. My full Disclosure Policy is
here.
No matter how beautiful real flowers are…sometimes you want something that can last forever…and can be the exact colors and style you’re looking for. I understand. We all want this.
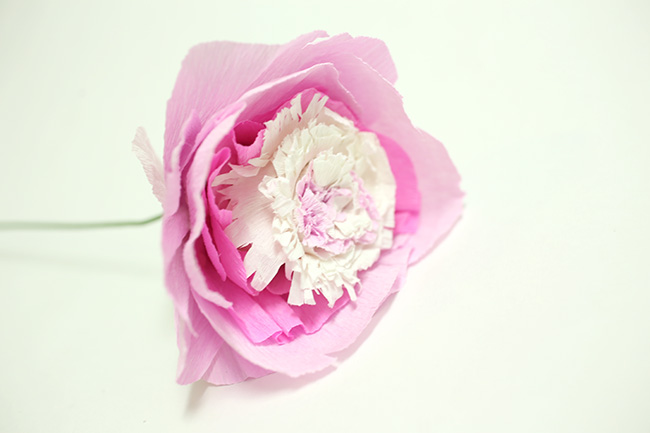
Enter the DIY floral craft: the crepe paper peony, a pretty layered flower that can be any beautiful color scheme you wish…and will last no matter the occasion. For this tutorial I’ve teamed up with Paper Mart again to bring you a fun DIY right in time for Valentine’s Day. Here’s how to make it:
How to Make Your Own DIY Paper Flowers (Crepe Paper Peonies)
You Need:

choose your favorite colors: ivory crepe paper / rose crepe paper / pink crepe paper / hot pink crepe paper / light green cloth-wrapped floral stem wire / round ball or ornament / scissors / hot glue & glue gun
How To:

1. Tear a long strip of crepe paper (perpendiular to the grain) along the top edge of one of the colored rolls of crepe paper. Tear another similar length from the white crepe paper.


2. Start rolling up the crepe paper into a bundle, folding back on itself and crumpling the folds here and there for a more natural look.

3. Use hot glue to glue down the folds into a roll.

4. Keep adding layers of white and colored crepe paper ripped edges until you have built up a nice thick roll.
5. Use scissors to snip the top edges and distress them.
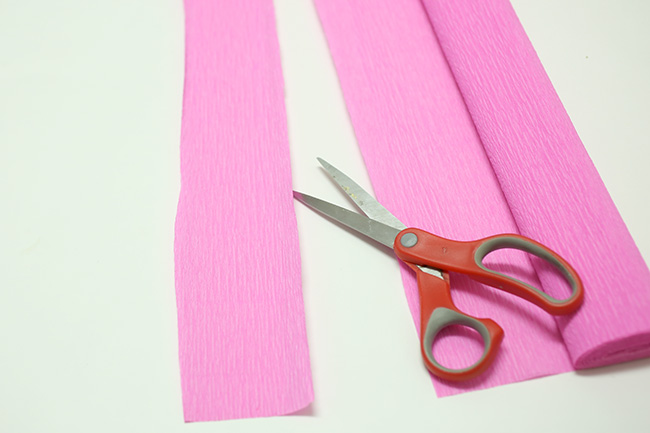
6. Cut a long piece of colored crepe paper about 2″ wide, parallel to the grain.

7. Fold the paper on itself to create a stacked accordion.

8. Cut a petal shape in the stack, with the bottom of the petal at where the folds are in the stack.

9. Separate and spread each petal pair over a round ball, stretching and shaping the paper to the ball.


10. Glue the center roll to the middle of one of the rounded petal pairs you just made.

11. Glue another petal pair onto the bottom of that, at a 90-degree angle to the previous petals, and fold the petals up around the center, cupping it.

12. Keep gluing on more petals, making more from different colors of paper, and cupping around the center as you go.

13. For a more rounded shape, overlap slightly and glue the edges of petals together.
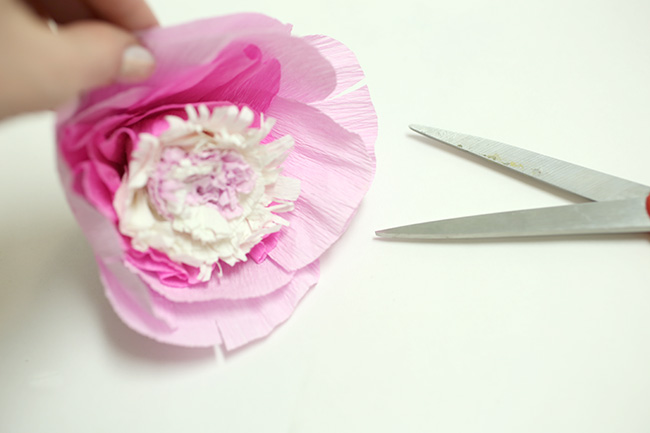
14. Cut small notches in the edges of the large petals to look like a real peony.

15. Cut a 1.5″ wide piece from the white crepe paper (parallel to the grain) like in Step 6, accordion fold it, and cut joined leaf-like shapes from it.
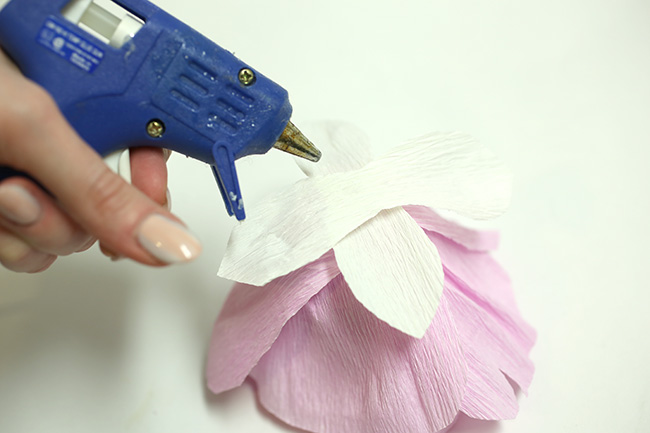
16. Glue the white leaf-like shapes in an X to the bottom of the flower.
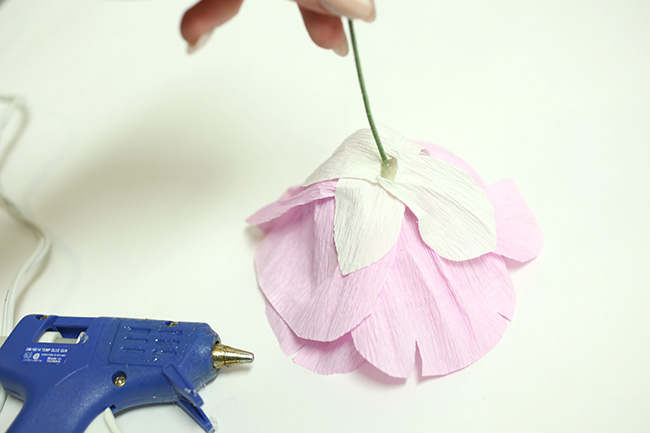
17. Stab the floral wire into the center of the X, pushing through several layers deep into the flower center. Hot glue around the hole in the bottom to secure.
And you’re done!
These flowers are kind of fiddly to make, so I recommend having something to watch on TV whilst doing it…but the results are so satisfyingly worth it!
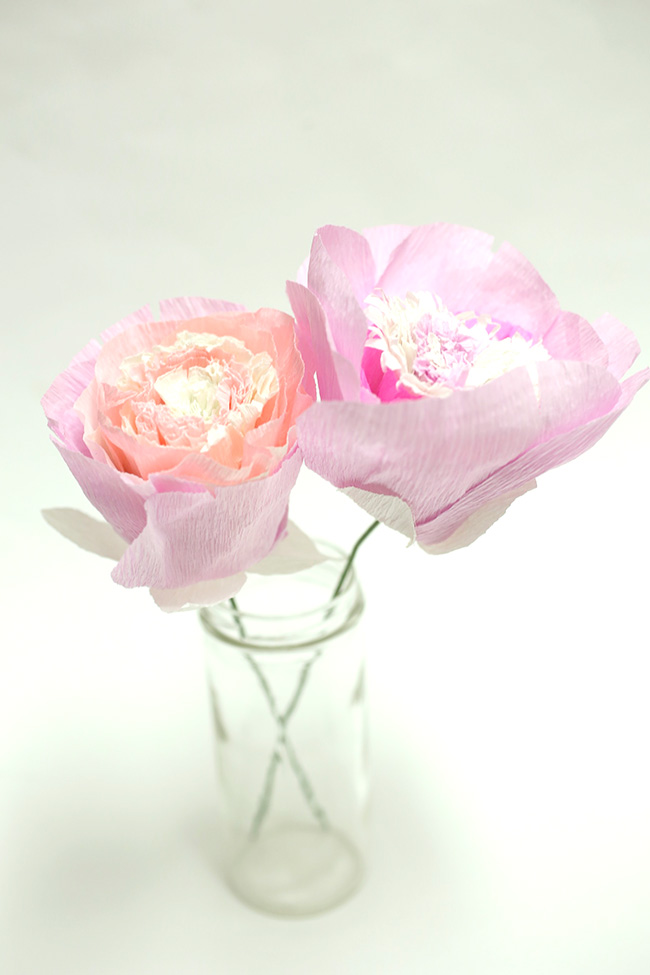

Pretty, unique to you, and everlasting…what’s not to love?
So some of you may also be wondering…why are we using crepe paper for this when regular paper could work just fine too?åÊ Well here’s why…
Why You Should Use Crepe Paper for Floral Crafts and Flower DIYs

Crepe paper lends itself really well to creating petals and leaves, because of its natural texture. If you look closely, although the petals of some flowers may appear smooth, many have a slightly wrinkled or puckered texture that is well-mimicked by the crinkles in crepe paper. Got a leaf or a petal with a a veiny, ribbed texture you want to recreate in a realistic floral craft? It’s very easy to duplicate using crepe paper…whereas a regular un-textured paper will look flat and unnatural compared to the real thing. The problem is that crepe paper can be too crinkly overall, so stretching the crepe paper out when making flower petals will produce a texture that is smooth, curved, and stretched out in one area, and tapering down to an area that is crinkled and puckered. This looks very realistic! (This technique works great for roses, plumeria, or peonies that have smoother petals, whereas stretching may not be necessary for daisies, cosmos, zinnias, or other varieties.) Try it sometime to see how much more realistic your fake flowers look when you use crepe paper for your floral crafts!
 Happy DIY’ing!
xo
Carly
Save
Save
Save
Leave Comment
Feb 7, 2017 | DIY

This project is in collaboration with Paper Mart. I was provided supplies to create a Valentine’s Day tutorial. All opinions are my own. My full Disclosure Policy is
here.
There’s something about a suite of matching, pretty labels on all your toiletries…something high-end and chic-looking about lovely bottles all in a row. I’m a big fan of decanting product since it creates a consistent look and feel. Yet this was the first time I was using printable clear stickers in my inkjet printer…so I had a bit of a learning curve. In collaboration with Paper Mart, here’s how to make your own pretty bath product labels (for a Valentine’s Day gift or just for yourself!) with some printable adhesive sticker paper and a printer:
How to Make Your Own Valentine’s Day Printed Toiletry Bath Product Labels
You Need:

glass bottles (these are a smaller size, good for gifts) bottle caps or dispenser pumps scissors printable clear sticker paper white eraser (not pictured) Krylon Preserve It! spray (not pictured) old newspapers or something to protect your surface (not pictured)
label template piece of plain paper (not pictured, optional) tape (not pictured, optional) rubbing alcohol and paper towels (not pictured) small funnel (not pictured)
How To:
1. Create your labels on the computer. I used these original templates from Creative Market, and customized them for this project. You can download the labels I created here – or use this version where you can type your own product names in Acrobat, Photoshop, or another graphics program.

2. Print out your labels on your inkjet printer. I found that my printer had A LOT of trouble feeding the clear sticker sheet through. I got past that by taping a piece of regular 8.5″ x 11″ printer paper to the back of the sticker sheet with a couple pieces of tape, and then the printer was able to grab it and feed it through. HOWEVER printing labels on an inkjet printer I found requires sealing the labels, or else the ink will run when it gets wet. More below. (You could also use this brand on a laser printer down at the print shop to get around this…or use this waterproof label paper here.)

3. I found that my inkjet had smeared the ink a little bit. I was able to clean that up with a white eraser, and scrubbing at the ink blots before the ink was completely dry.
4. At this point if you opted for printing in your inkjet printer, you will have to seal the labels so you can use the bottles in the bathroom (where they are bound to come in contact with moisture). Here is a tutorial for sealing with clear crayon, but I prefer to use Krylon Preserve It! spray. Lay the sticker paper, right side up, on some newspapers and give it a good spray according to the directions and allow to dry.

4. Cut out your labels, leaving a small amount of sticker sheet around the label edge.

5. Remove the sticker sheet backing. Clean the bottle surface with rubbing alcohol if you need to. Making sure your bottles are clean and dry, apply the labels to the front of the bottles.

6. If you purchase the dispenser pumps through Paper Mart, you’ll find they are a bit long for these bottles. Cut the straw shorter at a length that is long enough to touch the bottom of the bottle. (I made my straws long enough so they would be pushed up against the bottle bottom, and be slightly curved in order to fit.) Cut the straw on an angle, and round out the cut edges.
7. Pour your product into the bottles (you may need a small funnel) – and enjoy!

And that’s it!

These are super-cute as a gift (think a coordinating product suite, themed gift or spa basket, or even bottles for homemade body products!). Plus, they look great on the bathroom counter.

Oh, FYI – the rose petals are from here.


Happy DIY’ing – and Happy Valentine’s Day!
xo
Carly
Save
Leave Comment
May 18, 2016 | DIY
FTC Disclosure: This blog post contains affiliate links, which means I receive a small commission if you click through and make a purchase. My full Disclosure Policy is here.
And dare I add…sexy to the title?
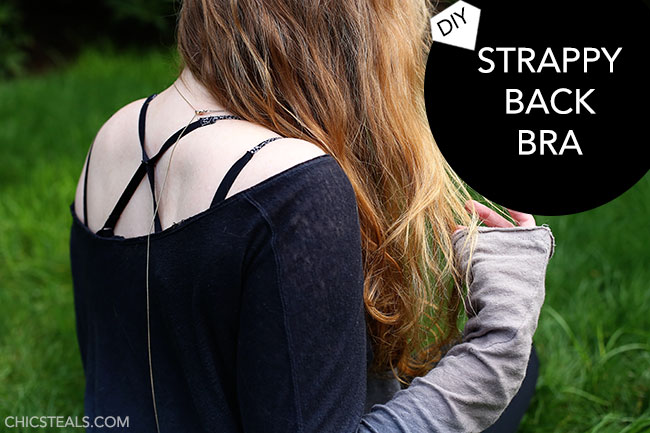
I’m sure you’ve noticed that a recent trend for the past couple of years has been lingerie (and swimwear!) getting more complex and strappy. Lots of extra ties, crossing strings, layered straps…I just love it! Bra straps peeking out from under a shirt are no longer risque; they’re trendy and cute. Welcome to the era of underthings that are meant to be shown…and this DIY takes any old bra you might have and upgrades it into the strappy bra trend. Get ready for some major sexiness with this project.
Many brands come already with tons of great strappiness. (Victoria’s Secret, Only Hearts, Free People, and One Teaspoon are particular faves.)
 I really liked this particular Victoria’s Secret bra (no longer available…but this is very similar) …but didn’t want to buy a whole new bra.
So what are you to do if you want a little sultriness but the lingerie you have needs a little upgrade? Add MORE straps of course! Here’s how:
You Need:
bra rings and sliders set / extra pair of bra straps (salvaged from a convertible or strapless bra, or bought as a separate item) / bra you don’t mind attaching the straps to permanently / matching thread / hand-sewing needle / pins / scissors
How To:


1. For the particular style I’m making, you have to cut off the ends of the bra straps. This bra had convertible straps, so I unhooked them and cut off the ends.

2. Thread both loose ends through a double-sided slider.

3. Now to create the upside-down V’s that will anchor each strap to the bra band. Take your two extra straps and cut off the ends. Thread a bra O-ring onto each. Pin down one cut end to the underside of the bra band, near the hook closure. (Note where the end is in relation to where the old straps connected.)

4. Pin the other end of the strap to the bra band, closer to the cups, to make an upside-down V on each side of the bra hook closure.

5. Thread the loose ends of the original bra straps through each O-ring. Fold the end of the original straps under and pin around that O-ring to secure.
6. Try on the bra to make sure all the straps lie correctly, and adjust the pinning if necessary. DO NOT CUT ANY STRAPS SHORTER until you’re ABSOLUTELY sure everything fits!

7. Once you’re sure you like the fit, now’s the time to sew. Trim the bra’s original straps shorter if necessary, and hand-sew each end onto the O-rings where you’d pinned.
 8. Stitch down the ends of the upside-down V straps to the bands (after trimming the excess). I made 2 lines of horizontal back-stitching for extra security.

9. Now everything’s secured and your bra is strappy (-er). I wanted to add yet another layer of strappy goodness…so I hooked the convertible straps I got from the kit I’d purchased to each original strap-anchor on the bra band.

10. Then, since my bra had a double strap attached to each cup, I snipped the end so I could separate them and work with the outer straps only. These I attached to the cut straps from Step 9.

If you don’t have a double strap, use the extra strap material to connect the O-rings to the tops of the cups with some stitching.

And that’s it!


It sounds terribly confusing, but it looks incredibly awesome once done (and peeking out from flimsy tops and low-back dresses ;-).

Happy DIY’ing! (and happy strappiness 😉
xo
Carly
Save
Leave Comment
Apr 21, 2016 | DIY
FTC Disclosure: I was provided with a complimentary bouquet of my choice from ProFlowers.com to create a DIY tutorial. The below opinions are my own. I have not been otherwise compensated for this post. This post may contain affiliate links, wherein if you click through and make a purchase I receive a small percentage of the sale. My full Disclosure Policy is here.
 With the Weekend 2 of Coachella coming up, you’re probably prepping your floral crowns and boho headdresses right now – or even trying to reuse what you had from the first weekend. By now perhaps your flowers have withered or maybe you want to go for an entirely different look the second time around. Why not try a handmade leaf and crystal crown and stand out from the crowd? Here’s how:
DIY Music Festival Leaf and Crystal Crown (for Coachella, Bonnaroo, etc.)
I received a beautiful bouquet from ProFlowers.com, reviewed here – and wanted to try something a little different with the included greenery.
You Need:
crystals (preferably drilled) – mine are C-grade Quartz Crystal Points / thin brass jewelry wire (20ga+) / wire cutting pliers / gold-tone headband with decorative piece (mine is from Target) / green leaf stalks and/or flowers
How To:

1. Thread one of the crystals onto a long piece of cut wire, and place onto the flat design element of your headband. Start wrapping one end of the wire around the headband wire, leaving a couple inches at the tail end.

2. Secure the crystal by continuing to wrap.

3. Add another crystal on, and wrap the wire around the headband base again to secure. Keep adding crystals on in this manner, in a row.

4. When you are satisfied with the number of crystals secured to your headband, wrap the wire around the headband base a few times to secure, leaving a couple inches at the tail end.

5. Now is when those couple inches of wire come in handy. Place a green leaf stalk near the crystals, and wrap the wire end around the stem to secure. Wrap any sharp ends underneath so they don’t stick out.

6. If needed, add another piece of wire to wrap the stalk to the headband. Cut the stalk about 2″ shorter than the end of the headband, and secure with wrapping the wire around it.

7. Once your greenery is secure, you can add flowers to fill in gaps if you like.

Pretty easy!

And pretty!

In order to preserve your crown until you’re ready to wear, keep in a cool, dark place (like your fridge!) Enjoy-and feel like a woodland queen for your next festival or Summer gathering.
Happy DIY’ing!
xo
Carly
P.S. The weight of the crystals and stems is pretty hefty, which is why you need a strong base. There are other flower crown tutorials out there using dead-soft jewelry wire or elastic, but I wouldn’t recommend either because they would bend or get weighed down. Using a finished store-bought metal headband (made of tempered hardened metal) will provide a strong enough base – and it is ideal if you can find a headband that is 2 wires with a space between them (like this one). I couldn’t find one like that, so went with a headband that had some wire detailing in an area that would work well to wire some crystals on to. (Plus, you can remove the wire and floral elements and just wear the headband once your greenery dies!)
Save
Leave Comment
Apr 19, 2016 | DIY
FTC Disclosure: This post is in partnership with FontBundles.net, where you can get a variety of beautiful fonts for great prices (around 96% off the regular price!) They also offer a free font download every week. My full Disclosure Policy is here.
 Hi friends – today, as promised, I’m sharing the tutorial for how to create your own digital typography art.
You see it all around the internet: pinned on Pinterest, prints on Etsy, shared on Instagram…the font-based typography layout as art has taken the world by storm. There’s nothing like a motivational or inspirational quote to get your going in the morning, or inspire you to pick up when you’ve lost steam. So here’s how to make your own:
DIY Digital* Gold Typography How-To
I’m using the Sobbers font from the Spring Bundle from FontBundles.net if you’d like to follow along. I’m also using Photoshop CS6 on a Mac – so replace any CMD (command) with CTRL (control) keys for PC’s.

1. Create a new file, size it square, 72dpi, RGB. Save it as a .PSD on your desktop or somewhere as your working file.

2. Hit T for the Type Tool shortcut, choose Sobbers font, and type one word on the canvas. Type the 2nd word. Type the 3rd word. You want each word to be separate (and to commit your typing, hit CMD Enter to exit the Type Tool and start another word).

3. SHIFT-select your 3 separate words (that are all on their own layers) and choose the vertical align option from the Align panel to center them all to each other. I chose not to center to the canvas but you could do that by selecting all the layers and aligning them.

4. With all 3 layers selected, press and hold SHIFT and OPTION keys, grab the lower right-hand corner of the transform control. (Make sure your “Show transform controls” option is checked when the Move tool (V) is selected. Drag it out so all the words are sized larger so they look nice on the canvas but are still aligned center to each other.

5. Now select each single layer and move closer together so the spacing between them sees comfortable.

6. I chose to resize both the words “Spring” and “Action” larger, again keeping the 3 words vertically aligned with each other.


7. Then, move the words closer together again so they “fit” well – paying attention to creating similar white space between the ascenders and descenders of the font, and creating a path of movement for the eye through the artwork.

8. Select all your word layers and choose CMD G (or CTRL G on a PC) to group them. I renamed my group “Words.” Then create a new layer (CMD SHIFT N) and hit OK.

9. Choose the Gradient tool (G…keep hitting SHIFT G to cycle through the tools until the Gradient is chosen). Double-click on the gradient image at the top left of the window to open up the Gradient editor. I chose a 5-point gradient that was gold with 2 lighter stripes in it. Hit OK.

10. In your new layer, click near the top left and drag the gradient down to the bottom right.

11. To place (“clip”) the gradient to your words, hold down the OPTION key, hover over the line in-between the gradient layer and the “Words” group, and the cursor will change to a little bent arrow next to a box. Click on the line and you will “clip” the gradient to the letters.

12. If you don’t like the placement of the gradient, select the gradient layer and just use the Move tool to move it around on your words. I had to play with it a bit, enlargening it and spinning it around until I liked it. Finally, create a new layer again and type your name, website name, or whatever you like in there. (I tend to type in black and set the Blending mode to Multiply, at 35% opacity. It’s something you have to play with to see if you like the results.)
 And that’s it! It’s really simple to make with Photoshop (or GIMP, for that matter) – with spectacular results. Now you have something all your own that you can share across your channels to inspire your friends and family with quotes, ideas, funny phrases – anything!


Happy DIY’ing!
xo
Carly
*Note: this tutorial is for digital typography – if you want to create something for print you need to set up your file as CYMK 300dpi.
Save
Leave Comment


