Feb 2, 2017 | DIY

This project is in collaboration with Paper Mart. I was provided supplies to create a Valentine’s Day tutorial. All opinions are my own. My full Disclosure Policy is
here.
Most of the year I have a seasonal wreath hanging on my door…but realized that for Valentine’s Day I’ve never made anything appropriate for the holiday. My initial thoughts were to just do something easy peasy (and a little cheesy 😉 : gluing foam cut-out hearts to a wreath ring and call it that. Then I decided I wanted to take things up a notch and make something sparkly, chic, and not so obviously Valentine’s Day…and Paper Mart came to my rescue. (And let me preface this by saying this project is as easy as gluing stuff onto a wreath form!!) Here’s how you can make your own bejeweled beautiful sophisticated wreath – not just for Valentine’s Day but for any day of the year:
How to Make a Jeweled Valentine’s Day Wreath
You Need:

16″ wreath frame / 1+ pack of pink round acrylic jewels / 1+ pack of 20mm crystals / 1+ pack of 12mm crystals / silver wired lame ribbon / jewel placement tool (optional) / slow-drying clear glue (recommended: Dazzle Tac) / scissors / glue gun
How To:

1. Start wrapping the end of your ribbon to the top of the frame (I didn’t even need a glue gun to secure because the wire inside of the ribbon will hold it down!).

2. Wrap ribbon around the entire frame to make a gluable ribbon base, overlapping the ribbon slightly.

3. Cut the ribbon once you meet the beginning of it again, fold over the cut edge slightly, and glue down the end to cover up the other ribbon end.

4.Now make a bow for your wreath. Here’s how:
How to Make the Perfect Bow (gluing wired ribbon)

Cut 3 pieces of ribbon. For 1.5″ wide ribbons like this, the measurements I used were:
5.Take the middle length of ribbon and hot glue the ends overlapping (about 1/2″) to make a loop.
6. Press the loop down in the middle and glue the inner center of the loop at the overlapping area to the other side of the loop on the inside. This now creates 2 loops: the loops of the bow.
7. Glue the center of the longest piece to the back of the loop you created at the overlap, right sides together.
8. Place the shortest piece on top of the bundle at the center front of the two loop piece and glue down.
9. Pull the ends of the shortest ribbon piece to the back of the bundle, scrunching in at its sides, and glue at the back, the ends slightly overlapping.
10. Fluff out your ribbon by making the loops large and round, and fold the long ribbon piece down so it’s visible behind the loops. Add some waviness to the longer ribbon ends.
11. Cut the long ribbon ends at an angle.
12. Top off your wreath by hot-gluing on a bow made from the wired ribbon.

13. Now it’s time to have some fun! Spread slow-drying glue onto the back of a large gemstone, and place onto the wreath. (I know it shows E6000 glue in the photo, but I quickly found that Dazzle Tac was much better.) I chose an evenly-spaced placement.


14. Then repeat for the medium-sized jewels (these too I opted for an evenly-spaced placement around the wreath).

15. Repeat the process for the smallest rhinestones. You could use a jewel placement tool to help place gems quickly, but you can also use tweezers or even your fingers depending on how much precision you want. It’s always helpful to take a step back and assess your work. I chose to create a cluster with the smaller pink jewels near the bottom of the wreath; you can add more or less depending on what look you like.
And that’s it!


Allow to dry, then hang on your door – or wall – or use as a centerpiece for your delicious Valentine’s Day dinner. Sparkle – ribbon – jewels – beautiful!

Happy DIY’ing!
xo
Carly
Save
Leave Comment
Apr 9, 2015 | DIY
 Hi friends! It’s been awhile since I’ve shared a DIY here, for many reasons.
Life took over for awhile.
But I’m back – with a fun and easy DIY for you all to try out!
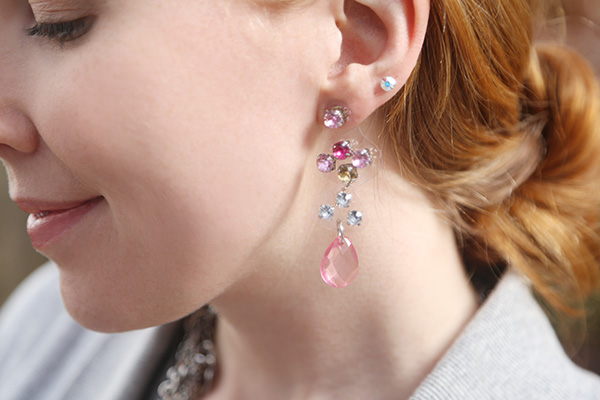
Big, bejeweled pendant chandelier earrings have been on-trend for awhile now…but unless you’re planning on whipping out that soldering torch and applying to your rhinestones…they’re a little hard to make.  Enter translucent vinyl PVC as a backing – plus some strong glue – and you don’t ever need to pick up that pesky torch. Here’s how to make your own designer-style illusion jeweled chandelier-style dangle earrings:
You Need:
PandaHall Acrylic Beads (I used the Mixed Color Transparent Acrylic Faceted Drop Pendants in light pink / PandaHall Mixed Acrylic Rhinestone Montee Beads in light pink, hot pink, and champagne / earring pads with backs / large jumprings (I actually used 2 per earring so 4 total) / transparent PVC vinyl / pliers and jumpring tool / glue for plastics and metals (I recommend Loctite but had run out when I made this project!) / awl or needle / scissors (smaller scissors are better I found, like nail scissors)
How To:  1. Lay out the beads on a flat surface to determine placement of the rhinestones.
 2. Use a generous dab of glue on the back of each rhinestone to glue it onto the transparent PVC vinyl. Space your rhinestones apart to allow for cutting them into separate pieces if you desire.
3. Once dry, use scissors to cut around the rhinestones. (I chose to cut around some clusters of rhinestones separately so I could join them with jumprings for more dangle.) Make sure to round your corners.
 4. Glue the earring pad onto the back of the earrings, and allow to dry.
5. Use an awl to pierce the vinyl for each separate rhinestone cluster that you want to connect, and at the middle of the bottommost rhinestone cluster, near the edge.
6. Connect a Drop Pendant to the bottom of the earring with a large jumpring.
7. Connect all the pieces with jumprings to complete your earrings.

And that’s it! They’re surprisingly stable and will withstand some wear (though I wouldn’t recommend running obstacle courses in them).
I also made some alternate-colored ones in the trendy asymmetrical earring style.

I love how they look disconnected – almost floating – above your shoulders – utterly utterly chic with a backswept ‘do and a pretty necklace for Spring.
 Happy DIY’ing!
xo
Carly
Save
Leave Comment
Sep 18, 2014 | DIY
 This DIY tutorial has likely been done already hundreds of times in the aftermath of Tom Binns releasing his neon cameo collection in Spring 2012 – but what’s once more? I love the juxtaposition of elegant, old-world cameos harkening back to the times of daguerrotypes and intaglio portraits…rendered in full-on neon for the modern age. You can make your own easily, with some paint, rhinestone chain, and a soft embossing metal as backing – with no one the wiser as to how your unique creation came about. Here’s how:
Materials:
1 cameo (and this place has the best selection!) / rhinestone cup chain / gold embossing metal / scissors / jump ring / pliers / wire-cutting pliers / jewelry glue (not pictured) / pin or awl (not pictured) / paint in 2 neon colors / primer or white paint / pen / paintbrush / matte sealant (optional, not pictured)
How To: 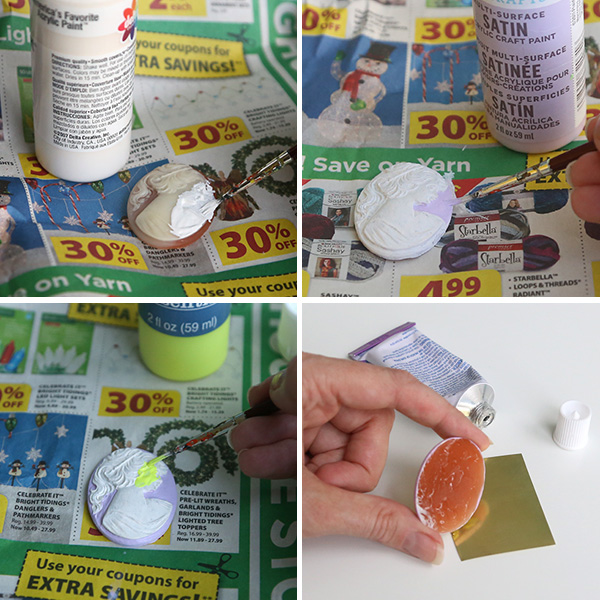 1. Since cameo colors are usually fairly opaque, you may want to prime your cameo first with a coat of primer, or just a coat of white paint. Allow to dry.
2. Paint the cameo. Usually it’s easiest to paint the lighter color first, than the brighter or darker color next. You may have to do a couple coats of each color to fully hide the color of the original cameo.
3. (optional) Paint a coat of sealant on he cameo to hide brushstrokes and prevent paint chipping. Allow to dry.
4. Glue the cameo onto a small piece of embossing metal.
5. Place the rhinestone chain around the cameo, and cut to desired length.
 6. Spread glue on the back of the rhinestone chain, and glue to the metal backing around the cameo.
7. When dry, poke a hole in the embossing metal with a pin or awl.
8. Trim the metal close around the chain, and use the side of the scissors to fold it to cup the chain so no sharp edges stick out.
 9. Thread a jumping through the hole you made, onto a necklace.
And you’re done!

Wear with something dark and modern for contrast, or pair with a pastel frilly corset for your best Marie Antoinette impression!
 Happy DIY’ing!
xo
Carly
Save
Leave Comment
Apr 23, 2014 | DIY
 Hello lovely readers! Today I’d like to share the DIY tutorial for the Gem Pendant Necklace I designed for Wander & Hunt. It was inspired by an over-the-top, bejeweled and utterly gorgeous Dannijo pendant – and so I couldn’t help myself but re-create all that glittery goodness.
 Here’s how:
You Need: (more…)
Leave Comment
Apr 15, 2014 | DIY
Hello friends! Today I am sharing the DIY tutorial for the Radiant Rhinestone Belt kit I designed for Wander & Hunt. It’s a fun little project with maximum impact, and you can place your stones however you like to get totally different looks.  (My version is less symmetrical and more random, as you can see.) Here’s how:
You Need: (more…)
Leave Comment


