 After spotting this editorial in Lucky Magazine back in winter, I decided I wanted a foldover-style boot too!
  So chic – and it visually slims up your legs, working in both casual and more edgy ensembles. But since I always make instead of buying new unless I absolutely must, I’m not going to plonk down $199 on a boot…especially when I already have a whole bunch of shorter boots that will work perfectly as the base (see below).
 Here’s how to make your own version, using an old beat-up leather jacket:
There are many great options for old leather jackets – I found mine at a Goodwill Outlet store, so it probably cost about $4 total, and it had a huge rip in the back of the jacket (probably the reason why the owner discarded it in the first place!)
Charity shops, garage sales, something in your guy’s closet he no longer wears…if you can give an old, distressed piece of clothing a new life, I’m all for it! And if you prefer using vegan alternatives, you can also try this with man-made pleathers or vinyl, sold at many fabric or craft stores. The only issue with pleather vs. leather is that pleather doesn’t breathe as well, and doesn’t have a natural stretch to it as leather does, so trying to push it down over your boot when finished may cause more seam stress. You may have to cut your pleather slightly larger at the bottom to accommodate different boot shapes, and you will likely have to make a lining as manmade leathers usually have a very rough underside that is uncomfortable next to the skin. You could also try fabric, canvas, corderuoy, or denim for an entirely different look!
You Need:
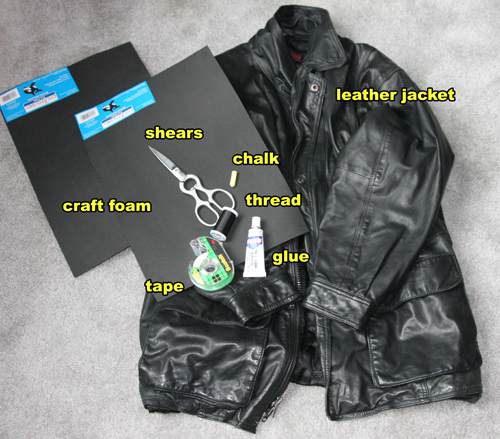 oversized leather jacket / matching thread / sewing machine needle for leathers (not pictured) (If you’d prefer not to sew, you can also try gluing the seam together) / 2 pieces flexible craft foam (about 12″ x 18″ each) / tape / Loctite Plastic, Fabric, and Vinyl Glue, Barge Cement, or other similar glue for leathers and varied, porous materials / marking chalk / shears or leather scissors
Tools: clothespins (optional) / seam ripper (optional) / Teflon machine foot (optional)
How-To:
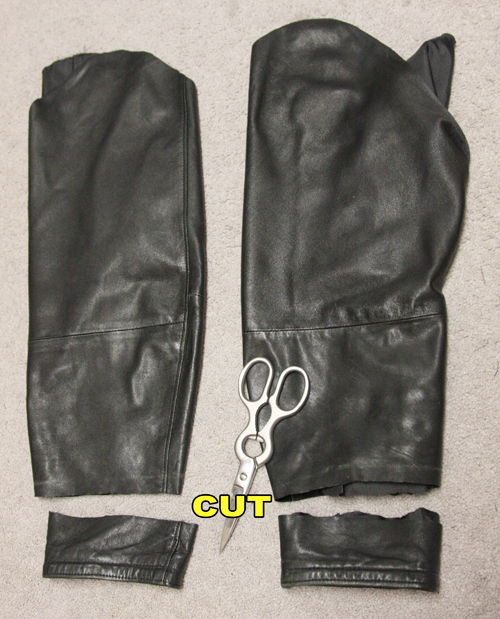
Prep: 1. Cut off the sleeves of your jacket off with the shears. (NEVER use fabric scissors for cutting leather – it will dull them permanently!)
 2. Slide the sleeve (with lining still inside) over your calf, put on the boot you want to cover, and pull the sleeve over it (cuff part at your ankle).
  Mark the sleeve with chalk at the bottom where the cuff part is widest in order to accommodate the boot and the amount you want to cover the heel. (We’ll be turning about 1/2″ under later so the cuff will be slightly bulky – make sure the circumference of the sleeve can accommodate this.)
 3. Take off the sleeves and remove their linings. Draw the chalk line straight across the bottom of the sleeve you marked, and transfer the markings to the other sleeve as well. Cut at your lines.
 Slit your sleeves down the seams (I used a seam ripper to salvage as much of the width of the sleeves as possible.)
 4. Cut sleeves straight across at their sleeve caps. Cut the sides of the sleeves straight up from the cuff area to make two rectangles of salvaged leather.
Sew It!

5. Using a machine needle for leathers, sew the vertical seam in your boot-covers together, at about 3/8″. (A Teflon or walking machine foot will help prevent the leather from sticking to the foot as you sew.)  6. Glue down each side of the seam allowance with leather glue, flattening as you go down the seam.
 Secure with tape until dry.
 7. Place the sleeve inside the sleeve lining, matching up the cuff areas, right sides together. Sew about 3/8″ from the edge all the way around the cuff. (I was having a MAJOR sticking problem with the leather, so that’s why I placed the silky poly lining on top of the leather to sew this.)
8. Turn boot-covers right-side out.
Stuff It!
 9. I wanted to make a very stiff, faux boot cover that would create the illusion of a rigid calf-high boot, so since jacket leather is quite soft and pliable, I had to make an insert to create structure. I used a piece of craft foam, rolled up and inserted between the lining and the leather outside. Push the foam all the way down to the bottom of the boot-cover, making sure the cuff part doesn’t reveal any lining on the outside. Once inserted all the way, put your hands inside and enlarge the foam roll so it conforms to the shape of the boot-cover. Also make sure that the foam roll seam overlap is at the back of your boot-covers, so no ugly ridge is seen down the front.
 10. Trim top of foam down in order to accommodate folding the lining and leather over it.
 11. Roll outside leather down slightly and out of the way. Cut any excess lining fabric, leaving enough to fold under.

Apply glue to the top edge of the foam, around the outside. Pull the lining up and over the top of the foam, completely covering the foam edge and sticking down into the glue.
 Secure with clothespins or tape to allow to dry.

12. When dry, roll leather outer back up, and fold under itself. Glue folded edge to the foam outside (on top of the lining edge), and secure with tape until dry.

And that’s it! Short booties…transformed into chic foldover boots!
 These boots are now made for walkin’…the only question is whether to pair them with a cute dress or super-short shorts!
And for other shoe-cover tutorials, try …love, Maegan‘s thigh-high spats made from an old leather skirt, or Threadbanger’s own DIY Spats Project!
 Thanks for reading – and if you have any questions, ask them in the Comments section below and I’ll do my best to help you out!
xo
Carly
{ originally contributed to Threadbanger.com in 2010. }


Love them!!
Wow.
Just. Wow.
Carly…you are so brilliant!! I could not do this. It's enough for me to 'know' someone who can. This looks amazing…you should be selling these!
ps. don't worry about that gold harness chain I asked about. I found something similar. Not quite as gorgeous as yours though! but closer to home. that was the only factor.
A well done tutorial of a very fashionable look, thanks for doing this! I cant help but wonder how they'd look with other shoes – not just black ones, red maybe, even an open toed shoe. Hmm you still have some jacket left, maybe a pair of ankle cuffs for warmer weather…! I have a pair of leather pants Ive been waiting to cut up (waiting for life to provide the time), had decided one leg for a shoulder wrap, but could do boot covers with the other… 🙂
(lost my so pithy comment…) This was a really well done tutorial and I love the result; cant help wondering how they'd look with other shoes, red maybe or even open toed! You have a lot f jacket left, maybe shorter ankle cuffs for warmer weather, ;).
I love your little ankle boots! (I know the whole point of this post was for the fold over boots, but seriously- the ankle boots are awesome!) Where'd you get them?
@trashywriter: I know, there's a ton of jacket left! (I'm going to use it for a Father's Day project coming up soon, so hopefully I'll be able to put all that leather to good use!) And you're right, these covers will look FAB with a number of different styles of shoes too!
@alex*aufdemaur: They're Forever21! (A half size too small and the most painful things I've even worn…whoever designed the last for this should be tortured!) I bought them back in October/November so they're probably not around anymore…
@Dusk: Thank you! Glad you found a harness like what you were searching for:-)
@Stacie: 😀
Thanks for your comments, gals!
xoxxo
Carly
great tutorial! Your faux boots are awesome!
Chic on the Cheap
WOW! This is intense! Thanks! 🙂
Wow, your faux boots are awesome. I will definitely try to do that myself, however I was always bad at stitching =(
Thank you, Motrev! If you use a strong enough glue (maybe stronger than the one I use in the tutorial…Barge Cement will be the strongest) and you make the boot-covers wide enough so they don’t have to withstand much stress…then you could probably get away with just gluing the seams rather than actually sewing them. Hope that helps! 🙂