Jul 17, 2010 | From You
from formspring.me:
do you have any idea why corinne, rob, and meg stopped making videos for threadbanger?
Leave Comment
Jun 27, 2010 | DIY

As you may recall from a previous project I posted, we still have the rest of the thrifted leather jacket leftover to something fantastic with! So with my Hubby’s birthday quickly approaching, I decided to make him a homemade sleeve for his laptop computer. Sure you can buy one from the store – and I did scrounge up a tutorial for using some neoprene from an old wetsuit [and here, too!] (like I have many of those laying around!)…but I wanted to try a different material. Leather is cushioning and sleek – but if you prefer manmade leather or vinyl (or even fabric, corderuoy, or denim!) this project will work just as well. I was inspired by those wraparound manila envelopes – but you can always use a strip of material and velcro as a closure, or fashion a long strip with a parachute buckle around the entire laptop, or extend one side of the outer material and use it as a closure flap, or even add a couple inches to each end and use a zipper as closure, turning this sleeve into a simple zippered bag. The possibilities are endless!
You Need:
*leather jacket with lining (or leather/other material + lining fabric, if you are not repurposing a jacket)
*quilt batting (I used Low-Loft crib-sized batting, and had quite a bit left over)
*1 button
*black elastic cord
and…
*marking chalk
*leather shears
*fabric scissors
*matching All Purpose thread
*sewing machine needle for leather
*sewing machine needle for wovens
*hand-sewing needle (not needed if your button is not shanked)
*leather/vinyl glue
*tape
Optional
*matching upholstery thread
*walking foot or Teflon foot for sewing machine
*clothespins or binder clips
How To:
Prep Your Parts
1. Place laptop on your sleeve material, right side up, front edge facing away from you. Trace around laptop on all sides, adding 1″.
2. Lift and rotate laptop up on its back edge towards you, then wrong side up on top of the material. (Front edge will be facing towards you.) Keep drawing 1″ around all edges. (I know this sounds somewhat confusing, so I included the diagram above to show how the material was measured.)
3. Cut the rectangle out of the material (cutting through both outer and lining if you are using a jacket), using leather shears. If you do not have a lining, place this rectangle on top of your lining material, trace around, and cut using fabric scissors.
4. Cut a small piece of leather about 1″ square.
5. Unroll batting from package, and leave it doubled up as you flatten it out. Place rectangle of material on top of the batting. Cut a piece of batting the same size as the lining, then trim batting about 1/2″ on the sides only.
Time to Sew!
6. Fold material rectangle in half, and machine-stitch the edges together, using a needle for leather and upholstery thread. (Upholstery thread is not a must-have…but it is a lot stronger that regular cotton/poly mercenized, and is more suited to sewing leather and taking the stress of repeat usage. Also, f you have a walking foot or Teflon foot for your machine, it can help the leather from sticking.)
Clip corners and turn right side out.
7. Fold lining rectangle in half, and machine-stitch the edges together, using a needle for wovens and regular thread. This will make the lining into a “pouch.” Do not turn right side out; the right side needs to remain on the inside.
8. Wrap batting around the outside of the lining pouch. Fold upper edges of lining pouch down and overlap batting piece at top edges. (Trim batting top edges if they are too bulky or long.)
Machine-stitch the lining edges down over the batting, at about a 3/8″ hem.
Closing It Up
9. Sew button to the material pouch you made in Step 6), about 2″ down from the top edge on the front of the pouch.
10. Slide the lining into the material pouch, and slip the laptop inside to check for sizing. On the back side of the material pouch, tape one end of the elastic cord to the center, about 2″ down from the top edge.
11. Wrap elastic cord around button, and bring the other end to the back, cutting it and gluing it down next to the other end. Make sure the cord is taut around the button and will keep the laptop from falling out.
12. Trim the cord to meet the taped-down end.
13. Re-tape cords down with the ends free. Place a dab of glue under the ends and press them into it.
13. Remove tape and glue the small square over the ends of the cords.
14. Remove laptop and lining from the material pouch, and machine-sew the square over the elastic cord ends, first sewing a square around the edge, then an “X” shape in the center.
Finishing
14. Spread glue on the inside of the outer pouch, close to the top edge. Turn down top edge about 3/8″; clamp until dry.
15. Slip the lining back inside the outer pouch, pushing the corners all the way in.
Stitch around upper edge of laptop sleeve to secure the lining to the outer material, using a needle for leather and upholstery thread.
Et voila!
Finally, a homemade FUNCTIONAL accessory that my husband will actually use! (And it’s unisex, so can be a great gift for a man or woman!)
Happy DIY’ing and Happy Birthday, Hub!
xoxox
Carly
This is my last post for Threadbanger – wish I could do more! Hasta la vista, TB!
Save
Leave Comment
May 5, 2010 | DIY
With Mother’s Day just around the corner, probably the biggest question on everyone’s mind is what to get for the mother in their lives. DIY a lovely gift for a Mom of any age – using fabric and glass, two of the best materials known to the modern gal. Here’s an internet roundup of some great projects to create flowers that last forever, and beautiful jars to display them in or use as knicknacks around the house:
Happy Together makes a beautiful bouquet out of multilayered fabric flowers by tracing the shapes of store-bought flowers to make a pattern.

If you’d like some patterns for making fabric flowers without having to sacrifice store-bought blooms, I’ve shared a few patterns for a camellia, carnation, dahlia, and lush camellia on my site Chic Steals.
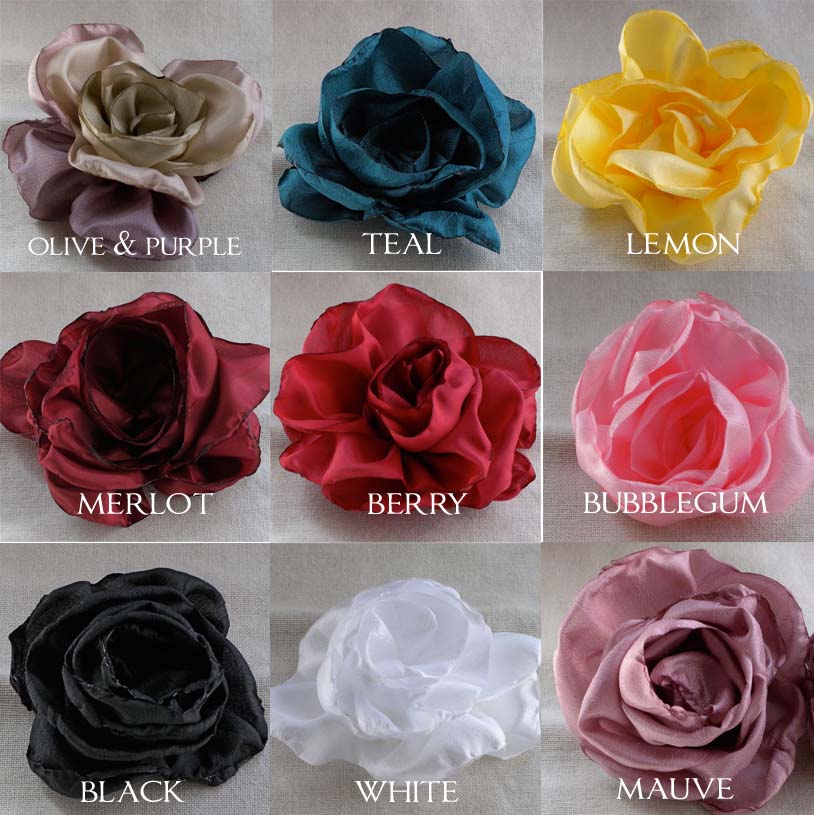
If you’re looking for rose-making how-to’s, here’s a tutorial on DuhBe for a satin rose bloom, a Rolled Fabric Rose tutorial downloadable pdf from Portobello Pixie, and a Tattered Fabric Rose Tutorial from Everyday Chaos.

You can also buy small fabric gifts for Mom (decorative pouches, stockings, scarves, underwear * o * …) and roll them up tightly to make your own rolled rose bouquet, adding straws, wrapped wire, or takeout chopsticks for stems. (Taking a leaf from Hanky Panky, seen above.)
Now as to what to put your lovely flowers in…
And if you want to go all-out and present in a beautiful vintage-style faux blue mason jar, Bridal Buzz has the how-to for ya.

To take a break from the “must give flowers for Mother’s Day” mantra…what not think a little out of the jar box? If Mason jars are on your mind, maybe Mom would love this handcrafted terrarium that Craftzine can help you with?
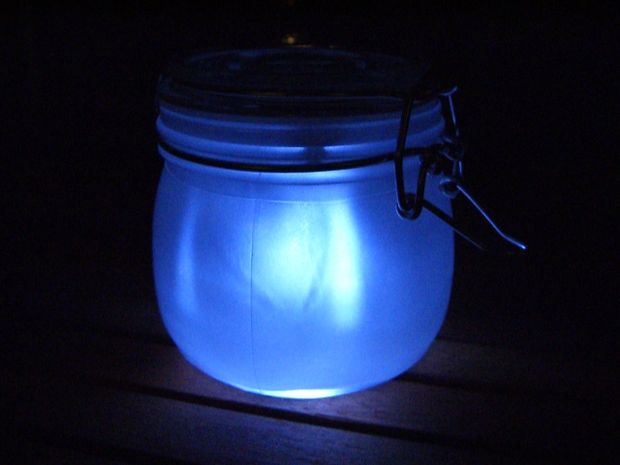
The Home-Made Sun Jar from Instructables user cre8tor is another fabulous use of the jarred variety.
You could also make Freehand Etched Glass Votives, thanks to Instructables user Robyntheslug.

Or, you could make hand-poured candles in jars, courtesy of Centsational Girl.
Bath salts…bath fizzies..bath bombs…lotions…find every single recipe you could ever want for home-made bath & body products at Craftbits.com, and present in a beautiful jar.
Or even a jar of a homemade cookie mix, granola, or hot cocoa might work well for a mother with a sweet tooth. (Guilty!) See RazzleDazzleRecipes for a ton of great cookie-mix-in-a-jar recipes.
And isn’t this ingenious? Cupcake in a Jar recipe, courtesy of MyCakies.Hope that’s planted some seeds for some great DIY ideas for Mom…and if your Mom isn’t the type to swoon over flowers or decorate with jars and knicknacks…well, there’s always a gift card to Amazon.com, right?
Have a Happy Mother’s Day!
xoxox
Carly
top image from stockphotopro.com
as posted on Threadbanger
Leave Comment
Apr 28, 2010 | DIY
 After spotting this editorial in Lucky Magazine back in winter, I decided I wanted a foldover-style boot too!
  So chic – and it visually slims up your legs, working in both casual and more edgy ensembles. But since I always make instead of buying new unless I absolutely must, I’m not going to plonk down $199 on a boot…especially when I already have a whole bunch of shorter boots that will work perfectly as the base (see below).
 Here’s how to make your own version, using an old beat-up leather jacket: (more…)
Leave Comment