May 28, 2020 | DIY

If you follow me on Instagram, you would have seen the DIY No-Sew Face Mask I posted a quick video tutorial for the other week. Even though some states are lifting stay-at-home restrictions and people are beginning to venture out again, I figure better late than never! And it’s another way to use up shirt scraps from any DIY men’s shirt makeover you do. This tutorial is super-easy and makes a double-layered mask, and although I find it difficult to breathe through for long periods of time, it’s great in a pinch. Plus – no sewing required! Just a pair of scissors…and a shirt sleeve. It should take you less than 5 minutes to make!
How to Make Your Own DIY No-Sew Face Mask from a Men’s Shirt
You Need:
scissors / top of a shirt sleeve
How To:

1. Start by cutting the shirt sleeve from the body of the shirt around the armscye.

You’ll want to cut around the armscye seam so it is a loop.

2. Cut another loop of fabric around the circumference of the top of the sleeve.

Now you have 2 fabric loops.
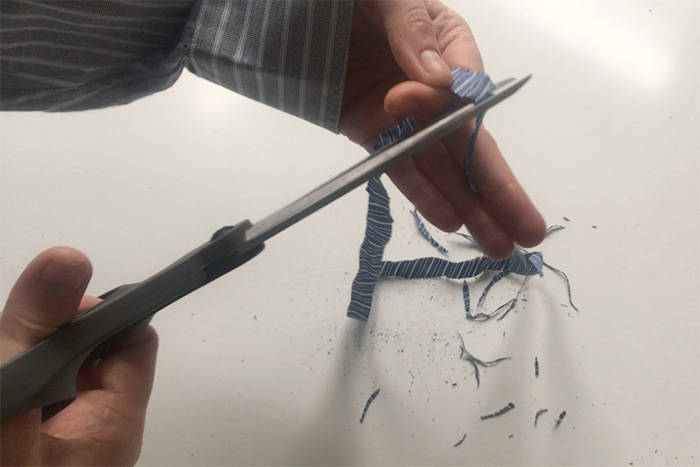
Trim any raw or ragged edges around the edges of the loops.

3. Place the sleeve on a flat surface, and your palm on top of it with fingers outstretched along the sleeve seam. Measure the distance from your outstretched thumb tip (at the top of the sleeve seam) to your outstretched pinky tip, and cut the sleeve at that point.

4. (Optional) Tuck the raw edges of this piece of fabric inside to hide them.
5. Cut the loops you made in Step 2. open.

Tie one pair of their ends together in a square knot.

6. Thread this long tie in a U-shape into the large piece of fabric cut from the sleeve in Step 3, so the bottom of the U extends below the large fabric piece.
When you go to wear the mask, place the bottom of the U at the back of your neck and the fabric piece at the front of your face. Pull on the end of each tie to tighten the mask placement on the bottom of your face. Then tie the ties in a bow over your ears and at the back (top) of your head. Scrunch the mask fabric so it sits properly on the bottom of your face and covers your nose and mouth.

And you’re done! Simple, right??
Check out my video below on Instagram and follow me there!
Also…this article here has a lot of great information about how to keep your mask clean, so definitely check it out too!
xo
Carly
Leave Comment
Apr 28, 2012 | DIY
 Japan is just awash in adorable little accessories and things that can make even the most hardened person want to let out a big ol’ squeeeeee! every so often.
I was able to go to one of my favorite craft stores the other day (Mano Creare in the Futako Tamagawa Rise Mall…which incidentally I’ve written about for Cut Out + Keep‘s Snippets Magazine before)…and couldn’t resist buying a little kit to make a mini felt cookie-shaped coin purse.

Apparently these “Macaron Coin Cases” [read: round and double-sided, like a macaron) are currently all the rage here in Japan and are flying off retail shelves by the dozens (as well as the kits to make them!) (photo collage from Google “Macaron Coin Case” search results)
It took me about 20 minutes, tops, to make.


 Now, the finished product is super, super-tiny, so it could only fit like 1 or 2 coins…so is pretty much useless as a coin purse. But it’s so adorable I couldn’t help myself!


Now I have it hanging from my bag and I just love it! (Knowing my luck, I’ll probably snag it on something and lose it next time I leave the apartment.)
P.S. Which in fact I did about 5 days after I wrote this post draft. *Le sigh.* Oh well, I can just make another one!
xoxox
Carly
~If you liked this post, add it to Pinterest!~
Leave Comment
Jan 11, 2012 | Fashion
 I’ve been hard at work over the last month or so putting together – you guessed it – a line of DIY printable patterns!
What I truly loved about designing my own line – 5 years ago now! – was thinking up ideas, but the actual manufacturing of a clothing line (in multiples) to sell in stores was where the headaches started. It was such a huge expense to do, and at the end of it when things didn’t sell, I was left with excess inventory that no one wanted. All that money, time, and skills wasted; all the fabric and notions no longer usable. This is an affliction that all clothing lines have, as long as they’re operating via the push manufacturing model; that is, they manufacture the clothing first, and then push it on the consumer after they have the stock and hope that it sells out. Retailers as big as Forever 21 and The Gap are, season after season, stuck with excess inventory and styles than don’t sell, ultimately to be sold at below cost (less than what it cost to manufacture), donated, or even destroyed (as in the case of H&M). It’s a huge waste of time, not to mention resources.
I think a different model is what many people are looking for. Patterns that you can print at home, and either make yourself or bring to a tailor, truly make the experience of creating clothing uniquely personalized to everyone. It requires a higher investment of time and effort, but in the end you are rewarded with something that you made yourself, that has created little if no fabric waste, and has no leftover unsold pieces at the end of the season. It can be something you love because of that extra investment, and you can even create it repeatedly, in numerous colors/style for yourself, with minimal cost to you each time.
Thus I decided to launch a line of printable patterns, focused on bringing current trends to all, offering up numerous Variations and Design Ideas for each piece, and making the instructions as easy to follow as possible. You don’t have to wait for these pieces to come to a store near you…they’re here now, and available at your fingertips. The only thing missing is a little dose of YOU into each project!
First up:
 The Removable Peter Pan Collar
4 Patterns Included
6 Collar Variations (with instructions for each)
Numerous Design Ideas for each Variation (embellishment, material, and construction ideas)
—->Hundreds of Possibilities!
For this particular pattern, I’ve created 6 Variations with the How-To (& photos):
 The Lace Collar
{A single layer of lace with ribbon tie}
 The Overlay Collar
{Crochet layered over a fabric backing, with woven tie}

The Embellished Collar
{Fabric collar constructed to hold the weight of embellishments, with front closure}

The Finished Fabric Collar
{Fabric collar with finished sewn edge and front closure}

The Open-Front Fabric Collar
{fabric collar with finished sewn edge and center chain closure}

The Oversized Fabric Collar
{Fabric collar with finished sewn edge, slightly larger than the other Variations, with front closure}
The sizing is one-size-fits-all [up to a 15 3/4″ circumference neck].
Right now I’m beginning the line with accessories, and hope to move on to offer graded patterns at some point in the future. Here are some features of my line of patterns that differentiate them from the other patterns out there on the market:
- Current, on-trend styles
- Meticulous instructions with accompanying photographs
- Always include a number of variation instructions for each pattern (other patterns usually only offer 1 or 2 variations per pattern)
- Accurate, vector-based patterns (nothing hand-drawn, sketchy, or lopsided)
- Affordable prices on-par with other downloadable patterns
- Licenses available for purchase so that you can use these patterns to create your own line of finished pieces and sell them (like in an Etsy store!)
This pattern (for home usage) is now available for purchase in my Etsy store for $5.00. Within 24 hours of your purchase I will email you the pattern and instructions in PDF format. I’m also available for any questions or support if you run into any issues with your purchased pattern.
Buy Now!
I’d love to know what you, my lovely readers, think! Please let me know!
xoxox
Carly
~If you liked this post, please share it!~
Leave Comment
Nov 16, 2011 | Fashion
PLEASE NOTE: This post is from November 2011, and after this post was published Colourme.com continued to do business online for a few months. On July 6, 2012 I was alerted by one of my readers that their website has been down for quite some time, and there is no information on where the company went. I have not yet been able to track down the story on Colourme.com, but it’s looking like now the company may have gone out of business. Sometimes online retailing is not a long-lived endeavor.
xo
Carly
 It’s giveaway time again! I’ve been so fortunate to receive a new sponsor for Chic Steals this month (and whose ad you can now see in the sidebar of my blog!). Colour Me is a brand-new one-stop accessories e-shop, designed to make the online shopping experience fun and simple. Their entire site is organized by color, which allows searching for the exact accessory you need fast and frustration-free. You can also search accessories by trend and be inspired by the pairings they provide.
I’ll be writing a formal introduction on them in a coming post, but for now, to celebrate the occasion, they are generously offering a fully color-coordinated “Look” to one lucky Chic Steals reader!
The look consists of a scarf, a ring, and a bangle: YOU choose ONE of 3 color combos!


Pictured above: Soiree Scarf, Taury Ring, and Zoe Leaf Cuff, ARV $40.
 How to Enter
ADDITIONAL ENTRIES:
2. Post a comment on any accessory at ColourMe.com (in the Facebook comment box at the very bottom of the item page). Leave a SEPARATE comment on this post to let me know! (1 entry)
2. Tweet anything you’d like to @ShopColourMe. Leave a SEPARATE comment on this post with the link to your Tweet. (1 entry)
Total: 3 entries per person allowed.
Edit 11/24: The Entry period is now closed and the winner will be announced shortly.
However, if you do not keep your additional entry comment separate from your required entry comment, it WILL NOT BE COUNTED.
Giveaway open to U.S. residents only (apologies to my international readers).
Giveaway period is open from now until Wednesday, Nov 23, 11:59 PM PST.
Winner chosen by Random.org and notified by email.
Good luck!
xoxox
Carly
FTC Disclosure: I was not compensated in any way for this post; I am being provided with one group of accessories for one winner; company will be shipping the prize directly to the winning entrant. For more information, see my Disclosure Policy.
~If you liked this post, please share it!~
Leave Comment
Nov 4, 2011 | Media
 I’m currently swamped with projects and midterms for my classes, so today I’ll leave you guys with this quickie blog post.
Are you watching Lifetime TV‘s new series, Project Accessory? I’m on the fence about it (although I do love accessory design!) simply because I’ve heard mixed reviews about it, and have given up on y formerly favorite show, Project Runway, after the move to this network and the meddling of Bunim/Murray with everything that made the show great. Word has it this permutation of the soon-to-be franchise is still trying to find its footing inamongst the inevitable comparisons and the producers’ fondness for manufactured drama. But here’s something neat and DIY-related! Project Runway alum Laura Bennett (Season 5) is coming out with a book called Handmade Chic: Fashionable Projects That Look High-End, Not Homespun (Jan. 2012), and is blogging for Project Accessory. Every week she’ll feature a DIY of the winning project, which is really cool! (Much better than the buy-the-winning-look possibilities that have cropped up from time to time throughout Project Runway’s run…since this democratizes fashion for everyone!).
Check out the first project and follow along with her blogging here:
Laura Bennett’s Blogs for Project Accessory
Has anyone been watching Project Accessory? What do you guys think so far…must-see TV, or only good enough to read the recaps?
xoxox
Carly
~If you liked this post, please share it!~
Save
Leave Comment


