 I’m a sucker for big, sparkly things – and those Prada rose cabochon earrings from S/S 2012 caught my eye immediately. (And if you were the same and thought of DIY’ing the trend, you’ve probably already seen tutorials by Honestly…WTF, Gloriously Chic, and P.S. I Made This.)
But for my version I wanted to make large, oversized retro-style studs, with a homemade cabochon in the center. Itching to make your own non-dangly version too? Here’s how:
You Need:

Sculpey III in Translucent and Red (for pink cabs, if you are making them yourself) / Rose Cabochon clay mold (if you are making the cabochons yourself) / rhinestone chain trim / metal disks for earring base (I’m using a large metal brad from the scrapbooking section of the craft store, with the prongs twisted off) / earring posts with pads / earring nuts (I recommend the larger ones that have the disc backs, since these studs get pretty heavy)
Tools: wire-cutting pliers / jewelry glue for metals
How To:
PART A: Make the Rose Cabochons
*if you are using store-bought cabs, skip to PART B. The great thing about this project is you can go for do-it-yourself from the beginning, or use purchased cabochons. You can get beautiful rose cabochons from the craft store in the scrapbooking section now…just look for Jolee’s Boutique dimensional stickers and there is a set that has flowers and the Eiffel tower and metal danglies and the perfect rose cabochons! You can also buy resin rose cabochons from Etsy as well. But here’s how to make them if you want complete control over the color and look to them:
 1. Preheat the oven to 275 degrees, or whatever the temperature needed for the clay you’re working with.
2. Knead the translucent Sculpey (about the size of a small bouncy ball) with the tiniest dab of red Sculpey, until well-mixed.
3. Push a small amount into your mold.
4. Place the mold onto a piece of foil and fold the foil over (to prevent fumes throughout your oven). Bake for the recommended amount (I found 5 minutes was enough for the depth of my mold).
5. Repeat to make a second cabochon.

Tools: tiny scissors (if making your own cabs) / small file or sandpaper (if making your own cabs) / Mod Podge gloss / brush
The above are the tools you need once your cabochons are baked.

6. I found the edges of my cabs had some extra clay, so they needed cleaning up. I used a small pair of scissors to snip off the extra clay, and then a needle file to file down the rough edges.
7. Brush on gloss Mod Podge to give your home-made cabochons a resin look. Allow to dry.
Now you’re ready to move on to the next phase…
PART B: Assemble the Earrings
8. You only need your earring parts, wire cutters, and glue now.

First, wrap the rhinestone chain around your earring base to figure out how much you need.
 9. Cut two pieces the same length.
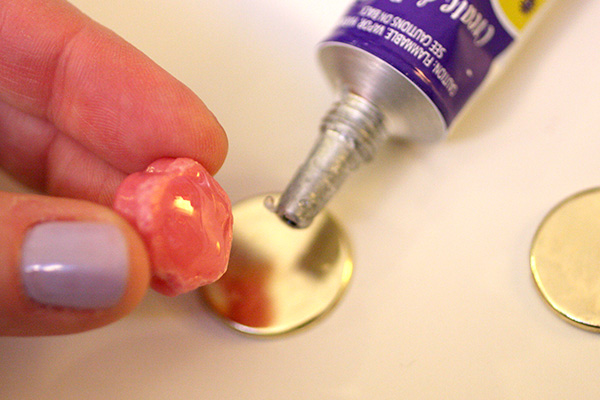 10. Place glue on the back of your cabochons, and glue each to the center of each large disk.


 11. Place glue around the cabochon and push the rhinestone chain into it.
 12. Allow to dry.
 13. Glue the post-backs onto the backs of the disks. Position the posts above the center in order to sit properly on your earlobes (dead center won’t allow the studs to sit on your lobes properly).

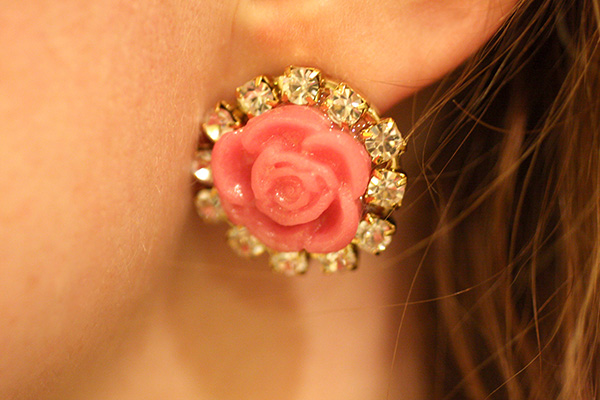
And there you go! They look so vintage and decadent…

But are actually super-affordable and made with your own two hands!

Try out different colors of clay or even add dangly rhinestones like in the tutorials from last year!
Come back tomorrow to see how I style these in an outfit!
Stay chic~
xo
Carly
Save


Wow, this looks so easy!
This may be my favorite thing you’ve made! LOVE these. Kinda makes me wish I didn’t have plugs so that I could wear earrings like that.
Awwww, thank you Janine 🙂 You could always make a version using plugs for your earring posts…which would result in something kind of unusual but really really neat!!
Love that you made the rosettes yourself… very impressive!
These are so pretty! I never thought of using mod podge on polymer clay – cheaper and easier than spraying and other methods that I’ve been using. Also, thank you for putting in the tin foil baking part about the fumes – really important info for polymer clay safety that only a few bloggers seeem to mention. I posted two photos of your finished earrings and a link back to you on truebluemeandyou.
Thanks so much for the reblog!! 😀
You are so right about poly clay baking safety…Ideally, people should be using dedicated ovens for poly clay projects, but once in awhile I think you can get away with baking it in the same oven you do for food. (This is just my naive assumption though…) I always wrap the foil pretty tightly around the project just in case, though I’m sure it’s not the most foolproof method. It’s so true that a lot of people don’t think about the fumes…which can affect your health if you’re baking lots of clay in the same oven. It’s often much more “editorial” and brief on the Internet to just say “Bake your poly clay in the oven!” in your post and be done with it, but I think that it’s important to be safe first!! I see that from your Tumblr you also mention poly clay safety too, so thanks for bringing that up!
A good solution to the fumes problem in to bake your item in a tin with the lid on. I use a cookie tin from Christmas and it works great.Comment
That’s a great idea, Rita! Then you can have a dedicated baking tin and not have to throw away tinfoil each time. Thanks for sharing!!
So pretty! I love the idea! 🙂 xx
The fashion gods smiled on me today. What an honor to be mentioned by you!! Love these <3
so cute!
Join my galaxy leggings giveaway!
http://sittingwaitingwishin.blogspot.com/
OMG this diy is so amazing
ENTER>>>Dress and make-up goodies Giveaway<<<
Adorable. Nice DIY!
Hey, I was going to get the flat earring posts instead of the brads, do you know how wide the brads were, and the rose once it was finished and out of the mold? I can’t wait to make these! Thanks!
If you can find earring posts that have a large-sized disc, then go for it! I looked and looked at the supply stores and couldn’t find any posts with a disc pad larger than 1/4″. So I had to glue on the brad disc as a base. Out of the mold the can back was about 1/2″ diameter, and I still needed some space around that for the rhinestone trim. So I believe the brad disks were about 5/8″ diameter if I remember correctly. You can of course use anything round and flat for a base: metal pendants, buttons, plastic scrap booking stickers…really anything would work as long as it’s not flimsy and can withstand the weight. Hope that helps!
It does, Thanks so much!
WAW these are beautiful! Sharing it on my pinterest! 😉
XO