Apr 9, 2015 | DIY
 Hi friends! It’s been awhile since I’ve shared a DIY here, for many reasons.
Life took over for awhile.
But I’m back – with a fun and easy DIY for you all to try out!
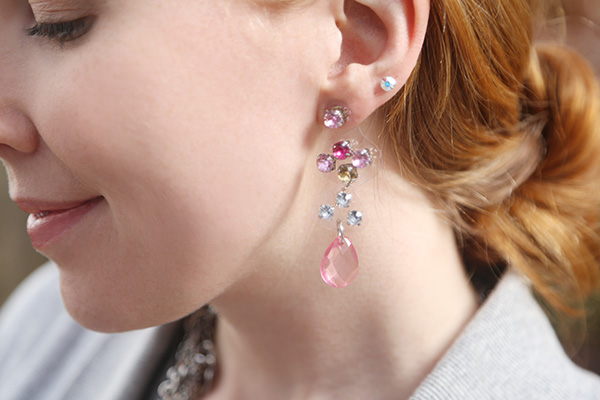
Big, bejeweled pendant chandelier earrings have been on-trend for awhile now…but unless you’re planning on whipping out that soldering torch and applying to your rhinestones…they’re a little hard to make.  Enter translucent vinyl PVC as a backing – plus some strong glue – and you don’t ever need to pick up that pesky torch. Here’s how to make your own designer-style illusion jeweled chandelier-style dangle earrings:
You Need:
PandaHall Acrylic Beads (I used the Mixed Color Transparent Acrylic Faceted Drop Pendants in light pink / PandaHall Mixed Acrylic Rhinestone Montee Beads in light pink, hot pink, and champagne / earring pads with backs / large jumprings (I actually used 2 per earring so 4 total) / transparent PVC vinyl / pliers and jumpring tool / glue for plastics and metals (I recommend Loctite but had run out when I made this project!) / awl or needle / scissors (smaller scissors are better I found, like nail scissors)
How To:  1. Lay out the beads on a flat surface to determine placement of the rhinestones.
 2. Use a generous dab of glue on the back of each rhinestone to glue it onto the transparent PVC vinyl. Space your rhinestones apart to allow for cutting them into separate pieces if you desire.
3. Once dry, use scissors to cut around the rhinestones. (I chose to cut around some clusters of rhinestones separately so I could join them with jumprings for more dangle.) Make sure to round your corners.
 4. Glue the earring pad onto the back of the earrings, and allow to dry.
5. Use an awl to pierce the vinyl for each separate rhinestone cluster that you want to connect, and at the middle of the bottommost rhinestone cluster, near the edge.
6. Connect a Drop Pendant to the bottom of the earring with a large jumpring.
7. Connect all the pieces with jumprings to complete your earrings.

And that’s it! They’re surprisingly stable and will withstand some wear (though I wouldn’t recommend running obstacle courses in them).
I also made some alternate-colored ones in the trendy asymmetrical earring style.

I love how they look disconnected – almost floating – above your shoulders – utterly utterly chic with a backswept ‘do and a pretty necklace for Spring.
 Happy DIY’ing!
xo
Carly
Save
Leave Comment
Jan 7, 2014 | DIY
 Hello again everyone! After almost a week without Internet, I finally received my new router and am connected once again. (*huge sigh of relief*)
Today I am over on We Heart This, posting this cool DIY for making your own initial stud earrings…out of alphabet pasta! Check it out below!
 xo
xo
Carly
Save
Leave Comment
Nov 19, 2013 | DIY
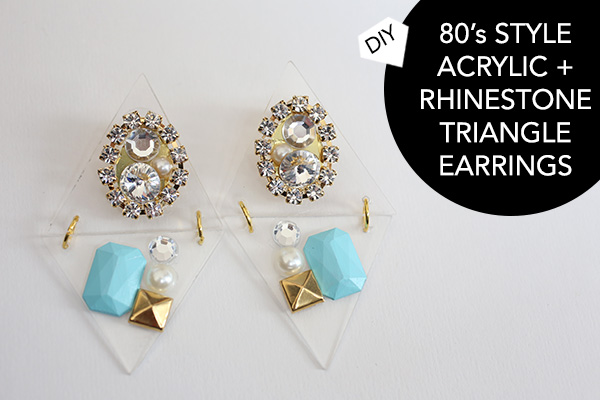 Big jewelry straight out of the 1980’s is having a HUGE moment this year. The bigger, the better – covered with plexi and acrylic, chunky bold shapes, and glittering rhinestones – anything goes right now. I saw these earrings for sale in a store during my last trip to Tokyo this Summer – and decided to DIY them with some materials I already had on hand. Clear acrylic for accessories is hard to come by – so I just repurposed an old photo-frame for my main material. Here’s how:
You Need: (more…)
Leave Comment
Jul 21, 2013 | DIY
 Back when I worked on the May campaign with Martha Stewart Jewelry, I actually made a couple of pieces while playing around with the treasure trove of supplies I was sent. (Only my DIY Enamel Spring Flower Bib Necklace made it to the blog for the campaign post.) But I also made these earrings, and though I don’t have a shot of me wearing them yet (Hub has been working odd hours ever since we got back from Japan), I still wanted to share the how-to with all of you.
I’ve always been drawn to the intricate nature of filigree pieces and love its versatility (I even used it for the backing of the bib necklace above!). It reminds me of ancient scrolling and iron work – perhaps more suited to Guinevere’s or Cleopatra’s time than the modern minimalism of today. Of course these jewelry findings are not true filigree (which is made of soldered wire that is curved and bent to form patterns), but instead is created with dies cutting the pattern into metal. Incorporating them into your jewelry will add a sophisticated touch with a vintage feel, and adding crystal components and a wash of color from the Martha Stewart Jewelry line is a great way to truly customize your pieces. And you only need to be able to link jumprings and wield a paintbrush! Here’s how: (more…)
Leave Comment
Mar 28, 2013 | DIY
 *This project was featured here in the New York Issue of Snippets Magazine on Cut Out + Keep in 2010; I’m just re-posting the tutorial on my site.
This last season of TV’s Gossip Girl has seen the two female leads wear some awfully big, flashy earrings in true 80’s throwback style. Taking a leaf from Blair’s Dynasty-inspired playbook, I’m DIY’ing another version of a pair of oversized gemstone earrings, using fabric and mesh tulle.
You Need: (more…)
Leave Comment