Jun 3, 2014 | DIY
 It seems like an age since I posted I posted about Daisy-Print Inspiration here on the blog…but yes, this print is still trending amongst street style and retailers lately. I DIY’d an oversized sweatshirt in this neat pattern, and though it may be a little out of season by now, you can always do this on a more lightweight material.
  Plus you can customize the flowers exactly how you want! Here’s how:
You Need: (more…)
Leave Comment
May 4, 2014 | DIY
 *This is a project I shared in Snippets Magazine: The New York Issue on Cut Out + Keep in 2010, and am re-posting here on my blog.

 Serena sported this beautiful vintage-style necklace in an early episode of the addictive Gossip Girl TV series. Its charm was its modern take on the beautiful art of crochet – and the delicate balance between darkness and fragility. Plus, with some appliques from the sewing store it’s a cinch to make. Here’s how:
(more…)
Leave Comment
May 19, 2013 | DIY
 Wow, that title looks weird when you write it out like that;-) But there’s really no other way to describe this!
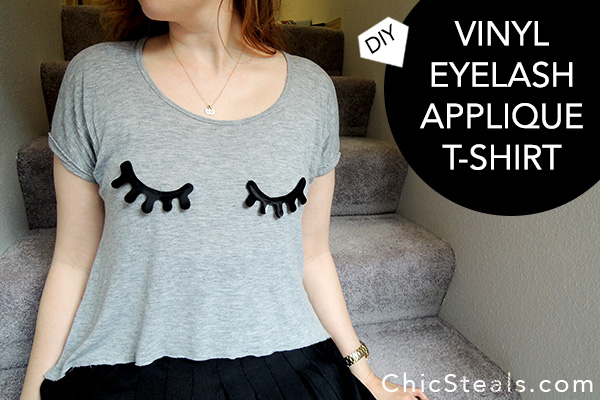
Have you noticed that over the past year or so, there have been a ton of women’s tops that highlight the boobage area? Like this one, this one, or this one, for example. Perhaps Wildfox started it off with their double ice cream tees back in 2010. (I even made a similar DIY Ice Cream Applique Tee inspired by that very trend!)
However, I wanted to make something with stark contrast, that was a little slick and a little sweet at the same time. Sleepy eyelash eye masks have always been a favorite of mine, so I decided to re-create that effect onto a T-shirt, with some shiny vinyl PVC. It’s adorbs (and yes, highlights the chest area, LOL). And if you have a sewing machine, it’s so easy. Here’s how:
You Need: (more…)
Leave Comment
Apr 11, 2012 | DIY
 I’m so glad that Spring is finally here in all its glory – and floral items are on the top of my must-wear list for the season. But I couldn’t find any chic floral prints that I liked – and that were actually affordable – and so set out to make my own. Applique is the name of the game – and is super-simple to do if you have an iron, a pair of scissors, and a little patience!
  Make your own on-trend lightweight layer for Spring by jazzing up an old piece from your closet (or thrifted – mine was $2.99 from the local Goodwill!) – and infuse your days with a little flowery fun. Here’s how…
(more…)
Leave Comment
Nov 18, 2010 | DIY
This post contains affiliate links – and I receive a small commission on sales from readers clicking through these links. My full
Disclosure Policy is here.
So to break up the monotony of my 30 days of outfits…I thought to share with all of you this cute and easy DIY.
I first saw this on Ramblings from the Sunshine State, where Wendy shared her how-to for a 6 Scoop T-Shirt for her daughter’s ice-cream-themed 6th birthday party.
I loved the idea of adding brightly-colored quilting fabric to a t-shirt!
I’m always dreaming of screenprinting designs into tees…The colors! The vibrant blacks! The limitless designs!…But face it, screenprinting ONE t-shirt (even with a Yudu) is a huge time commitment. There isn’t much point if you’re just going to make one.
Fabric paint I don’t like very much, as even the “soft” fabric paint adds stiffness to the shirt, and you can’t get very crisp lines.
The iron-on transfers they sell at the sewing store also leave a distinct and ugly “sheen” to them…it’s obvious you’ve stuck something on your shirt. No thanks.
But applique?! Never thought of that!
Now the world is my oyster…or at least, the design possibilities are limitless when you start to think of re-creating your favorite screened t-shirt design with cutouts of bright fabric and patterns. The edges to the appliques are crisp, and the applying is so easy! (Plus it’s a great way to experiment with color and pattern…and use up the scraps of fabric you may have laying around in your scrap bag.)
You Need:
a t-shirt (I originally was going to use the white one above, and changed my mind after I took the photo) / brightly-colored fabric for your design (I picked out some quilter’s fat quarters at my local Jo-Ann Fabrics, paying attention to the coordination of the patterns and prints) / black fabric for your details (mine is a woven lightweight cotton suiting)
double-sided fusible web for applique / (optional) black embroidery thread
Tools
scissors / iron & ironing board / pen / paper to make your pattern
How-To:
1. Make a pattern for your ice cream cones. I made one that I used for each scoop, one for the cherry, one for the chocolate sauce, one for the ice cream cone, and one for the smile.
2. Place your pattern on your fabric (folded over). Trace and cut 2 pieces for each part of the ice creams, and one piece for the smile.
3. Follow the instructions for fusing the pieces to the front of your shirt. (Usually sticking the applique onto the sticky front, peeling off the back, pressing to the shirt, and ironing for 15 – 30 seconds, applying pressure and making a few passes. The instructions said to stick the entire piece of fabric onto the sticky front of the web and cutting through both layers just once…I don’t think it really matters how you do it.)
4. (Optional) To make your creation more “polished,” you could go over the edges of each fabric piece in a satin stitch (closely-spaced zigzag stitch on your machine), in black embroidery thread. (I didn’t because I was feeling lazy.) This will make your tee look (from a distance) like a cartoony ice cream face, without all the hassle of the screenprinting!
But even without the outlining, it looks pretty cute as is!
Cool down on a hot summer’s day quickly in this…or just have a sweet sense of humor while relaxing at home.
Happy DIY’ing!
xo
Carly
Leave Comment


