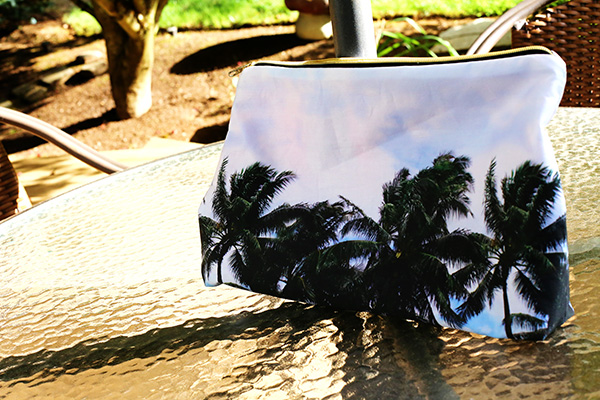
 I’ve been loving all of the pouches made by Samudra: these beautiful, printed zip-cases that work so well for your most basic essentials – or that can dress up any outfit for a night on the town. I decided to create my own version of the zippered pouch – and to give it more structure, I designed it with a flat bottom (similar to the Samudra style). And to go the extra mile, I also designed my own photo-print fabric from a photo of palm trees that I took on a long-ago trip to Guam, and then edited to make perfectly seamless and repeating. (You can purchase this exact same fabric here – and it was just featured on Spoonflower’s Latest Favorites list on Friday!) Ready for the tutorial? Let’s go!
You Need:
 printed cotton twill or sateen fabric / solid cotton twill, linen, or satin fabric / fusible for wovens (medium-weight) / 14″ zipper (with metal pull) / ruler / marking chalk / iron & ironing board / fabric scissors / sewing machine / needle for fabrics you chose / pins / matching thread / zipper foot
How To:
 1. Measure out a 14″ wide by 9″ high rectangle on the underside of your printed fabric (choosing part of the print that you want to be the front of the bag). Extend the bottom line 1.25″ to either side. Connect the top corners of the rectangle with the extended side, creating a trapezoid shape. Extend each side of the original rectangle 1.25″ down from where the original bottom corners were. Connect the new bottom corners together in a straight line.
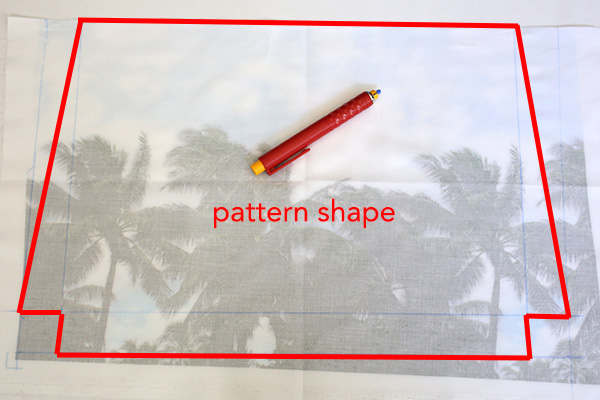 This will be the finished shape of the bag.
 2. Add 3/8″ around the entire shape for seam allowance, and then cut out. This will be your bag pattern.
 3. Trace around the pattern onto the other printed fabric, again choosing the best part of the pattern you want (ideally, it would be the same as the other piece you cut). Trace around the pattern onto the solid fabric to create 2 pieces.
 4. Use the iron to adhere the fusible to the wrong side of the printed fabric. Trim away any excess fusible around the edge of the fabric.
 6. To sew the bag pieces to the zipper, first turn the zipper upside-down so the underside faces you. Make a sandwich with one lining piece and one outer piece and the zipper: the outer piece is on the bottom, right side up. The zipper is on top of that. And on the very top is the lining piece, wrong side up. Align the top edges of the fabric pieces with the top edge of the zipper, and pin.
 7. Stitch along the pinned line, close to the zipper, with a zipper foot.
 8. Fold the sewn fabrics away from the zipper, and repeat steps 6 and 7 for the other lining and outer fabric pieces. (You can see how the fabric sandwiches stack up in the above photo.)
 9. Once everything is sewn to the zipper, place the lining pieces together (right sides together) and the outer pieces together (right rides together), and pin around the edges. (Move the zipper pull between the bag pieces before sewing!)
10. Sew around the edges with a 3/8″ seam allowance, sewing straight through the zipper in the center. Do not sew the corners. Leave about a 3″ space unsewn in the bottom of the lining.
11. Flatten each corner, matching the seams in the center, and pin.
12. Stitch across the flat corners with a 3/8″ seam allowance.
13. Turn the lining right-side-out by stuffing the whole bag through the unsewn space in the lining. 14. Turn the outer right-side out through the unzipped zipper.
15. Hand-sew the open space in the bottom of the bag closed with a needle.


And that’s it! Though the zipper part looks tricky, once you’ve mastered this bag-making technique you’ll be whipping these bags out in no time! Play around with fabrics and patterns to create your own perfect pouch:-)
 Happy DIY’ing!
xo
Carly
P.S. On another note, for the last week you may have noticed a slowdown in posts. I’m currently dealing with a major backend problem that is slowing down my site and interfering with backing it up, as well as creating massive database tables. As a result my site may have been unavailable, unaccessible, or may have just plain looked weird. I spent most of last week posting on various forums trying to get to the root of the issue and how to fix it, but I’m still trying to figure out. Thanks for your continued patience!


Just saw this on CraftGawker.. Love it. Looks awesome and great tutorial
Thank you so much, Marni! I appreciate it! I just love zippered pouches for everything – and this flat-bottomed style helps my pouches keep their shape. 🙂
Absolutely fabulous. I love Samudra and your DIY.
Thanks so much Samantha! I love Samudra too 🙂
I really like your palm tree pouches and I wasnt sure if your selling them. I actually have a store in Hawaii and if you sell these beautiful pouches I would love to buy from you. LMK. thanks
Hi Mireille, you are so kind! No, I’m actually not selling them because I don’t have the capabilities to manufacture them one by one. I had tried in the past to have a fashion and accessories line where I either made all the items I sold myself, or paid a local manufacturer (when I lived in Honolulu – they were based off of Iwilei Rd, actually). I found that I either spent all my time making everything by myself, or used up all my money to manufacture in bulk, and then try to sell items that were already made. It was very difficult and the profit margins were eaten away by the realities of being a small-scale business. I think if you are looking for something similar for your store then Samudra http://samudra11.com/ would probably be the way to go: they have a proven brand and are a strong seller online and in a few retailers with their many tropical designs. I do believe they’re actually based in Hawaii too. Hope that helps!! 🙂
sooo sooo cute!
Thank you, Priyanjana!
HOW DID YOU print the picture on the fabric ?
thanks
jeanne
Hi Jeanne – if you click the link it will take you to Spoonflower, which is a fabric print-on-demand service. You upload your photo or artwork into their interface, apply a tiling pattern that you like, and then order a test swatch to make sure the placement and color is correct. Then you can post the fabric for sale in your shop which is what I did. I wish I had a fabric printer at home, but those things are huge! And expensive! You can also print on inkjet fabric sheets (like there: http://www.amazon.com/Jacquard-Fabric-Cotton-Sheets-Pack/dp/B002201YEC/ref=sr_1_1?ie=UTF8&qid=1396980631&sr=8-1&keywords=inkjet+fabric+sheets) if you have an inkjet printer at home but the fabric is quite stiff and cannot be used by itself to make something wearable. For a pouch or purse I think it would be okay though, if you didn’t want to print your fabric through Spoonflower. Hope that helps!! 🙂
Hi! Love this pouch! What kind of zipper did you use? You mentioned a metal pull, but I can’t tell if the zipper is a gold color or actually brass. Also, wondering what weight of Spoonflower fabric did you use? You used interfacing and was wondering if a heavy Spoonflower fabric might work as well?
Thanks so much!
Jana
Hi Jana- Thanks so much for your kind words! I used a junky zipper from the 100-yen store in Japan…the zipper color is gold but it was not made of true brass like a YKK zipper would be. For the Spoonflower fabric I ordered the organic cotton sateen because I liked the polished, soft feel to it and the vibrancy of the print on this particular fabric. (The fabric feels like brushed cotton and feels very “high-end.”) But it has a very soft and light hand, so I wanted to add some stability with the interfacing. I had tried with the cotton twill but I just didn’t like how the twill weave interfered with the image, you know? I felt it was distracting. It’s really up to you what you want to go with, but you could also go with the Eco Canvas or the Faux Suede if you’re looking for a heavier fabric. Hope that helps! Good luck with the project and please share if you made something 🙂
Love this thank you so much for sharing! What brand/style of sewing machine do you use for this? I wanted to start sewing I have a ton of Christmas gifts I want to start making these pouches for but not sure which is the best sewing machine to use
Hi love this thank you for sharing. But I’m having trouble with the spoon flower website. What size fabric did you order the picture on and did you use any of the repeats or just centered it? Can you give a list of the dimensions you used. Thanks