Jun 27, 2010 | DIY

As you may recall from a previous project I posted, we still have the rest of the thrifted leather jacket leftover to something fantastic with! So with my Hubby’s birthday quickly approaching, I decided to make him a homemade sleeve for his laptop computer. Sure you can buy one from the store – and I did scrounge up a tutorial for using some neoprene from an old wetsuit [and here, too!] (like I have many of those laying around!)…but I wanted to try a different material. Leather is cushioning and sleek – but if you prefer manmade leather or vinyl (or even fabric, corderuoy, or denim!) this project will work just as well. I was inspired by those wraparound manila envelopes – but you can always use a strip of material and velcro as a closure, or fashion a long strip with a parachute buckle around the entire laptop, or extend one side of the outer material and use it as a closure flap, or even add a couple inches to each end and use a zipper as closure, turning this sleeve into a simple zippered bag. The possibilities are endless!
You Need:
*leather jacket with lining (or leather/other material + lining fabric, if you are not repurposing a jacket)
*quilt batting (I used Low-Loft crib-sized batting, and had quite a bit left over)
*1 button
*black elastic cord
and…
*marking chalk
*leather shears
*fabric scissors
*matching All Purpose thread
*sewing machine needle for leather
*sewing machine needle for wovens
*hand-sewing needle (not needed if your button is not shanked)
*leather/vinyl glue
*tape
Optional
*matching upholstery thread
*walking foot or Teflon foot for sewing machine
*clothespins or binder clips
How To:
Prep Your Parts
1. Place laptop on your sleeve material, right side up, front edge facing away from you. Trace around laptop on all sides, adding 1″.
2. Lift and rotate laptop up on its back edge towards you, then wrong side up on top of the material. (Front edge will be facing towards you.) Keep drawing 1″ around all edges. (I know this sounds somewhat confusing, so I included the diagram above to show how the material was measured.)
3. Cut the rectangle out of the material (cutting through both outer and lining if you are using a jacket), using leather shears. If you do not have a lining, place this rectangle on top of your lining material, trace around, and cut using fabric scissors.
4. Cut a small piece of leather about 1″ square.
5. Unroll batting from package, and leave it doubled up as you flatten it out. Place rectangle of material on top of the batting. Cut a piece of batting the same size as the lining, then trim batting about 1/2″ on the sides only.
Time to Sew!
6. Fold material rectangle in half, and machine-stitch the edges together, using a needle for leather and upholstery thread. (Upholstery thread is not a must-have…but it is a lot stronger that regular cotton/poly mercenized, and is more suited to sewing leather and taking the stress of repeat usage. Also, f you have a walking foot or Teflon foot for your machine, it can help the leather from sticking.)
Clip corners and turn right side out.
7. Fold lining rectangle in half, and machine-stitch the edges together, using a needle for wovens and regular thread. This will make the lining into a “pouch.” Do not turn right side out; the right side needs to remain on the inside.
8. Wrap batting around the outside of the lining pouch. Fold upper edges of lining pouch down and overlap batting piece at top edges. (Trim batting top edges if they are too bulky or long.)
Machine-stitch the lining edges down over the batting, at about a 3/8″ hem.
Closing It Up
9. Sew button to the material pouch you made in Step 6), about 2″ down from the top edge on the front of the pouch.
10. Slide the lining into the material pouch, and slip the laptop inside to check for sizing. On the back side of the material pouch, tape one end of the elastic cord to the center, about 2″ down from the top edge.
11. Wrap elastic cord around button, and bring the other end to the back, cutting it and gluing it down next to the other end. Make sure the cord is taut around the button and will keep the laptop from falling out.
12. Trim the cord to meet the taped-down end.
13. Re-tape cords down with the ends free. Place a dab of glue under the ends and press them into it.
13. Remove tape and glue the small square over the ends of the cords.
14. Remove laptop and lining from the material pouch, and machine-sew the square over the elastic cord ends, first sewing a square around the edge, then an “X” shape in the center.
Finishing
14. Spread glue on the inside of the outer pouch, close to the top edge. Turn down top edge about 3/8″; clamp until dry.
15. Slip the lining back inside the outer pouch, pushing the corners all the way in.
Stitch around upper edge of laptop sleeve to secure the lining to the outer material, using a needle for leather and upholstery thread.
Et voila!
Finally, a homemade FUNCTIONAL accessory that my husband will actually use! (And it’s unisex, so can be a great gift for a man or woman!)
Happy DIY’ing and Happy Birthday, Hub!
xoxox
Carly
This is my last post for Threadbanger – wish I could do more! Hasta la vista, TB!
Save
Leave Comment
Jun 3, 2010 | DIY
Pillowcases come in a variety of prints that work just as well for pieces clothing. Plus, they have just enough fabric (and are roughly the same shape) as a cute little A-line mini-skirt – and can be transformed easily, with just a couple seams. (You can of course also transform them into dresses and skirts for small children.) And now there’s no need to worry when you have a lone pillowcase and can’t find its mate.
Take Exhibit A, a dot-printed piece that I pulled out of my 48-lb. haul of clothing I sourced at my local Goodwill Outlet. I was drawn to it because of the fabulous print – and I could only find one of them, so I had no intention of using it as a pillowcase…thus I thought it would work great as a skirt! The whole process took me maybe 30 minutes – a quick-sew project to be sure!
How to Make an Elastic-Banded Mini-Skirt from a Pillowcase
You Need:
*a standard-size (or larger!) pillowcase
*2″ wide piece of black elastic
*tape measure
*marking chalk
*pins
*fabric scissors
*thread and machine needle for wovens
*iron & ironing board
How To:
1. Turn pillowcase inside out and cut off all the sewn seams, leaving two large rectangles.
2. Turn rectangles sideways and fold in half. Cut edge on a slight A-line angle to the top. (I know in the photo above the fabric isn’t folded in half – but you should probably do that to ensure the right and left sides of each piece are at exactly the same angle.)
3. Unfold your pieces. Measure 1/2″ in from the angled edges of one of the pieces, and cut. This piece will become the back of the skirt.
4. Pin back to front of the skirt at the angled sides, and sew together.
5. Wrap piece of elastic at your natural waist (or where you want to wear the skirt). Make sure it is taut on your waist – not so tight you can’t breathe – but fairly tight. Overlap ends by 1/2″ and cut.
6. Sew piece of elastic in a circle on your machine with a 1/2″ seam allowance. (I used a straight stitch, then flattened each end and zigzagged over it to further secure it.)
 7. Place elastic band over pillowcase top, overlapping about 1/2″. Match pillowcase skirt center front to center of elastic band, and skirt center back to the seam you sewed in Step 6). Pin the two sides as well.
8. Sew pillowcase to elastic band using a stretch stitch on your machine, with the elastic on the top and the fabric below being thread through by the machine’s feed dogs. Stretch the elastic between the pins so the pillowcase “gathers” naturally to the elastic.
 9. Try on the skirt, mark where you want your hem to fall, and turn the hem (about 1″). Sew a 3/4″ hem on the bottom.
10. Iron to set the hem and remove any creases.
 And that’s it! And the great thing is, the waist is elastic, so you can wear it belted higher up with a wide belt…or wear it lower near your hips for a different look. Hope you have as much fun making yours as I did mine!
 Happy DIY’ing!
xoxo
Carly
~If you liked this post, please share it!~
Save
Leave Comment
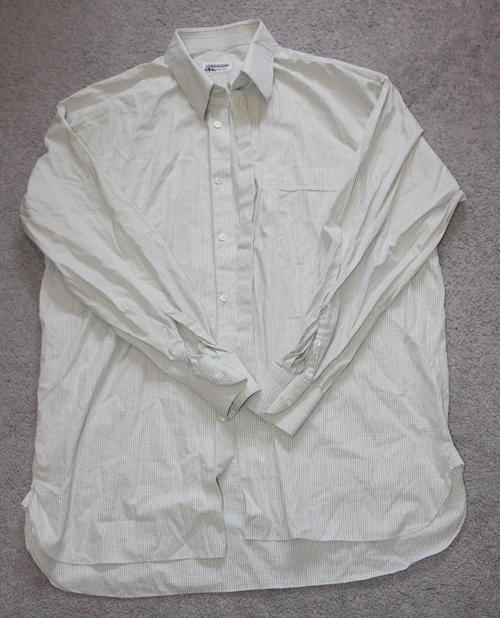
Apr 20, 2010 | DIY
Get This Tutorial As a PDF
This tutorial has been updated, and is now available as a full step-by-step with photos in my new book 7 DIY Men’s Shirt Makeovers, part of the DIY Men’s Shirt Makeovers System.

Tomorrow being
Administrative Professionals’ Day I wanted to create something that’s fashionable yet doesn’t scream “look at me!” (and is totally appropos for the office!).

With Earth Day just around the corner as well, what could be more eco than upcycling? Steal a button-down from your guy’s closet and give it a feminine makeover…that will make it a mainstay in yours.
You Need:
 1 man’s button-down shirt (sized larger than you are; doesn’t matter what size) / thread matching topstitching in shirt
Tools:
fabric scissors / seam ripper / pins / marking chalk / sewing machine / needle for wovens / iron and ironing board / hand-sewing needle (optional)
How To:
Prep Time:
1. Put shirt on. Button 3rd and fourth buttons on shirt. Place one hand underneath your armpit; mark where armscye depth should be on the front of your shirt, as close to the side seam as possible. (I used a pin.) Take off the shirt and also mark the armscye depth for the other arm.
2. Lay your shirt on a flat surface and cut off the sleeves. Cut off the cuffs and discard; slit the sleeves down their side seams (as close to the seams as possible without going through any lapped seam detail). Remove the pocket with a seam ripper and discard.
3. Cut off the center button placard and buttonhole placard, below the fourth button, leaving enough allowance at the sides of each placard to fold under about 1/4″. (If your placard is finished and bound, you won’t need the folding allowance, but mine wasn’t, so I have the extra step of finishing it below.) Cut the collar from the front of the shirt (as close to the collar band as possible without going through it), and cut about 1″ along the bottom line of collar band into the back of the shirt. (You won’t remove the collar entirely from the back of the shirt; you’ll just be freeing it from the front of the shirt. We want that sucker still attached at the back!!)
4. Turn shirt inside out and button remaining buttons on the shirt.
Sew Front Center Seam
5. Sew front together, down buttoned placard that’s still attached to the shirt, so you only have a single center front seam.
6. Trim seam and buttoned placard off on the inside.
Adjust Fit
7. Take shirt off and lay it flat. Pin down sides, straight down from the pins you added at the armscye depth.
8. Turn shirt right-side-out and try it on. Adjust pins as necessary for a more tapered fit at the waist, and a freer fit at the hip. Make sure the armscye depth is still correct, and that you can get the shirt over your head.
9. Take shirt off, turn inside out, and trace a “best-fit” line between your pins at the sides. Remove pins. Add 1″ to the outside of the lines, and retrace the shape of the sides.
10. Cut shirt front from shirt back at the sides, cutting along the outside lines you drew in the previous step.
11. Trace shirt front onto shirt back.Draw lines on back about 3/8″ to the inside of the lines you just draw. Cut shirt back on these lines.
12. Pin shirt front to shirt back. (Your shirt front should now be about 3/4″ larger than the back.)
Sew the Sides
13. Sew shirt sides together.
14. Iron shirt and sleeves flat, paying special attention to the button placard still attached to the collar.
If your button placard is not finished on one side, now is the time to fold the unfinished side under, and topstitch so that both sides are finished.
Make the Ruffles
15. Lay your sleeves flat and cut two pieces from the sleeves, next to the angled sleeve seams. (These pieces will be your Angled Ruffles.) Cut on the grain, cutting a piece about 1.5″ wide at its smaller end and 5.5″ wide at the widest end. Trim any raw edges near the bound edge off.
16. Cut 2 long rectangles from each sleeve about 3″ wide by the length of your sleeve. Square off the ends. These pieces will be your Long Ruffles.
17. Sew 2 long rectangles together, short end to short end. Repeat for the other 2 pieces.
18. Fold over the long edge of one of the pieces from the previous step about 1/4″; sew a scant 1/16″ from the edge. Trim the raw edge next to your line of stitching. Fold over the stitched edges about 1/4″ again; topstitch close to the edge to create a bound seam. Do the same for the other connected long rectangle piece.
19. Using either a hand-sewing needle or a long basting stitch on your machine (or a gathering foot if you have it!), stitch long, basting stitches along the long raw edge of each long rectangle, and along the unbound raw edges of the angled ruffles. Pull the thread to gather the pieces into ruffles.
Finish the Collar
20. Pin one long ruffled rectangle under the button placket of your collar piece, matching the length by pulling on the basting thread. Pin the angled ruffled piece underneath the long ruffled piece – the piece will only go down about 3/4 of the way of the placket. Fold the bottom of the placket under the long rectangle ruffle end about 1/4″.21. Topstitch the edge of the placket, through all layers to secure. (I chose to connect the top of the rectangle ruffle under my collar band piece, but leave the top of the angled ruffle free, like “wings.”)
21. Repeat for the other side and the buttonhole placket.
23. We need to re-connect the collar to the shirt now – so start with the button placket side, and pin down overlapping the open hole in the front of the shirt. (Make sure the buttons are centered over the center front seam!) Pin the placket to the shirt, going straight upwards all the way to the collar area.
Pin the collar to the back of the shirt, overlapping the back of the shirt as much as you can by angling the collar downward. Between the top of the placket and the shoulder seam of the shirt, you’re going to have excess fabric, so gather it and pin the collar over it.24. Topstitch the button placket to the shirt. (I had to zigzag over the collar band connection at the back of the shirt – there was a small gap that no amount of angling that collar piece was going to fix.)
25. Place buttonhole placket end over end of button placket, and do up the bottom button.
Topstitch end down, through all layers, and reinforce stitching.
26. Un-button bottom button, and pin buttonhole placket to front of shirt in the same manner as you did the button placket. Topstitch through all layers.
Finish the Armscyes
27. Try on the shirt and draw the shape of the shoulder how you want it.
28. Take off the shirt, and cut the armscye shape about 1/2″ on the outside of your markings. Trace the shape onto the other shoulder, and cut it out too.
29. Turn under 1/2″ of an inch, and stitch about 3/8″ from the edge to finish, notching as you go. (If you want a more finished look, cut the armscye 3/4″ outside of your markings, turn once and topstitch; turn again and topstitch to create a bound seam. I find this very difficult along a curve, as often the armscye becomes tighter and smaller the more times you turn the edge, and notching the inside on such a small seam allowance is quite difficult. If anyone has any tips, I’d love to hear them!)
Hem and You’re Done!
30. Try on the shirt and mark where you want the hem to be.
Cut about 1/2″ below this line, fold under, and stitch at a 3/8″ hem on your machine.
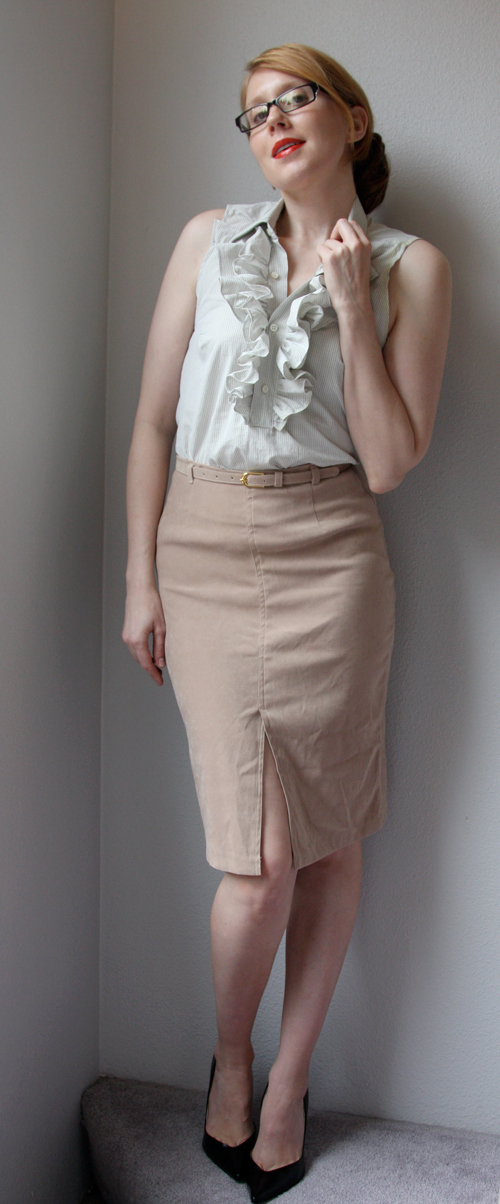
Voila! A super-ruffly, super-feminine piece for the office.
 (As you can see, I also added 2 bust darts to make the feminine fit even better; you might need to do the same depending on the size of your bust and how you “fill out” the bust area of the top. I do also need to press the armscye seams and remove the yellow chalk lines…I was just so excited to be done and couldn’t wait to take the photo…;-)
Thank goodness there’s someone around to redo all these stuffy men’s shirts and breathe some girly life into them!
 Happy DIY’ing!
xo
Carly
as posted on Threadbanger.com in 2010 (no longer hosted there since they changed networks)
Get This Tutorial As a PDF
This tutorial has been updated, and is now available as a full step-by-step with photos in my new book 7 DIY Men’s Shirt Makeovers, part of the DIY Men’s Shirt Makeovers System.
Leave Comment
Mar 31, 2010 | DIY
The temperature’s rising, but maybe you’ve tired of the ol’ tanktop-and-jeans ensemble. Maybe you want a go-to summer dress but still want it to be comfortable for when it gets really hot. Revamp a tanktop with the addition of an old men’s tee,** and live in soft-washed cotton comfort all summer.
**I’ve adapted this recon from the book Kakkoii Kuchuuru Rimeiku [“Cool Couture Remake”], by Hiroko Yamase [Bunka Publishing, 2009]. The book is in Japanese, and I’ve converted the sizing to Western sizing, and changed the methodology here and there. Hope you like it!
You Need:


*1 tanktop that fits you well
*1 men’s t-shirt (preferably XL)
*thread matching t-shirt
*fabric scissors
and…
*marking chalk
*pins
*measuring tape

Optional:
*velvet or satin ribbon (1″ – 1.5″ wide)
*pronged studs, sew-on jewels, hotfix nailheads, or fancy trim
How To:
Prep Time
1. Wash and dry both your tanktop and t-shirt if they haven’t been washed before. Turn the t-shirt inside out and cut off the label at the back of the neck. (not pictured) Cut off the shoulder seams all the way to the sleeve seams.

Start Sewing

2. Sew the ends of the t-shirt’s sleeves closed, just inside the sleeve cuffs. These will become pockets.
3. Fold down about 1/2″ along the slit shoulders (the raw edges) of the t-shirt, all the way around, front to back, neck ribbing to neck ribbing. Stitch down, creating a 3/8″ hem.
4. Turn the t-shirt right side out, tucking the sewn sleeves inside. Fold in half and mark the center front and center back at the neck ribbing. Do the same with the tanktop.
5. Measure 4″ straight down from the mark you made on both the front and the back of your tanktop. Make another mark at each point.
6. Place the tanktop inside the t-shirt. Line up the center front of your t-shirt on top of the mark you made on the center front of the tanktop. Pin in place.
7. Pin the neck ribbing of the t-shirt to the front of the tanktop, following the natural curve of the t-shirt’s neck. (I folded the edges of the t-shirt under about 1/2″ again, since I liked the way that looked.)
8. Repeat Step 6) and Step 7) to pin the back of the t-shirt onto the back of the tanktop.
9. Stitch the t-shirt to the tanktop, following the lines of the neck-ribbing of the t-shirt. Sew TWO lines of stitching to secure: one line at the very top of the neck-ribbing, and one line at the point where the ribbing connects to the t-shirt. Do for both front and back of your piece.
Embellish It! (Optional)
9. Use a piece of ribbon as a tie for the waist, stitching at the back to secure. (not pictured)
10. Add studs, hotfix embellishments, sew-on jewels, or fancy trim to the the tanktop neck, the t-shirt ribbing, or the hem of the garment to doll your piece up.
You’re finished!
Without the belt, hands in pockets.
Belted with a velvet ribbon.

Tip: If you feel the weight of the t-shirt distorts the tank too much, sewing the sides of the tee to the tank will help eliminate the “pulling.”
Wear with some espadrille wedges and a cool pair of shades for a chic casual look as the mercury rises.
I’d love to hear your feedback everyone!
xoxox
Carly
for Threadbanger Blog Projects
Save
Leave Comment
Jan 24, 2010 | DIY
 Blame it on Rachel Zoe and that fabulous vintage fox fur hip-length vest. The F/W 2010 runways followed suit, and fur – both real & faux – abounded. Designers such as Barbara Bui, Antonio Berardi, and Christian Dior made faux fur a must-have, while the release of Spike Jonze’s “Where the Wild Things Are” in October 2009 put all things furry front & center. But why buy when you can easily DIY? This stole is a quick and easy project – very Marilyn Monroe-fabulous, and totally guilt-free. Here’s how:
You Need:
*a piece of faux fur, at least 45″ wide by 12″ tall (this Tissavel faux fur is high quality, has a plush feel and super-luxurious hand)
*piece of satin or poly acetate for the lining, same size
*matching thread
*large sew-on snap set
*brooch (optional)
*24″ of satin ribbon cut into two 12″ pieces for a ribbon-tie (optional)
TOOLS:
*box cutter or razor blade
*scissors
*pins
*sewing machine
*needle for wovens
*skewer or knitting needle
*hand-sewing needle
CUT OUT THE FABRIC PIECES: 1.Cut the faux fur. First, though, a tip about cutting any kind of fur, both real & fake: never ever use scissors, or cut from the front (fur) side. Why not? Because you’ll chop right through the fur itself, giving it a weird-looking “haircut” that will make your finished piece look anything but. (Nobody, not even a fur stole, wants to wear a fur mullet. 😉 To cut like a pro, turn the fur over so the underside is facing upward; this is also the time to make sure the nap is laying down (ie. all the fur hairs are pointing down toward the bottom of your stole). Then use the box cutter or razor blade to delicately cut out a rectangle that is at least 12″ wide and 45″ long. By making it 10-15″ longer, you can wrap your stole scrunchie-style around your neck, belt it, or even rock it halter-style vest, cinched together with a fabulous statement belt.
2. Use the box cutter or razor to round off the corners.
3. Cut the lining: The cut-fur piece will act as your template when you cut out the satin lining. First place the cut-fur piece onto the satin, fur side down against the back side of the satin. Then carefully cut out the satin lining, taking care to not accidentally trim off any of the fur.
 SEW IT TOGETHER:
4. Place fur and lining right-sides together (ie. fur side next to the shiny side of the satin), and match up the corners. Pin together. Tip: Satin is slippery when you sew it, so be sure to pin in more places than you think you will need…you can’t overpin!
Optional: Add a ribbon-tie using a 12″ piece of ribbon attached to each side of the faux fur, the end of each ribbon piece sandwiched between the lining and the fur. (The long end of the ribbon needs to sit inside the pinned stole pieces.) Pin the ends of the ribbon down to the edges.
5. Sew the fur to the lining, Starting about 3/8″ to 1/2″ in from the edge (your seam allowance), sew the fur to the lining – but not all the way around. Along the bottom, leave about 6″ unsewn.
6. Around the sewn edge, trim away the excess fur.
7. To turn the piece right side out, pull it through the 6″ gap you left unsewn (in Step 5). Optional: If you added a ribbon tie (Step 4), the ribbons will now be on the outside of your stole and serve as closure ties.
8. Finish the remaining 6″ unsewn edge by gently tucking the excess 3/8″-1/2″ faux fur and the lining fabric into the hole. Close the hole by topstitching as close to the finished edge as you can.
ADD CLOSURE & FINISH:
9. Use a skewer, pencil, or knitting needle to pick the fur hairs out of the edge seams.
10. Try on the stole and decide where you want to place the closure. Mark it with a pin.
11. Hand-sew a large snap onto your piece. (If you made a ribbon-tie, this won’t be necessary.)
Optional: Decorate the front with a large, eye-catching brooch.
You’re done!
For a “I’m headed to the opera” look, wear your stole draped glamorously around your shoulders; to look more Russian-Anastasia, scrunch up closer to your neck. Mix it up with other faux furs in gray, leopard, or even multicolored – PreFurs.com sells high quality faux fur yardage, while Cornelia James and Charly Calder both sell chic finished items – and enjoy a fashionable walk on the wild side.
And yes, you look bananas in it!
Happy DIY’ing!
-Carly J. Cais, Contributing Editor
(as contributed to FashionTribes.com)
A note about this piece: I actually started out doing a DIY for a faux-fur vest, and then discovered a tute at P.S. I Made This – which I thought was so fantastic I lost the will to do mine. So if you want to do a vest – try those instructions out – can’t go wrong with just cutting and wearing!:-)
Have fun any way you try your flirt with the faux!
Leave Comment


