Mar 29, 2016 | DIY
I’m big on squeezing every.last.drop of usefulness out of a manicure. If I’ve gone to the trouble of painting my nails (and it’s not gel)…I want them to last as long as humanly possible. Some bottles of nail polish say that to keep your mani fresh you need to paint another coat on your nails every 2 days. But seriously…who’s got time for that?? (Plus, if you’re sealing your manicure with a topcoat once done…wouldn’t you have to paint…and then seal…again?) I want minimal time, minimal fuss, and minimal damage to my nails.

This is where I’m at after about 10 days of wear using a base coat, regular nail polish, and topcoat. It’s almost time to retire it…or is it??
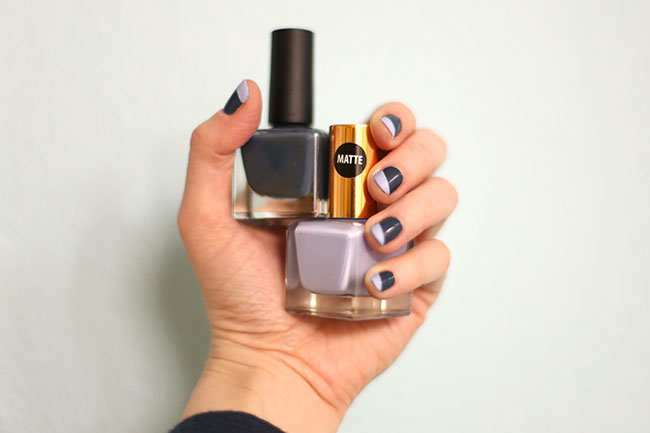
In the past, I’ve shared a Glitter Tip Refresh and a Sharpie Tip Refresh. How about another nail polish refresh…but this time playing with a matte version for contrast? 
I’m using: Urban Outfitters UO Classics Midnight Rider Nail Polish with Urban Outfitters UO Matte Violet Nail Polish on the tips for the refresh (aff. links)

The tutorial is pretty self-explanatory: use tape to cordon off a cool diagonal stripe that makes the nail art cool city girl chic.

Peel tape off while tip color is still wet.

If you do the proper thing and add a layer of topcoat you’ll lose the pretty matte textural contrast…but your tip refresh will last longer. Matte polish chips a lot faster than regular, so you may only get a few more days out of this mani…but it’s good enough for me!

What do you guys think? Something you might try to keep that manicure going a little longer?
xo
Carly
Leave Comment
Jul 27, 2014 | DIY
 Hello friends! Here’s an ombre nail art idea for you today to try out the next time you’re painting your nails.
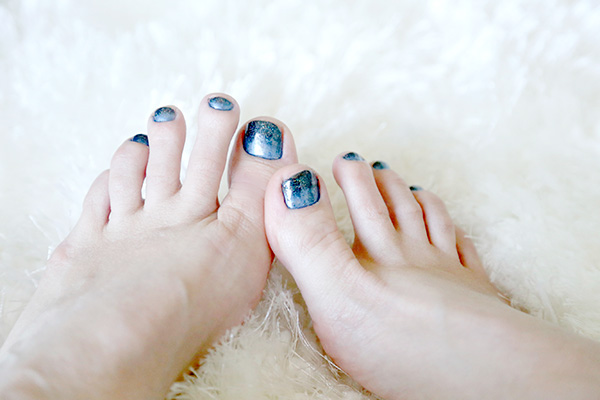 I was wanting to update my pedi with something reminiscent of warm, starry night skies – which are so much more gorgeous in Summer. While everyone else is doing pastels or neons this season, I went dark and spangled, just like late July evenings with the sky dotted with fireflies and stars.
 After prepping my feet according to this DIY Pedicure Guide (and using my favorite Spongeables Ped-Scrub Foot Buffer to scrub away any rough patches), I painted a clear base coat, and then:
- Painted one coat of a dark cobalt blue that had a small amount of micro glitter in it, and let dry. (The polish I used I bought like 10+ years ago, so if you’re looking for something similar now, this one is a close match.)
- Then I painted half of my nails close to the cuticle with the blue
- While the polish was still wet, I painted the ends with Estelle (black multi-glitter), mixing the polish where it met the blue. I let dry.
- Finally I applied another coat of Estelle at the tips to darken into black. One topcoat to smooth the surface and it was all done!

 I love the dark and mysterious look to this pedi, and how it sparkles in the sunlight (and against my favorite silver sandals).
What other colors do you think it would be fun to mix into an ombre mani? 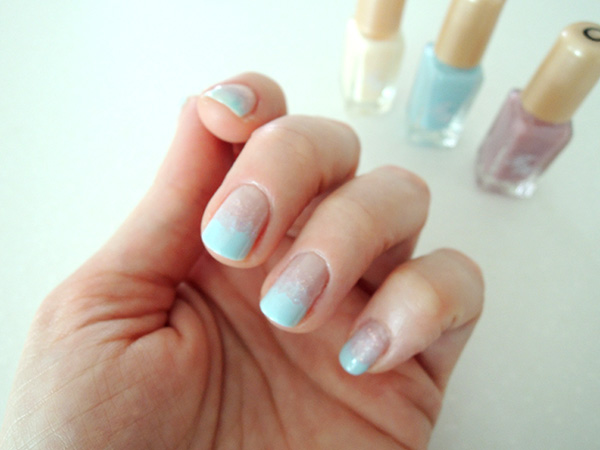 (I tried sorbet blue and lavender in this DIY Ombre Sherbet Nail Art last year!)
 Happy Summer DIY pedis!
xo
Carly
Save
Leave Comment
Apr 6, 2014 | DIY
 Since Easter is coming up soon, I was collecting some images of inspiring egg decoration. I landed upon this, and began thinking…what about doing this to your nails? So I did. And it turned out amaaaaaazing. (Who doesn’t love chic gold leaf, right??!)
  Here’s how to do it too:
You Need: (more…)
Leave Comment
Jul 31, 2013 | DIY
 When nail polish starts chipping there are only a few options for you: take it all off, swipe another coat of same-colored polish on to try to hide it, or try a contrasting color layered over top. I’m very much a contrasting-color sort-of-person since I love incorporating different textures and colors into my mani.
 One of the easiest ways to fix a slightly chipped mani is by adding a French manicure tip: I love the luxe look of a gold glitter tip! {Click for photos of my version above)
 Another great way is with a shiny metallic tip: so chic and polished. I love cool silver too – and this can even be accomplished with a silver metallic Sharpie you may have on hand!
 My mani is just a coat of clear – and then silver Sharpie at the ends – and a topcoat. You could also do any color you want, and pair with a gold, rose gold, or other metallic-hued pen for ultra glamour!
 How do you extend the life of your mani?
xo
Carly
Save
Leave Comment
Jun 29, 2013 | DIY
 As a child I was always drawn to the rainbow sherbet at the ice cream shop in my little town…and loved to watch all the colors melt together in my tiny paper cup into a rainbow lava flow of epic proportions (read: icky orangey-brown). I’ve always had a thing for ombre colors (and sherbet, LOL), but they’re really hard to re-create on one’s nails without an airbrush.
  While in Tokyo I recently bought a couple extra sets of Beauty Wild’s nail polish trios that I first discovered during last year’s Japan trip. This year Beauty Wild now has a “Gelato” version that includes a neutral base + color, with a glitter polish to create a pretty ombre transition (and labeled A, B, and C for ease of use).
  Even if you don’t have access to Beauty Wild products, you can easily re-create the ombre mani at home with 3 coordinating nail polish colors in your stash. Here’s how:
You Need: (more…)
Leave Comment


