May 18, 2016 | DIY
FTC Disclosure: This blog post contains affiliate links, which means I receive a small commission if you click through and make a purchase. My full Disclosure Policy is here.
And dare I add…sexy to the title?
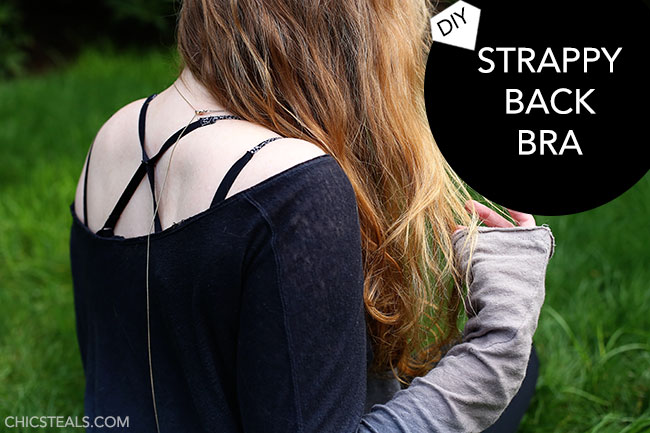
I’m sure you’ve noticed that a recent trend for the past couple of years has been lingerie (and swimwear!) getting more complex and strappy. Lots of extra ties, crossing strings, layered straps…I just love it! Bra straps peeking out from under a shirt are no longer risque; they’re trendy and cute. Welcome to the era of underthings that are meant to be shown…and this DIY takes any old bra you might have and upgrades it into the strappy bra trend. Get ready for some major sexiness with this project.
Many brands come already with tons of great strappiness. (Victoria’s Secret, Only Hearts, Free People, and One Teaspoon are particular faves.)
 I really liked this particular Victoria’s Secret bra (no longer available…but this is very similar) …but didn’t want to buy a whole new bra.
So what are you to do if you want a little sultriness but the lingerie you have needs a little upgrade? Add MORE straps of course! Here’s how:
You Need:
bra rings and sliders set / extra pair of bra straps (salvaged from a convertible or strapless bra, or bought as a separate item) / bra you don’t mind attaching the straps to permanently / matching thread / hand-sewing needle / pins / scissors
How To:


1. For the particular style I’m making, you have to cut off the ends of the bra straps. This bra had convertible straps, so I unhooked them and cut off the ends.

2. Thread both loose ends through a double-sided slider.

3. Now to create the upside-down V’s that will anchor each strap to the bra band. Take your two extra straps and cut off the ends. Thread a bra O-ring onto each. Pin down one cut end to the underside of the bra band, near the hook closure. (Note where the end is in relation to where the old straps connected.)

4. Pin the other end of the strap to the bra band, closer to the cups, to make an upside-down V on each side of the bra hook closure.

5. Thread the loose ends of the original bra straps through each O-ring. Fold the end of the original straps under and pin around that O-ring to secure.
6. Try on the bra to make sure all the straps lie correctly, and adjust the pinning if necessary. DO NOT CUT ANY STRAPS SHORTER until you’re ABSOLUTELY sure everything fits!

7. Once you’re sure you like the fit, now’s the time to sew. Trim the bra’s original straps shorter if necessary, and hand-sew each end onto the O-rings where you’d pinned.
 8. Stitch down the ends of the upside-down V straps to the bands (after trimming the excess). I made 2 lines of horizontal back-stitching for extra security.

9. Now everything’s secured and your bra is strappy (-er). I wanted to add yet another layer of strappy goodness…so I hooked the convertible straps I got from the kit I’d purchased to each original strap-anchor on the bra band.

10. Then, since my bra had a double strap attached to each cup, I snipped the end so I could separate them and work with the outer straps only. These I attached to the cut straps from Step 9.

If you don’t have a double strap, use the extra strap material to connect the O-rings to the tops of the cups with some stitching.

And that’s it!


It sounds terribly confusing, but it looks incredibly awesome once done (and peeking out from flimsy tops and low-back dresses ;-).

Happy DIY’ing! (and happy strappiness 😉
xo
Carly
Save
Leave Comment
Jan 4, 2016 | DIY
 Oh metallic lurex thread, how I love thee!! It adds so much dimension, so much Wintry sparkle, so much glamour to just plain old fabrics. But it’s a demon to clean.
Once I found a beautiful silvery sweater at H&M on the clearance rack for a mere $8.95. And it happened to be in my size, too. I wore it often for many years. I wore it here, for example.
And then while at work one day I dropped my lunch on it. A small mouthful of leftover Thai drunken noodles. In oily brown sauce. And my favorite sweater was ruined forever.
 I washed it multiple times, in both cold and warm water, and tried every stain remover known to woman. But nothing got the stain out of acrylic. That brownish-yellow stain would not budge. I tried to wear it after the unfortunate incident, but the stain was too obvious, and I felt self-conscious. I thought about discarding the sweater (heck, I had only paid $8.95 for it so it wasn’t a huge investment)…but I wanted to save it if I could.
And then I had an epiphany…to combine that trend of one big word on your shirt…with my poor abused sweater…hence forever covering up that stain and allowing me to wear it again (or at least, until it got too pilled and stretched out to even resemble clothing anymore). Hence this DIY. Here’s how to cover up that horrible stain on your own shirt if it has befallen similar circumstances:
DIY Shine Word Sweater (or, How to Cover a Stain on Your Sweater)
You Need:
 sweater or top / black felt / fabric scissors / needle and matching thread / pins / graphic program to create your word if you’re not using the download below / printer (or print at an office store) / regular scissors
How To:

- Choose what word you’re going to put on your top. It took me forever to finally choose a word (and yes, I browsed Pinterest, blogs, and magazines for what seemed like ages). But I found it: Shine. Quite ironically literal. So I went with that, and typed it out in Photoshop using the Ballpark Weiner font and printed out a copy of the word to see if the spacing and font would indeed cover up the stain. It did so I went with that.

- Cut out the word using regular scissors. Don’t forget to cut out dots on i’s or punctuation as well. I didn’t cut out the negative space inside the letters at this point.

- Pin the word to your felt.

- Use fabric scissors to cut around your word carefully. You may need to make certain areas wider than the font so the felt doesn’t pull apart. For cutting the negative space out of the inside of loops, I just eyeballed it, cutting smaller than I needed to and then widening once I laid the cut-out on the original font.


- Place the the cut out felt word to the center of your top, and pin down so it is flat.


- Use a running stitch (looks like – – – – ) around the inside edges of the felt to secure the word to your top. This is long and tedious – make sure you have some Netflix or mindless TV to get you through. Also stitch on any i dots or punctuation as well. (If you’re dealing with a stretchy top like a sweater, be careful not to stretch the knit too much as you are sewing or else the finished word will pucker.)
 And that’s it! A pretty upgrade to a soiled mistake…and I’ve just saved a major piece in my wardrobe. How to cover a stain on your sweater is really as easy as a bit of felt, time, and thread!
 This is something you will need to hand-wash cold and lay flat to dry. You could also use suedecloth or any other fabric that doesn’t fray when you cut it – leather or vinyl I would think a little tough to hand-sew but you could always try it if you prefer that look.
Download my DIY Shine Word Sweater graphic here if you’d like to make your own “Shine” version (click below):
(77 KB PDF, sized at 300 dpi, for 8.5″ x 11″ paper)

 Shine on, my friends!
Ever had a stain on your shirt where you did something creative to cover it up? Do tell!
xo
Carly
Save
Leave Comment
Feb 16, 2015 | DIY
 So it’s still Winter and I wanted a (p)leather skirt – midi length, so demure, yet made of a material that’s a little reminiscent of biker gangs. That’s just how I roll.
Midi-length leather and pleather skirts have been a Winter staple for awhile – and I love that the quilting pushes it into Chanel-esque territory without being anywhere near that price-point. Plus quilting can hide fabric (or pleather) that is actually quite cheap and force it to look more expensive. And no hemming required! Here’s how:
You Need:
(more…)
Leave Comment
Oct 14, 2014 | DIY

What’s a MUST for a spooky, scary, FUN Halloween project? Anything that GLOWS in the dark – and Tulip glow paint is the perfect product to make your DIY Halloween projects light up! (more…)
Leave Comment
Sep 7, 2014 | DIY
 Hello all!
I apologize for my week-long absence…things have been just crazy with Lil Tot going back to school and getting back into the school routine. And I have an announcement to make soon – can’t wait to share!
 I snapped up a Stylestalker Space Jam T-shirt style dress from Shopbop in February – I just couldn’t pass up the cool pattern on it. (All it needs is a kitten shooting rainbows out of its eyes and then its the perfect Dark Side of the Moon-style CD album artwork. Or something like that.)
  Unfortunately it was the last dress left and at a size 4 it was a little too tight here and there on me (at the time in February). The mantra I live by: [Tweet “Clothing needs to skim the body…not show where your bellybutton is!”] So I went about to alter it to be a little more skimming, and here’s how you could do the same to a straight-shaped dress that just needs a little extra something:
You Need: (more…)
Leave Comment


