 What could speak to Spring more than a bouquet of pretty pastels, made into jewelry? With Martha Stewart Jewelry you can now easily make beautiful enamel jewelry, no powdered glass, no kiln, no firing, no fuss. Up until now, coloring jewelry with enamel has been pretty difficult to do on your own without a kiln to fire the enameled pieces. It’s an investment of time, money, and major equipment. But using Martha’a enamel paints and blanks makes it just as easy as painting! I couldn’t wait to get started with my first-ever enameling project, and re-work metal charms into a colorful bib necklace. Here’s how:
You Need:**
{Enameled Floral Charms}
Martha Stewart Jewelry Enamel Paint in your favorite colors / Martha Stewart Jewelry Enamel Blank Charms / Martha Stewart Jewelry silicon mat / rubbing alcohol / tissue / toothpick
{Bib Necklace}
enameled floral charms (see above) / Martha Stewart Jewelry resin cabochons / filigree stampings as a backing / Martha Stewart Jewelry Glue / jump rings / chain / Martha Stewart Jewelry Toggle Clasp / pliers / thin wire (optional, not pictured)
**The whole line of Martha Stewart Jewelry is available exclusively at Michael’s stores!
How To:  1. Start by enameling your charms. Mix 1 part enamel to 2 parts enamel activator with a toothpick on the silicone mat.
 2. Do the same for all the colors you are using. Since I wanted a thicker enamel, I let it sit about 2-3 hours to thicken up before applying.
 3. Wipe the charms down with alcohol to remove any oils or dirt.
 4. Use the toothpick to apply the enamel.
5. Add more colors, being careful to keep them separate. (You can use the Martha Stewart silicone-tipped tool to remove enamel that has overflowed into areas you don’t want it in.)
 6. Allow to dry 24 hours until the enamel is hard.
 7. Once dry, arrange the enameled pieces with the cabochons in the configuration you like.
 8. Glue the filigree pieces together, and add glue on the backs of your charms.
9. Let the glue set for about 2 minutes before attaching your charms.
 10. Keep adding charms and filigree pieces to the bib, and allow to dry.
 11. When partially dry, you can turn it over and thread some wire through the filigree to secure the connections if you’d like.
 12. Attach the toggle ends to the chain…
13. Cut the chain in half…
14. …And connect the chain pieces to jump rings on either side of the bib piece.
 You’re done!

A pretty, flowery necklace to welcome Spring with – and to impress your friends at your enameling abilities! It was surprisingly easy to create a professional, enameled look to these pieces, and even a novice could very quickly create something that rivals store-bought jewelry. 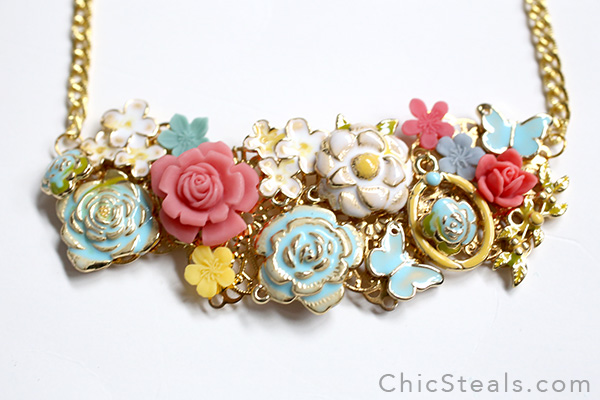 Plus you can choose your own colors and customize the finished piece to your liking!
See what other bloggers have made with Martha Stewart Jewelry:
Happy DIY’ing!
Check out Plaid Crafts for more DIY inspiration on
Facebook / Twitter / Pinterest
Have you ever tried enameling jewelry? Did you find it challenging – or easy to do?
xo
Carly
I wrote this post as part of a paid campaign with Plaid/Martha Stewart Jewelry and Blueprint Social. The opinions in this post are my own. I was sent jewelry components, glue, tools, and enamel paints from the Martha Stewart Jewelry line to create my own jewelry and share a tutorial with my readers. To read more about my Disclosure Policy, see here.


In love with this, so beautiful and girly.
Thanks for sharing.
Lila&Sirena
lilasirena.blogspot.com
Have not tried enamel yet. Love what you did. It looks like something you would buy at a store (in a good way.)
Thank you, Samantha! That’s so kind of you:-)
This is SO super duper cute!!! The color combo is gorgeous. 🙂
Thank you Michele! And it’s all due to Martha;-)
SO pretty!
Thank you Bethany! 🙂