 So having been so inspired by gold-appointed typography art, I just had to make some myself to hang in my new office. The great thing about DIY’ing it is that you can choose anything: any word, phrase, or saying that has special meaning to you – and forever memorialize it in paint and glitter. It looks so chic livening up a freshly-painted wall!
You Need:
pre-cut picture mat / large piece of white cardstock / gold craft paint / loose gold glitter (not pictured) / printout of your words / Mod Podge (not pictured)
Tools: paintbrush / tape / something to protect your surface / craft knife / pencil & eraser / ruler / bowl for paint
How To:
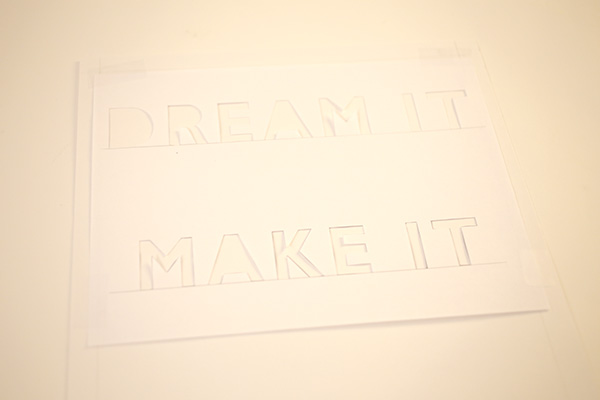
 1. Print out your words or phrase on a piece of paper. I decided on my mantra: “Dream It / Make It / DO IT” and laid it out on Photoshop to fit the inner dimensions of my picture mat (which were 11″ x 14″), and set it to print on 2 separate pages. [Coming Soon: Dream It / Make It / DO IT prints available for purchase if you’d prefer not to DIY!]
 2. Trace the opening of your mat onto your cardstock.
 3. Use your craft knife to carefully cut around each letter. You want the inner parts of the letter (the closed counters, in typography terms) intact, because…
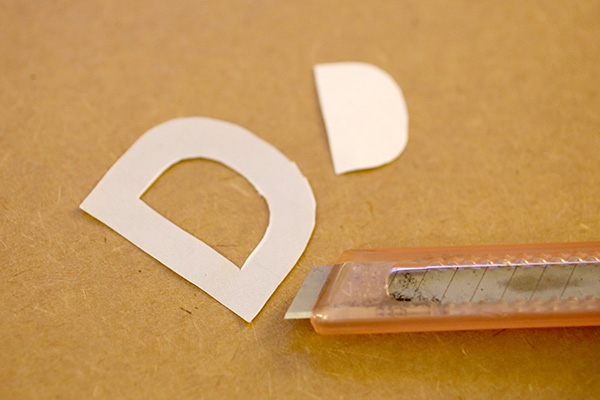
4. Cut out the closed counters of your letters as well.
5. Use tape to affix your paper stencil edges onto the cardstock, centering it in the lines you drew in Step 2).

(I had to overlap my stencils since my word art was larger than a single page.)

6. Very lightly trace around the edges of your cutouts in the paper. For the letterform counters, place the letters you cut out on the cardstock, matching with the edges you traced. Trace around the inner edges for the inside space.

7. Use a small paintbrush to carefully fill in the letterforms, covering up any pencil marks.

8. For any letters you’d like to add glitter to, first paint them and let dry. Add a coat of Mod Podge, sprinkle glitter on, and tap off any loose glitter once dry.

9. Erase the pencil lines around your art.

10. Place pieces of tape at the corners of your piece on the WRONG side, facing upwards.

11. Place the matboard down on top of your artwork, centering it on the letters.

12. Turn everything over and add more tape to firmly secure.

And that’s it!


Easy to make, easy to do – and utterly inspirational. Just seeing that every day by my computer lifts my spirits and inspires me!
 Happy DIY’ing!
xo
Carly
Materials Used for the DIY Gold Typography Art:
Pre-Cut Picture Mat – I found my mat for an 11″ x 14″ piece of artwork at Michaels; you can buy online here.
Martha Stewart Crafts Metallic Paint in Gold – c/o Martha Stewart Crafts, available here.
Tulip Fashion Glitter in Gold Fine Jewel – c/o Tulip Crafts, available here.
Mod Podge – available at Michael’s, Jo-Ann’s, or here.


I love how you changed your office! I love the gold colour on accessories in the office,and I think I am gonna do my desk in a simmilar style, with white, gold and mint green colour scheme. Will you do a post of the finished office?:)Dom x
poppygoeswild.blogspot.com