Sep 18, 2014 | DIY
 This DIY tutorial has likely been done already hundreds of times in the aftermath of Tom Binns releasing his neon cameo collection in Spring 2012 – but what’s once more? I love the juxtaposition of elegant, old-world cameos harkening back to the times of daguerrotypes and intaglio portraits…rendered in full-on neon for the modern age. You can make your own easily, with some paint, rhinestone chain, and a soft embossing metal as backing – with no one the wiser as to how your unique creation came about. Here’s how:
Materials:
1 cameo (and this place has the best selection!) / rhinestone cup chain / gold embossing metal / scissors / jump ring / pliers / wire-cutting pliers / jewelry glue (not pictured) / pin or awl (not pictured) / paint in 2 neon colors / primer or white paint / pen / paintbrush / matte sealant (optional, not pictured)
How To: 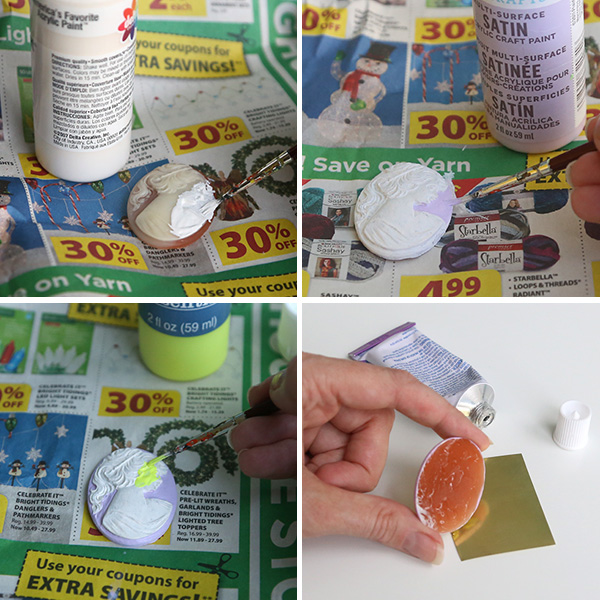 1. Since cameo colors are usually fairly opaque, you may want to prime your cameo first with a coat of primer, or just a coat of white paint. Allow to dry.
2. Paint the cameo. Usually it’s easiest to paint the lighter color first, than the brighter or darker color next. You may have to do a couple coats of each color to fully hide the color of the original cameo.
3. (optional) Paint a coat of sealant on he cameo to hide brushstrokes and prevent paint chipping. Allow to dry.
4. Glue the cameo onto a small piece of embossing metal.
5. Place the rhinestone chain around the cameo, and cut to desired length.
 6. Spread glue on the back of the rhinestone chain, and glue to the metal backing around the cameo.
7. When dry, poke a hole in the embossing metal with a pin or awl.
8. Trim the metal close around the chain, and use the side of the scissors to fold it to cup the chain so no sharp edges stick out.
 9. Thread a jumping through the hole you made, onto a necklace.
And you’re done!

Wear with something dark and modern for contrast, or pair with a pastel frilly corset for your best Marie Antoinette impression!
 Happy DIY’ing!
xo
Carly
Save
Leave Comment
Aug 14, 2014 | DIY
 For the past couple months, I’ve turned my attention from clothing and accessory DIY’s to home DIY’s. I’ve felt like I was entering a new phase stylistically, and some areas of our house were still frozen in time – almost exactly the same as they were when we first moved in (now 6 years ago!!). One area was our downstairs bathroom.
 Straight off of the kitchen and next to the garage door, this is the bathroom that is one of the first things you see when you come in from the garage – and that people visiting our home will always use. It was a pastel mint color with a mid-90’s-style pastel lavender-and-mint wallpaper border.
  The previous owners of this house LOVED lavender and pastel mint – the entire outside of the house and the master bath were lavender, and the kitchen, downstairs bathroom, and bedroom were pastel mint. Though I don’t mind either of those colors in clothing (some clothing), the color scheme felt a little dated – and completely NOT us. However, after buying the house in February 2008, I went through a phase of painting Lil Tot’s room…then the kitchen…and then I think Hub got tired of constantly living amongst plastic dropcloths and paint cans and told me to stop.


 So this bathroom lingered for a long time, untouched.
  I purchased a Monet poster and a faux orchid thingy from Target to deck it out, for the sole reason that both items matched the color scheme. But I HATED this bathroom, and vowed to eventually do something about it.
In January of this year I finally decided: I was going to go modern, with gray and white and stark, raving mad bright orange. I wanted to go bold and cool and mix patterns and push myself out of my comfort zone. And after much browsing on Pinterest and design/home decor blogs, I finally took the plunge.
 First, I painted the main wall facing the door white (Miller – straight out of the can eggshell-finish white!!). Once dry, I taped off my stripes, and added a contrasting gray stripe down with the help of this tutorial. (Thanks, Jen!) Then I painted 3 walls the same gray (Glidden Pebble, in case anyone is wondering) in a satin finish (for easy cleaning – important in a bathroom!).
 One afternoon I handed Lil Tot 4 colors of coordinating gray and orange paint (ignoring his pleas for “Blue! Blue!”) and asked him to paint me a picture on a 24″ x 24″ canvas I’d gotten from Michael’s. At first he was grumpy, but then got into it. After about 30 minutes or so, he was upset that his painting was awful. I said leave it for a day, and the next day try again. And lo and behold, the next day we got out the paints again, and I encouraged him to add more layers of paint over top the parts he didn’t like. And what do you know? He ended up creating a beautiful, personal piece of art that I just love, and am so proud to hang in our house. Plus, he was so proud of himself for painting something he really liked and not giving up the first time around. (To me, it looks like a police car spinning its wheels in the snow…but it could be anything, really.) Seriously, who needs Monet??!
 Then I found the perfect mirror to replace that hideous mirror at Target. A friend and I pried the builders’ mirror off following this tutorial, with the help of a short crowbar from Home Depot ($11!) it came off easily.
 Inspired by this pin, I decided to make some washi tape gemstones on the wall. I bought some orange and grey-striped tape from Michael’s (the white was actually mat-mounting art tape from Dick Blick’s), and made some faceted shapes on the walls. (I really wanted to buy these wall decals – but just couldn’t afford them.:-(

 We had the soap and lotion dispensers (Molton Brown White Mulberry, a Christmas gift from years ago…and if you can find this scent on Ebay I highly, highly recommend it!!), so I placed them on a little striped tray from Target. (Tray was bought around Christmas-time, and I haven’t seen it since the Spring at Target, sorry.)
 The ugly dust-collecting orchid got the boot, and was replaced with what was actually the Ace ceramic hurricane from ZGallerie. (Now on sale for $7.99, folks!) Inside I placed a clear glass vase I had for filling with flowers. Since the hurricane is open, I could also use a colored vase inside and have it peek through!
 The books are Hub’s manga. I absolutely loathe having books in the bathroom – I think it ruins the books due to moisture and ugh! other bacteria floating around – plus, it looks super-tacky. But he loves reading them while doing his business (and leaving them all over the counter), so I just became the willow, bent, and covered his favorites in handmade Nepalese Lokta Bean paper and orange book cloth, both purchased from The Paper Source.
  Book-covering tutorial is here.
I added a lattice-pattern candle from HomeGoods that I just love – smells like lemongrass! – and a homemade baking soda deodorizer in a jar.
 I created that following this tutorial, using baking soda and a couple drops of essential oils (about 2/3 what I put in was Eternal Essence Clean Cotton
 , and the remaining 1/3 Tangerine essential oil). I can’t recommend the Clean Cotton scent enough – it’s just amaaaazing!!!
 I used an old jam jar, and replaced the lid with a piece of orange cardstock I painted a pattern on with white paint, then punched holes into. If you feel the bathroom is stinky, just shake thejar from side to side holding it above where the smell is originating – and poof! Gone. No nasty chemicals, no cloying, overpowering scents. Beautiful.
 The toilet paper holder got moved to the right utilizing a pivoting design…the previous owners must have been left-handed since all the toilet paper holders in our house are on the left side of the toilets! (With hastily-patched screw holes in the walls to the right of the toilets. 😉 I also got a matching towel ring for the wall next to the sink so Lil Tot stops dripping water all over the floor after washing his hands. And I replaced the cabinet pulls with silver hexagonal ones from the Home Depot.
 And finally, towels: picked these two grey-and-white patterned ones at TJ Maxx, and I just love the geometric pattern on them. Perfect for our little sanctuary!

 Every time I look at this room, I can’t help but smile. It’s so perfect. I want to spend all day in there. Well, not quite all day…. (Maybe that’s weird to share with the Internet…?)
But at least it’s not an eyesore and I’m no longer embarrassed when any guest visiting our house asks to use the bathroom. Yay for small comforts!
And one last time, BEFORE (above) and AFTER (below)…
What do you think? Would you have been able to go with a pop of bold color in such a small space? Or stick to muted pastels?
xo
Carly
Save
Leave Comment
Feb 12, 2014 | DIY
 Hello lovely readers! Today I am over on We Heart This with my tutorial for a DIY Evil Eye Ring. It’s actually so easy to make with a little bit of clay and paint, and rivals anything you can find in a store. Plus if you weren’t aware of the deep history behind this symbol, I’ve shared a little about the cultural significance of it too. Check it out and let me know what you think!
 xo
xo
Carly
Save
Leave Comment
Nov 19, 2013 | DIY
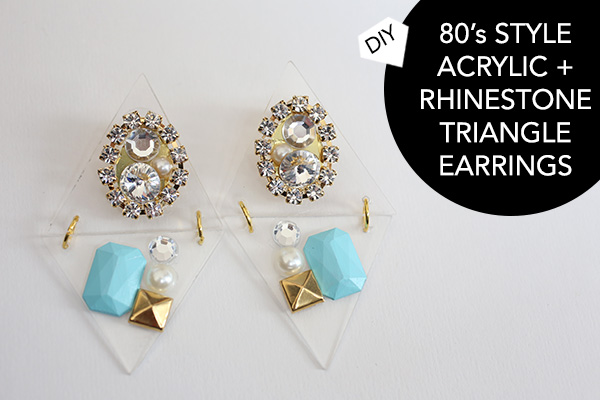 Big jewelry straight out of the 1980’s is having a HUGE moment this year. The bigger, the better – covered with plexi and acrylic, chunky bold shapes, and glittering rhinestones – anything goes right now. I saw these earrings for sale in a store during my last trip to Tokyo this Summer – and decided to DIY them with some materials I already had on hand. Clear acrylic for accessories is hard to come by – so I just repurposed an old photo-frame for my main material. Here’s how:
You Need: (more…)
Leave Comment
 Spring is almost sprung – and what better way to usher out those Winter blahs than with beautiful pops of color? Add a bright center to a faux stingray textured clutch with Tulip Neon 3D Paints from
  (Plus it creates the look of elegant stingray skin – without any of the unsustainability and cruelty of the shagreen industry.)


