 On the Spring/Summer 2013 runways, wrap skirts (a.k.a “split skirts”) showed up repeatedly in collections such as those from Rag & Bone, Tommy Hilfiger, and Proenza Schouler.
 Lucky Magazine also did a short feature on the wrap skirt (calling it the “Envelope Skirt” in their February 2013 issue), and I was immediately taken with how easy it seemed to make.

 This type of wrap skirt is hardly different from a single piece of fabric, wrapped around your waist like a simple toga-cloth, but you can add a few details to make it looked more finished and less like a scrap from the fabric store. Add a small bit of tailoring so it sits better, and an adjustable closure to allow movement, and you have a versatile bottom that is ready to usher in Spring. Here’s how:
You Need:
piece of stiff fabric that is wide enough to wrap around your waist**, and long enough to be mini- to knee-length / large sew-on snap pair / medium sew-on snap pair / matching thread / small piece of 1/2″ wide elastic (optional) / 2 small pieces of sticky-back velcro (optional)
Tools: fabric scissors / hand-sewing needle / pins / marking chalk
How To:
 1. Wrap the piece of fabric around your waist and pin the front at the place you want the overlap.
  (My striped green fabric wasn’t quite long enough to overlap how I wanted, so I stitched another piece to the end to extend the length of it. Because my fabric was striped, I placed this piece on-grain – instead of cross-grain, like the rest of my fabric – so the striping would be more interesting. The fabric I’m using in the above photo is for demonstration purposes, since I had sewn the skirt together and finished it first before deciding I wanted to write a tutorial for the making of it. Woops.)
 2. Start tucking the top of the fabric down so it hugs your body at the waist area. Move from the back of the skirt to the front (where you will have to tuck down less.)
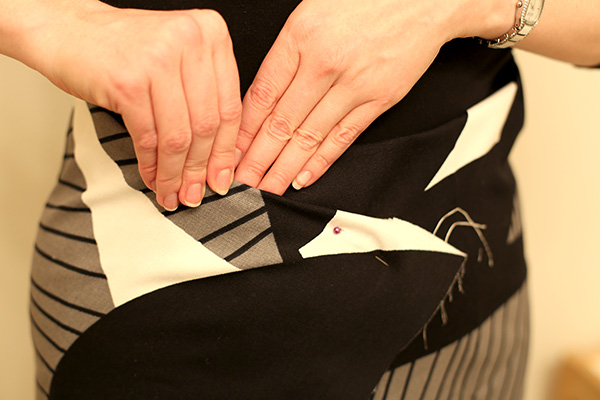
 3. Pin the part you tucked down.
 4. Tug down on the skirt so it sits on your hips, and make sure the top of the skirt looks how you want it to. Take the skirt off and lay it on a flat surface.
 5. Mark a line along the fold, which should be a curved waistline that hugs your waist perfectly.
6. For a simple folded-down waist, add about 1/2″-3/4″ above that line, and cut (not pictured). You can just fold that seam allowance to the inside and topstitch to create the top of your skirt. Depending on how curved the waistline is, you may need to notch the seam allowance on the inside of the skirt to allow the curve.
 7. For a waist with a waistband facing, cut at a 3/8-1/2″ seam allowance in the previous step, and create a waistband facing to attach to the inside. (Just trace around the top edge of your skirt, going down about 1.5″ on either side, onto the wrong side of your fabric. Join the two sides with a curved line, and cut. For stiff fabric, you wouldn’t even need any interfacing; just attach to the top edge of your skirt, right sides together, and fold the facing to the inside. Voila! A clean top edge to the skirt, with no visible stitching lines.)
8. Hem the edges of your skirt by turning to the inside and stitching down. I chose to overlock my edges first to prevent unraveling.
9. Try on your skirt and determine the length you want, and hem the skirt.
 10. To create a closure, hand-sew a large snap onto the inside front corner of your overlapped piece, with the corresponding snap on the skirt body. I used a medium-sized snap on the outside of the top corner of the inner part of the wrap skirt, to hold the top right corner underneath the wrapped-around piece. I also used 2 pieces of sticky velcro to hold the front flap down at the top; this helped secure the skirt a little better across the flap.
 11. (Optional) To prevent the skirt opening too wide as you walk, you can attach a small piece of elastic under the front flap right at the point it overlaps the other side at the bottom of the skirt. The ends of the elastic are just hand-stitched to the flap and the underside, so it doesn’t open up too much and give everyone a little too much to look at. 😉
And there you have it! Pretty easy, kind of cool, and super-fun to make!
 See how I wore the DIY Simple Wrap Skirt in this post here!
**The stiffer the fabric, the more it will accentuate the wrap shape to the skirt. I’m using some fabric from IKEA, which is more of an upholstery-weight fabric, so sits stiffly away from the body.
Happy DIY’ing!
xo
Carly
First two skirt photos by Brooke Morse.


So pretty! I should really learn to sew. I love the green and white print you chose!
There was a similar post with a scarf on the blog Runway DIY a year or two (I think) ago! I’ve been eyeing this style ever since and might just try it.
Oh, was there? I shall definitely have to check it out – thanks for the tip!!