 Jewelry is going on the offensive this season with razor-sharp spikes, hard edges, and chains. Make your own on-trend choker* with wire, chain, and beads, weaving them all together to create something reminiscent of Cleopatra…but with a modern-day edge. Here’s how:
You Need:

large box chain (about 1/8″ wide links) & clasp / large cube beads (8 mm) / medium cube beads (6 mm) / spike beads / tiny pearl beads / 2 small round gold beads / eyepins / matching dead soft jewelry wire (mine is 18 ga)
A note about the materials: I found that about 22 of each bead was the right number to produce a choker as wide as I wanted. The box chain however, was REALLY tough to source. I couldn’t find it online at all my usual sources of materials [like M&J Trimming, FireMountainGems.com, PandaHall.com, or numerous Google searches]. From Etsy sellers I could only find tiny box chains (like 2 mm width max). Finally I just bought a necklace from Forever 21 that had the super-large box chain, and pulled it apart. You may have to do that too, since the box chain has to accommodate threading eyepins through it, so the boxes need to be big enough.)
Tools: wire-cutting pliers / needle-nose pliers / jumpring tool (if you’re adding your own clasp)
How To:
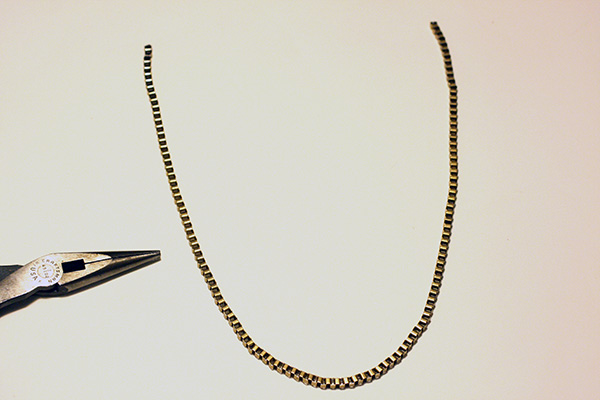 1. Collect all your materials and lay them out. Lay out the box chain in a U shape and note the center of it.
 2. Thread a gold bead onto the end of your wire, and curl the end into a loop with the needle-nose pliers. Bend the loop onto the bead to prevent everything sliding off.
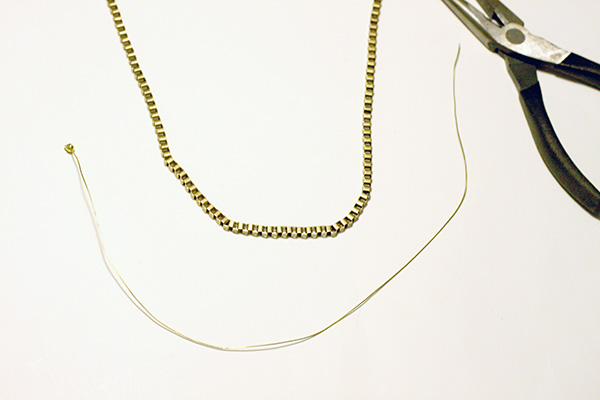
3. Cut the wire into a piece about the same length as your chain, bending it into a similar U-shape.

4. Thread a large cube bead onto an eyepin.
5. Thread the loop of the eyepin onto the wire, and push it all the way towards the little gold bead at the end.
6. Thread the tail of the eyepin into a link of the box chain. You want to do this about 4″ from the center of the U.
7. Thread a medium cube bead onto the end of the eye pin.
8. Bend the eye pin wire at an angle, and cut.  Twist around into an open loop with the needle-nose pliers.
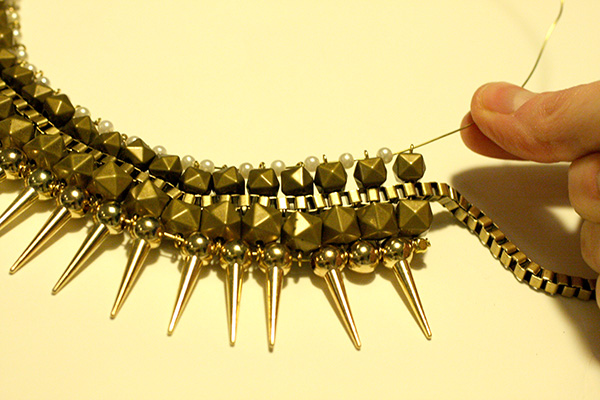
9. Thread a spike bead onto the wire and push it up against the eye pin.
10. Repeat steps 4) – 9) to create the whole choker base. The next eyepin gets threaded through a link in the box chain 2 links down from the first link you used. So you’d be skipping a link each time (determined by the width of your large cube beads).  Keep the eyepins close to the spike beads, and make sure the medium cube beads are pushed tightly down on the eye pins before making the loop in the wire, in order to keep everything taut. As you’re going, try to keep both the wire and the box chain curved in that U-shape.
11. Finish everything the way you started: with a small gold bead. Cut and twist the wire into a loop just as in Step 2).
12. Once you have the choker base done, the last part is to add the pearls. Cut a smaller length of wire, a little longer than the width of the woven bead choker part, bending into a U-shape again.
13. Twist one end of the wire into a small loop; thread a pearl bead onto it and bend the loop onto the pearl to keep it from falling off.  Bend that loop onto the top of the pearl.
 14. Slip the other end of the wire into the looped end of the first eye pin.
 15. Add another pearl bead to the wire.

16. Thread the end of the wire through the next eye pin, and add another pearl bead.
 17. Keep repeating until all the eye pin loops have the wire threaded through them, with pearl beads in-between. Pull the wire semi-taut.
 18. Finish by cutting the wire short, bending the end, and looping around so it won’t fall off. Bend the loop onto the pearl bead to secure.
19. (Optional) Cut the box chain to the appropriate length. If your chain doesn’t have it, add a clasp on the end. (not shown)
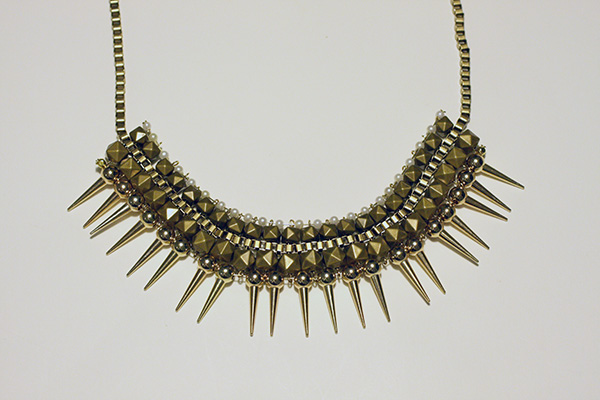 And there you go! A little fiddly, but I found it really enjoyable. You can also change this up by doing more rows of beads or spikes (with more eye pins to hold everything together), or add danglies or rhinestone trim…there are a lot of possibilities!

*Note: I saw this necklace in a Japanese magazine awhile ago, from a Japanese brand. Thinking it wasn’t available in the U.S., I decided to DIY it. Then I saw the EXACT SAME necklace at H&M back in early January 2012. My guess is that the necklace was actually produced by a high-end brand, and knocked off by both the Japanese brand and H&M. But I don’t know what the original was…and if you’re looking to get the same necklace and save yourself some DIY’ing, you could always check out your local H&M or Ebay to see if you can find it there.
Happy DIY’ing!
xo
Carly


Beautiful! Absolutely love this!
Thank you Natalie! You’re so sweet:-)
I love this necklace! I know what you mean about box chains – I have skinny tiny necklaces that are box chain, but none that are large enough to accomodate eyepins. I posted the top photo and a link back to you on truebluemeandyou.
This turned out so good! It looks very expensive and I’m sure it will hold up much better than store bought jewelry from the fast fashion chains (not that I don’t love those places, but it’s so annoying when your jewelry gets broken before you even get home with it). And I totally get the fiddly but enjoyable part. It’s nice to do non-computer things every now and again, even if they are tedious.
Thank you Sara! I am so with you re: your jewelry getting broken before you even get home from the cheap stores. :-/ This may not last much better; the materials were pretty cheap, but who knows! And I find repetitive, mindless work often so calming…must be why I love knitting and jewelry projects like this so much! Maybe I should take on some chain maille…
Love!
How edgy, I LOVE it!
Thanks Lana! I appreciate the feedback – and the visit:-)
Carly this project is amazing!!!! You can find the box chain at Beadaholique.com… I did a collar with box chain a few wks ago and sourced mine there! I think it should be big enough for this project. I love this, executed so well and such great results.
Thank you so much Grace!! What a great tip…I was looking for that chain for what felt like *FOREVER*!! I will definitely check out Beadaholique for future purchases! And I love your blog makeover – it looks fabulous!!
Fantastic job, Looks amazing.
Great DIY – this turned out really cool looking!
Isn’t That Charming.
Hi all,
Here is a source for the box chain: http://search.rings-things.com/search?keyword=box+chain, but you do have to purchase a whole 10-meter spool. It is, however, nice big 2.5mm diameter which I think is the same size used in the necklace. And available in 6 platings (including black gunmetal which I think goes great with spikes).
Thanks so much for the source link, Polly! I haven’t checked Rings & Things for awhile so I’m so glad you posted this:-)
xo
Carly
it is lovely! I generally look at DIYed jewelry and figure out how its made at a glace..but this one stumped me..the process is genius
I absolutely LOVE this! It’s just my style. Can’t wait to make it!!!
Have fun with it! You could even try varying the bead types for a totally different look. Good luck:-)
Hey love the necklace! I’m going to make it to go with my dress for graduation. Anyways, do you have any idea what size the pearls and eyepins and 2 small round gold beads are? I really wanna make sure i order the right size in everything… Thank you for your help! If you cannot answer thats fine, i’ll try to eyeball it!
Hi Malee! I had to go back to the choker I made to double-check the size of everything…here are my estimates:
Pearls: ~3mm diameter tiny pearls
Gold Beads: about the same
Eyepins: standard size hole; wire is 16ga I believe; need to be 1.5″ minimum since you need to cut them down to size.
Hope that helps!
xo
Carly