
Earlier this month I wore it in an outfit, today I’m going to show you how to DIY it. It’s DIY in 5 – minutes, that is. The easiest, quickest ways to take a piece from blah to fab and update it to current trends.
Fur trim is applicable for anything hooded: a sweater, hoodie, or jacket. (Or even on pocket edges, lapels, flaps…you get the idea!;-) As the temperatures drop, the need to bundle up increases – and adding a layer of furry material adds a ton of warmth. I always shop cheap when I can – but often affordable prices mean skimpy manufacturing techniques and minimal trim and details. Add more value to your bargain pieces by adding a quick-and-easy line of faux fur trim to your favorites.
You Need:

*hooded piece to embellish
*faux fur trim long enough to go around the hood – mine was 5″ wide (or a strip cut from faux fur by the yard)
And…

*scissors
*measuring tape
*sewing machine and thread matching fur
*hand-sewing needle and thread matching your hooded piece
*skewer, knitting needle, or chopstick
How-To:

1. Measure around your hood to find out how long your trim needs to be. (Add about 3/4″ to each end so you have enough trim for the seam allowance.) Cut trim according to measurement.

2. Fold the trim over on itself lengthwise and sew into a tube on your sewing machine, leaving about 2″ unsewn in the center of the seam. Taper the ends.
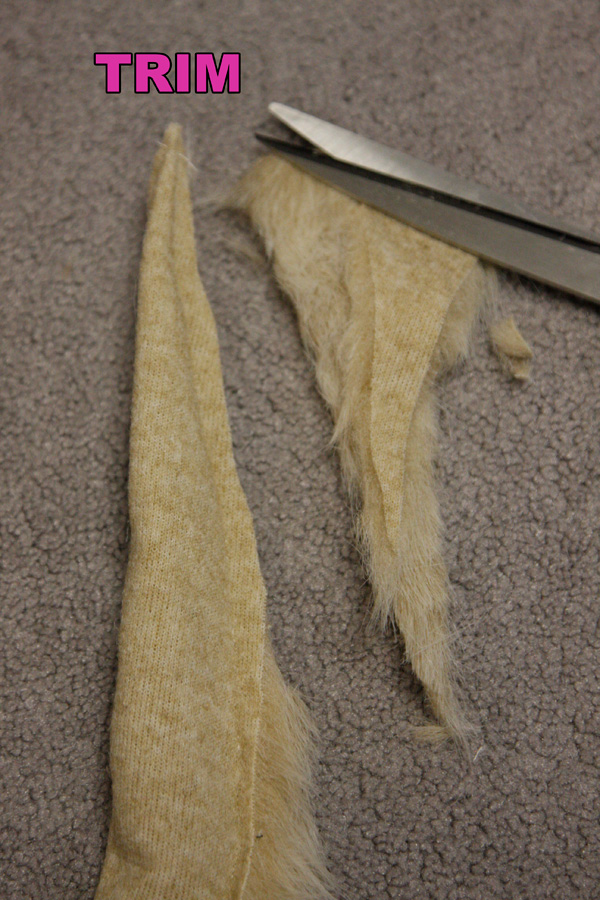
3. Trim the excess at the ends.

4. Turn right-side-out using a skewer, knitting needle, or chopstick.

5. Use the skewer to pull any fur our of the seam if it was caught in there while sewing.

6. Use a hand-sewing needle to stitch the trim around the edge of the hood, stitching the opening in the trim tube closed as you go.
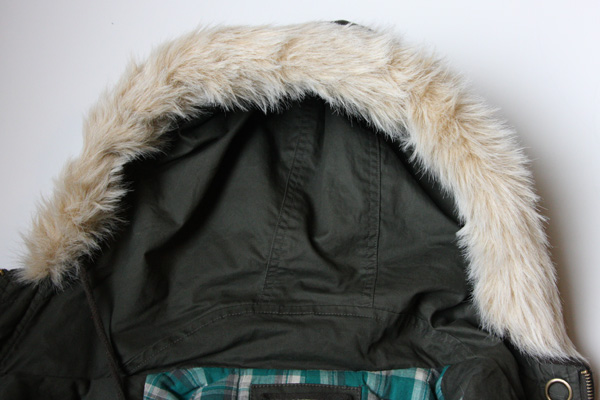
This is a super-easy way to add some wintery furriness to your favorite jacket or hoodie – and even if it takes more than 5 minutes to complete – it will most certainly take no longer than 15!

Happy DIY’ing!
xoxox
Carly


Perfect! What a great idea. I think you used the same fur trim that I used to make my faux fur bracelet. Nobody really seems to appreciate it but me. LOL!
Great DIY. Thanks for doing all this!
xx
maya
Very clever! Thanks for sharing!
Just in time! i want to change the fur lining on my coat. Thanks for great tutorial)
xx
Tali
Fetishist's Notes – http://ia-fetishistka.blogspot.com/
this post is very usefull thx!
Thanks for the tutorial. The pictures really made it easy to follow.
Tried it on this green hoodie and really liked how it turned out.
Faux fur on green hoodie @flickr
some of the pics are missing 🙁 i’m not quite understanding the instructions any help?
Hi there! Thanks for letting me know. I re-uploaded the pics, they are all showing now. Check out the post and let me know if there’s anything you’re unsure of. Thanks!
xoxo
Carly
What does the “leave 2 inches unsewn in the center” mean?
In the center of your fur piece, leave a 2″ hole. Don’t stitch the line all the way from one side to the other. Stitch it towards the center, remove from the sewing machine at 1″ before you hit the center, cut your threads if you want, then stick it back under the foot and continue sewing the line 1″ down from the center. Thus, there is a gap in the stitches – necessary for you to push the fur through to turn it right-side-out. I hope that makes sense!
xo
Carly
fantastic you make it look so easy, had a white padded coat that looks miserable so decided to put fur at hood and cuffs to hide horrible black cuffs and it was stumping me how to do it, then i went on google and there was your instructions so easy.
Thanks, Janice – so glad it worked for you! Hope your white padded coat is looking much better! 🙂
It looks quite expensive now, the only problem is the damn fluff from the fur gets everywhere, so i gave it a quick blast on slow suck with the hoover that seemed to help.
Ha! You are so funny. Hoovers solve everything – they’re what separate us from the animals;-)
Hello. I really love the idea. But I didn’t really understand step 6.
Do I have to open the seem then stitch the fur in between?
Hi Nada – you could, I didn’t since my fake fur was really puffy and the stitching just looped around the edge of the hood. The fur camouflaged the stitching really well. I think if your fur is not voluminous enough and can’t cover up the stitching, then it might make sense to open the seam of the hood and insert the fur. If you’re going that route, then there’s no reason to stitch the fur tube together right sides together and turn right side out. You could just fold the piece of fur over (wrong sides together) and insert into the open seam of the hood, then stitch the seam closed. I think either way would work – hope that helps! 🙂
Thank you Carly. You are amazing. Yes now I get the idea pretty well. I can not wait to buy the fur and follow your instructions to make my jacket furryyyy :*
Thanks, Nada! Good luck with your jacket furriness – just in time for Winter too! 😉
Thanks for idea bought red duffle with black buttons and black fur makes it look a little bit different !
Cool! It sounds like a very chic upgrade 🙂 So glad the tutorial worked for you!!
Hello! I may be super late to the party, but i love this and i’m going to attempt it on one of my warn out jackets to bring new life into it.
The jacket itself doesn’t have a hood, just a collar, so i will be attempting something a little different then you did here.
I was curious if you had a good recommendation for a fur fabric to check out? Its a hit or miss sometimes with online shopping, and i dont want to be stuck with sub par materials….
Thanks!
Hi Joe, I totally understand where you’re coming from with online shopping where you can’t see or feel the fur in person so it’s hard to tell the quality. With that being said, for this project you only need a small amount of fur (and maybe perhaps even less if you’re just going to do a collar…?). One place that I’ve always had a great experience with is Mendel’s: they offer free samples (looks like free swatches only with a paid order now) but they have a minimum order of their furs. The furs are quite luxurious, much better than I can get locally. If you are up for putting around $35 into the project, then I’d recommend them. http://www.mendels.com/Realistic/ Hope that helps! Good luck!
I bought a “fur” vest on clearance at Target today (just over $10.00) There’s enough fur on the XXL vest to do my hood and lots of other projects. It’s perfect!
Oh, that’s fantastic! Early Spring is the best time of year to get a deal on all those furry items from Winter…and repurpose for all your other projects. What a great find!
I need to do this to one of my jackets for a cosplay costume that I would like to put together. I saw the comment in which you shared a website that sells good furs. Do you have any other recommendations of where to buy furs if you are on a tight budget? Also, can this be done without a sewing machine?
Hi Mhyn! In regards to sewing it yourself, I’ve sewn lots of fur pieces before by hand. The trick is to be loose with the stitch, pick out any hairs caught in it, and then pull tight. You don’t have to place your stitches close together but try to keep them following a smooth line or curve so the fur doesn’t look bunchy or clumpy. To get lower-priced furs, you might look on eBay or Etsy, or even your local fabric store might have some remnants. The quality may not be that great, though. You could also hit up Goodwill or a thrift shop (or a Forever 21 sale!) and see if they have any faux fur items that you could use for the fur. Good luck!
So I bought a green coat with a faux fur hood at Miejer; the faux fur is decent, but not as luxurious as I wish. So here’s my question. Is it possible to (very carefully) remove the faux fur on my coat’s hood, and replace it with some nicer faux fur instead? I’d hate to ruin the hood and no longer be able to put new fur on! I sure wish there were places that JUST sell furred hoods. The only thing I’d change about my coat is that I wish it’s fur around the hood was thicker and a little longer and more plush.
Yes, you can certainly remove it! You just have to open the stitching around the edge of the hood that secures the fur, and rip the fur out. Once you’ve done that you have the option of inserting new fur into the gap between the inner and outer fabric of the hood…or just closing the two hood pieces together with stitching and having a hood that has no fur edging.
I love this! I bought an olive green jacket today that needs something extra, so I went to the fabric store and bought a strip of fur. To pull the tube inside out after stitching, what is another household item I could use? I don’t have a skewer or chopstick. Also, I am really nervous to sew the fabric into a tube… how exactly do I do it? do I sew the ends to a point? How close in should I make the stitching?
Hmmm…another household item… anything long and strong and thin. A metal garden stake? A long stick??? Or maybe just get a dowel from Michael’s for 25cents?
Yes, sew one end of the tube into a point. Turn right side out. And stitch the other end down into a point, trim the excess, and when you sew it to your hood you’ll hide that one end has a little more bulk than the other.
“How close in should I make the stitching?” – I’m not sure what you mean. Could you elaborate?