Nov 23, 2009 | DIY
 Note: Though this is a somewhat long and rambling post about shoe adornment, I do include a quick-and-easy DIY for the shoe elastics above. Scroll down for the tutorial!

As evidenced by the above Polyvore I made, elastic-banded pumps are in, in, in! I love how the black stretchy part over the upper contrasts so sharply with a shiny patent.
But I get the weird feeling that these will also be passe in a couple seasons. What to do??? I love that in Japan they’ve taken the idea of shoe-adornment to a whole ‘nother level with shoes that feature removable bands so you can change up your look whenever you get bored.
 Even though the above shoes were in a magazine a couple years ago (!), you can buy the bands separately, in red, holographic silver, white, brown, gold, or black, for about $9 a pair here. If I started making sets – like a set of 3 pairs – and sold them for $12, do you think they would catch on in the States?
  The concept of shoe bands is kinda similar to shoe clips, but just…bands. If you opt to adorn the top of your boot, then maybe Bandits are for you! They carry a number of different styles, not just the Southwestern-inspired motif pictured above.
 Bandit boot chains above. Adding to DIY list pronto.
Their boot chains are completely covetable, and a lookalike of
LitterSF‘s boot chains, only about $20 cheaper. But I digress.
Shoe bands! Right. So why buy when you can…
You guessed it!
DIY!
D.I.Y. Removable Shoe Elastics…Cause Why Not??!
(This is soooo simple!)
I have the skinniest, boniest feet ever. I know.
 You need:
*your favorite pair of heeled shoes
*about 8″ elastic
*sewing machine
*thread matching elastic color
(sorry, no photos…but you can definitely figure it out!!)
1. Start by puting on the pair of shoes you want to adorn with elastics. Wrap a piece of thick elastic around the upper part of your foot (halfway onto your arch). The band needs to go all the way around the pump and overlap about a 1/2″ on the underside, in front of the heel. Make sure it’s tight so it won’t slip down (just not too tight since we don’t want to crush our foot bones!).
2. Cut elastic to correct length.
3. Sew on a sewing machine – just reinforcing the overlap area on the elastic.
 See? The meeting of the two ends is at an angle – NOT straight on.
I’ve found they work best when the elastic overlaps at an angle – NOT one side meeting the other side exactly – to accommodate the curve of your foot. Repeat for other elastic.
Only really necessary for 1.5″ wide elastic like this; for the thinner types of elastic it doesn’t really matter.
 Presto! It’s like you have a whole new pair of shoes!
 And I also tried adding thinner elastic to the ends of silver vinyl belting for a different look…and sparkly silver ribbon for yet a third look. Both have thinner pieces of elastic sewn onto the ends of the contrasting ribbons. (The elastic is only about 1.5″ long in-between, for the underlay part and to allow the band to slide over the widest part of the shoe at the toe.)
You could do virtually anything! Chain overlaid onto ribbon…frilly ribbon with grosgrain in the center…a line of sequins…anything at all!
Happy DIY’ing!
xoxox
Carly
Leave Comment
Nov 12, 2009 | DIY, Fashion
To subject y’all to entirely non-fashion-related babbling drivel for a little bit…
One of the things that we were so psyched about when we moved from Honolulu to Oregon 2 years ago was…drumroll please….
Ikea within driving distance.
Yes, I know it’s sad and bourgeosie. Or strident middle-class desperation. Whatever. In Hawaii, the furniture available at most furniture stores is utter crap and ridiculously, ridiculously overpriced. And either teak (endangered…weighing a thousand pounds…um, no thanks) or wicker (infested with bugs, “island-style casual”…blech.) Nothing modern, nothing clean and streamlined…unless we wanted to pay thousands of dollars at Natuzzi or Z Design or somewhere. We lived in a beautiful condominium with cardboard boxes and junky mismatched stuff from Wal-Mart and cabinets from Home Depot.
Until we came to Oregon, finally visited Ikea, and were in heaven. Seriously, for the amount that you have to pay to furnish a home beautifully in a contemporary style in the islands…it would be cheaper to fly to the mainland, stock up at Ikea, and ship everything to Hawaii instead! Ikea could even raise their prices by 20% and still undercut what’s available in Honolulu by hundreds of dollars. Ikea people, take note!
But I digress. I love the textile patterns available in their fabric department; they’re so cool, so clean and uncomplicated. I must admit I went on a bit of a spree in the textiles department, picking myself up 2 yds of Patricia printed fabric last time I visited the mecca of Swedish design watered down for the average consumer palate.

And I made myself a dress. The fabric is stiff and 100% cotton, so it doesn’t lend itself well to anything but structured clothing, IMHO. I had to line the dress in poly satin since the fabric is really too rough to sit against the skin.
I wanted structured sheath dress with a little twist, so I chose Vogue pattern V1068 (dress on upper left). I had to make multiple alterations on the dress once made since of course the top part didn’t fit like the pattern said it would. I hate store-bought patterns. I thought the neckline was a little bit interesting. Not earth-shattering, but interesting.
This is why i.d. Bare Minerals is a travesty for my skin. It settles into all the fine lines around my eyes and makes me look like a perfectly lovely 60-year-old when I laugh.
I’m also working on a little removable puff-peplum for this dress…it won’t be done before the leaves start to decay, so I wanted to get these shots first. And a clutch handbag where I’m shading in the flowers with a fabric marker in various tones of gray…should be cool.
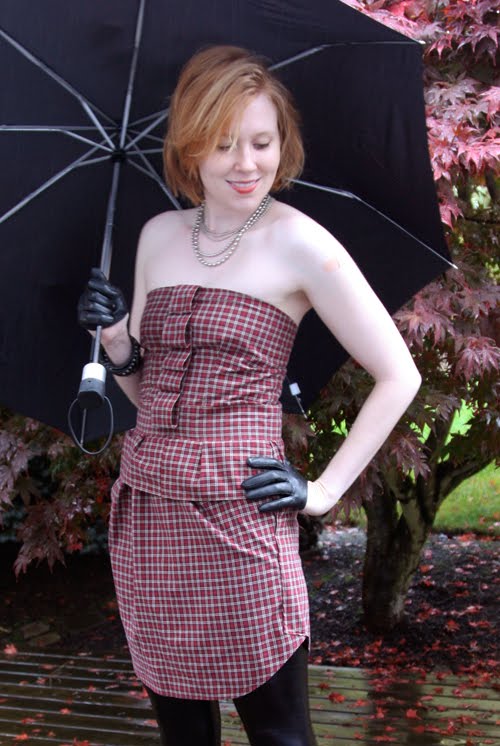
I’ve left the garden in this atrocious state for more than a week, reasoning that I wanted to do a photoshoot on top of all those beautiful Japanese Maple leaves before I rake them up. That’s my story and I’m sticking with it. I had a little Marilyn Monroe moment there with the elbow-length gloves…from Target, can you believe it?!

Now I’m off to rake me some leaves!
xoxox
Carly
Leave Comment
Nov 11, 2009 | DIY
As most of you probably already know, I did a DIY refashion of a Men’s Shirt to a Cute Summer ShirtDress that I posted back in August. One of my lovely readers, Amanda V., sent me a photo of the dress she made following the tutorial.
Amanda’s dress. Fabulous!
So I decided to do another shirt dress tutorial…this time using a men’s plaid shirt as the base, and changing up the front embellishment.
Are you ready? Here we go…
How to Make a Bustier Dress with a Peplum, Faux Waistband, Zip Back, Bust Darts, Tulip Skirt, & Front Cascading Folds
(say that 10 times fast!)
You’ll Need:
*1 men’s shirt (I used an Eddie Bauer M size shirt)…preferably not flannel
*1 invisible 14″ zipper
*12″ of 1/4″ wide elastic
*hook and eye
*thread matching topstitching thread in shirt
seam ripper / fabric scissors / pins / hand-sewing needle / sewing machine + regular sewing foot / zipper foot for sewing machine / a friend (or, a sewing dummy to pin on)
How To:
PREP YOUR PARTS

1. Cut shirt as follows:

- cut button placket off front
- cut sleeves off body
- rip pocket off front with seam ripper
- cut bottom off shirt, going straight across from underarms, through front and back
For each sleeve:
cut top rounded part off sleeves (we won’t use the tops)

2. Remove buttons from button placket.
 Bye-bye buttons!
Use seam ripper to open topstitched edges of button placket, making it into a flat piece of fabric.
Iron it completely flat.
3. Use seam ripper and open cuffs up at edge seams all the way to buttonholes; remove buttons.


Cut off ends of cuffs where the buttonholes are (we won’t use those parts).

Peel off any interfacing that’s stuck to your cuffs and discard.
PIN

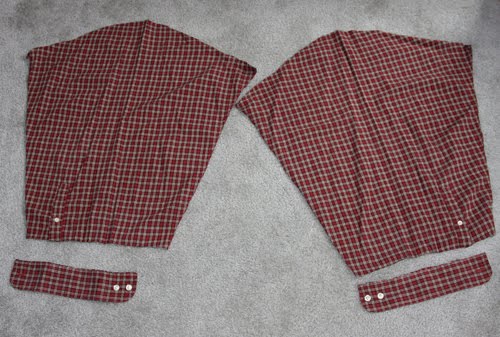
4. Turn shirt bottom inside out and cut off buttonhole placket. Pin edges together (where button placket formerly was). This will be your skirt. (top piece in photo; the shirt bottom is folded in half and flat)5. Pin the two sleeve pieces right sides together, matching the line where you cut the rounded tops off them. This will become the bodice of the dress. (bottom in photo above)
 5. Pin cuffs together, matching short ends, to make a long line. (I matched the center two so the curved parts of the cuffs will be in the center.) This will be your waistband. (I haven’t yet removed the interfacing in the photo below. My bad.:-)
SEW

6. Topstitch sleeve opening plackets closed on the back side of your bodice.
Sew both bodice pieces together where you pinned. (not pictured)
8. Sew all cuffs together at their ends.
This is what the waistband will look like once all your cuffs are connected.
9. Turn under about 1/4″ on each long side of the button placket you ironed back in Step 2). Sew 1/8″ from edges.
10. Sew along line you pinned on the shirt bottom in order to make the skirt, leaving about 5″ unsewn at the top of the skirt. (not pictured)
DART THE BUST
11. Cut off bottom of sewn bodice piece straight across. (This is the edge closest to your sleeve opening plackets.)
12. Wear a well-fitting sports bra or tank top that can support the weight of your dress bodice, and pin bodice (wrong side out) to your top in the center and at each of the side seams under your arm. (I’m referring to the side seams of the bra/tank top you are wearing.)
13. Using your fingers, start “pinching” the fabric outwards starting right below the fullest part of your bust on the right (usually where your nipple is). Pin as you go, moving downwards towards your waist. Do the same for your left side. Stand with both arms flat at your sides, move around, bend, etc…and see if the fabric pulls in strange ways. Alter your darting until both darts are relatively the same size and begin and end at symmetrical points to either side of your center front seam. (Measuring by the plaid pattern helps.)
14. Create side seams by the same method, using the side seams on your sports bra/tank as guidelines.
 I know it looks like it’s pulling in a lot of directions – mostly it’s because I’m raising one arm to take the photo.
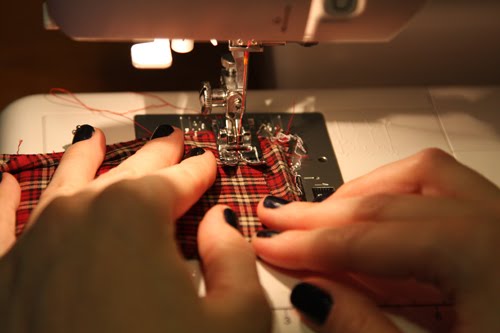
15. Take off the bodice and sew the darts on your machine, starting at the bottom and moving up to the bust point.
Leave two long threads at the end and knot the threads. Sew the side seams, and trim the seam allowance, notching where necessary.
16. Try the bodice on again, this time right side out. Are you pleased with the fit? No weird bobbles or anything? If it’s a little off, go back and fix. Also, does your bodice go all the way around your body? If not, now’s the time to add in some fabric salvaged from the leftover bits of your shirt – and add it to both sides of the open back. (You need enough fabric to touch at your center back PLUS 1/2″ on EACH SIDE.)
SEW THE TOP TO THE BOTTOM; MAKE THE PEPLUM
17. Pin the bodice back on your shirt/bra top. Pin the skirt underneath (onto a pair of tight-fitting leggings/underwear that you’re wearing underneath). Make sure the skirt underlaps the bodice part all the way up to your waist, since that will be the connection point of the skirt and the bodice. You need to match the side seams of that skirt to the side seams of what you’re wearing on the bottom…and place the seam that you sewed down the front of the shirt…at your center back. Place waistband over bodice at your natural waist, matching center fronts. Pin waistband to bodice all the way to the side seams. Make sure top of skirt underlaps bottom of waistband (or top of waistband, if you want a super-short miniskirt). Pin skirt bottom to bodice in center and at side seams only.
Take everything off.
18. Place dress on a flat surface. Continue pinning waistband all the way around to back parts of bodice. Pin skirt back to bodice back (pinning thru waistband) and gathering skirt at back where needed. Gather skirt at front between pins, and pin gathers in place.Creating gathers in the skirt part with my fingers.
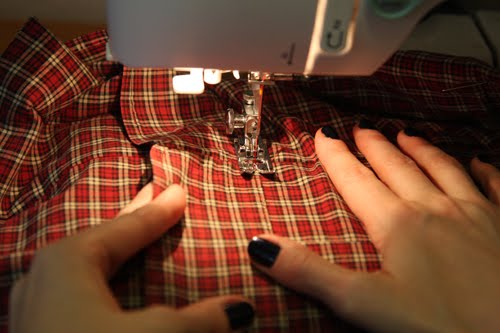
19. Topstitch top of waistband through all layers.

See the little w-shaped center to the waistband? A new day – you can see I’ve ditched the black nails.:-)
20. Topstitch bottom of waistband through all layers, preserving gathers in skirt as you stitch through them.
You can see the angle of the peplum at the center back.
21. Using a seam ripper, open the front bodice darts below the waistband to create a flared peplum. Fold under the ends of your peplum at an angle towards the center back, and topstitch edges.
PLACE THE ZIPPER
22. Try dress on inside out. Have a friend pin the dress at center back to create the seam allowance for the zipper. Also measure the zipper against the back of the dress and place a pin in the center back at the point where the zipper ends. (not pictured)
23. Take the dress off again. Sew the CB seam on your skirt up to the pin your friend placed. (not pictured)

24. Place the dress on a flat surface and pin the zipper to one side of the CB opening. Sew the zipper on one side, using a zipper foot. (Pre-basting if necessary.) Close the zipper, pin to other side of CB opening, and sew. Make sure not to catch the peplum in your stitching. (not pictured) Trim seam allowance next to zipper.
FINISHING TOUCHES
25. Put the dress on again. Fold under top of bodice to create a straight line, and pin. Take dress off; trim seam allowance under top. Stitch a 1/4″ seam at the top. (not pictured)
26. Try the dress on yet again. If the bodice seems too loose, zigzag-stitch a piece of elastic on each side of the back bodice, at the top on the wrong side of the garment. (not pictured)
27. Place top of flattened button placket on underside of top of bodice, matching edge of placket to edge of bodice top seam allowance. Center on bodice. Stitch placket to bodice on right side, going through all layers.

28. In order to make the cascading folds in the placket, measure out about 2″ from secured top of placket, and fold under, underlapping about 0.5″.
Sewing the first fold. The loop will actually hang a little below the line of sewing, camouflaging it. Work from the top to the bottom of the bodice in this way.
Push placket fabric up and out of the way, and sew straight across placket to secure at 1″ down from top of bodice. Repeat another 4 times to create cascading ripples down the front of the bodice; cut placket at appropriate length. The bottom looped ripple will cover up the end of the placket if you sew the end about 0.5″ above the bottom of the loop, and where the waistband top hits. (Your bottom loop will overlap the waistband slightly.)
28. Add a hook-and-eye closure above the zipper in the back. (not pictured)

29. To create a tulip-like effect to the skirt, overlap the edges at the side seams slightly, pin, and topstitch.Believe it or not, you’re finally done!!
I’m a Misses’ Size 4/6 (usually a S in dresses though sometimes a medium because my waist is kind of thick). A Men’s M shirt was sufficient for my size…if you are larger, choose a larger shirt to work with!
Not loving the ripply back, though. It might need a little nip in the back to make it sit right.


Whew! This took me awhile to write. I know the darting method I’m using is not exactly accurate (and most patternmakers would have my head), but as you can see, it works fairly well! The poor man’s (er, woman’s) version of bust darts.LOL
Thoughts: I’m thinking this is just too many elements for one dress. The point is for you to add and take away as you like. The peplum is not as full as I would like it – instead of being fashioned out of the bodice, it needs to be made from a completely rectangular piece of fabric to create the necessary flare. I’m also not liking the skirt gathers; I think instead the skirt should have pleats in the front to create the tulip shape; the gathers just look messy to me. I’m going to do a little makeover on this piece, but otherwise, I hope this gives you the tools to make your own!
Happy DIY’ing!
xxoxo
Carly
~If you liked this post, please share it!~
Leave Comment
Oct 29, 2009 | DIY


So, were you watching the last Sex and the City movie close enough to notice those adorable half-gloves Carrie was wearing while using a pay phone in one scene?
Such a subtle difference to the regular wrist-length leather glove…but oh so cute. The gloves were actually from Ines Gloves, available for $147.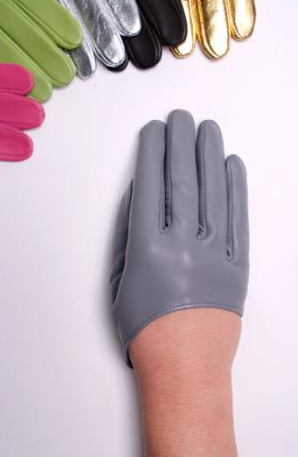
Ines gloves…so cute…but oh so expensive too. Why does this hand model lady have such hairy arms? This confuses me…and dissuades me from wanting to spend that $147 for some reason.
But we wouldn’t think of paying that much for such a simple accessory, now would we?
So why buy when you can D.I.Y.?!
 Enter a typical pair of wrist-length leather gloves (mine I got at the Buffalo Exchange for $8). Wish that they were gray or brown…but c’est la vie. (I didn’t want to go through the whole rigmarole of painting them with leather paint…or worse yet, attempting to dye them. I don’t even know if that would be possible with black gloves. In any case.)
By using the photos on the website as reference, I sketched the scoop shape using an eraseable fabric pen onto the gloves. 
You can see the white lines on the gloves…I tried a couple variations before deciding on the shape. Always make sure your pencil comes off of leather BEFORE you draw all over your gloves!
Add 1/4″ seam allowance below the line, and cut with a pair of sharp shears. Behold the scoop shape! Cut with a pair of sharp shears. I don’t have leather scissors, for some insane reason. Oh yes, because they’re ridiculously expensive and I just squandered my available funds on some new sewing scissors.
Using Loctite Vinyl, Fabric, and Plastic Glue, turn under that 1/4″ seam allowance and secure it to the underside of the glove. (Barge cement is a be-otch to work with since you have to wait 15 minutes after applying it before sticking your surfaces together…a total hang-up for a DIY’er in a rush like me…) ‘Tis necessary to glue the seam allowance since leather gloves are usually made from a thin and soft lambskin…which rolls and shifts uncontrollably as you sew it on a home sewing machine…unless you’re an all-star with sewing lightweight leathers, I’d recommend gluing it down to get that clean seam first!
The seam allowance glued (for the most part) down to the inside.
Then, using a leather needle (medium-weight leather, since we’re going through two thicknesses + two thicknesses of the lining), edge-stitch about 1/8″ from the edge of your gloves to secure that hem. (sorry no photo of the stitching…couldn’t work with the sewing of something black, with black thread, in a might-as-well-be-pitch-black poorly-lit sewing room.)
You’re done! Step back and admire.

LEATHER-SEWING TIPS:
Use a longer stitch than you normally would when it comes to leather…and a good tip when sewing leather is to crank the needle forward manually so that it has pierced the leather completely…BEFORE pressing with the presser foot of the machine to sew your line of stitching. Start sewing with the needle already in the leather to say it another way. Also, you can’t go super-fast or super-slow…there’s a happy medium where your machine’s feed dogs advance the leather at the right speed, the needle punches through the leather without jarring and hitting the needle plate, and the needle goes in vertically and doesn’t hit the bobbin case. Too fast and the aforementioned problems will crop up; too slow and the needle won’t punch through the leather. It’s different for every machine – just something you need to experiment with. (Of course, if you’re using a heavy-duty/industrial machine for sewing leather, you can completely ignore what I’ve just written.:-)
When starting your line of sewing, DO NOT BACKSTITCH. Go all the way around the edge, then back into the first ONE or TWO stitches you did at the beginning of the line. Backstitch ONCE. This will create a nice, professional look to your stitching.
Also, do not start stitching directly on a seamline. This will usually cause the needle to jar and hit your presser foot/needle plate/bobbin case. Sewing machine needles for leather (for the home sewing machine) are pieces of s$#@. They will snap willfully at ANY irregularity of thicknesses in your material; or bend and not punch the leather vertically at certain speeds…ugh. Buy more needles than you think you need!
Can’t wait to work these in a new outfit…the leather glove is THE must-have accessory this Fall, so rock it while you can!
Happy DIY’ing!
xoxo
Carly
Save
Leave Comment
Oct 21, 2009 | Media
 FaveCrafts.com has compiled an new sewing project eBook – featuring the Convertible Blouson Top from 3 Men’s Sweatshirts tutorial by yours truly!
If you enjoy sewing and crafting, this is a great little book to add to your arsenal – and it has some fun projects to try out.
Included in the 25 Sewing Crafts from Bloggers eBook:
Easy Clothing Patterns
Girls’ Tiered Skirt (page 4) – This is a must-have for every little girl. This free easy sewing pattern uses beautiful fabrics and basic techniques.
Reversible Scrap Fabric Apron (page 9) – Create an adorable half-apron with scraps of fabric from around the house.
Easy Applique Flowers (page 16) – This tutorial shows you how to dress up clothing in a simple and inexpensive way with scrap fabric pieces.
Sewing For the Holidays
Embellish a Pillow for Mom (page 29) – Even if you are not very crafty, you can still present a loving gift this Mothers Day, created by your own hands, without breaking a sweat.
Fleece Gnome Hat Tutorial (page 30) – This fleece baby’s gnome hat is adorable for the cold weather. It is easy to make following this quick tutorial.
Home Decor Crafts
Framed Monogram (page 37) – Create a beautiful, framed monogram with felt and fabric. A bird embellishment tops of a simple sewn creation for truly creative decor.
Heating Pillow with Buckwheat (40) – Sew up an easy pillow filled with buckwheat to serve as a heating pad.
Sewn Bags Patterns
Camping or Sleepover Bag (page 44) – Get a little creative and sew up a convenient bag in colorful fabric to transport your sleeping bag and other essentials.
Muslin Snack Bags (page 50) – These little muslin snack bags are the perfect size for all your snacking needs and environmentally friendly!
-Carly J. Cais
Leave Comment

 The concept of shoe bands is kinda similar to shoe clips, but just…bands. If you opt to adorn the top of your boot, then maybe Bandits are for you! They carry a number of different styles, not just the Southwestern-inspired motif pictured above.
 Bandit boot chains above. Adding to DIY list pronto.
 Presto! It’s like you have a whole new pair of shoes!


