Nov 24, 2014 | By Carly J. Cais, DIY

 Now with the holiday season nigh, the air is filled with rich, cozy scents reminiscent of home, family, and years past. Glade has come up with a Limited Edition Winter Collection of fragrances, encapsulating all that is wonderful about the season, including one of my favorites, Sparkling Spruce.
 (more…)
Leave Comment
Oct 28, 2014 | DIY
 I LOVE me some freeform, rough-hewn, organic-looking ROCKS lying about the house as home decor (and I’ve been a rockhound for as long as I can remember!). Now it’s particularly fashionable to have some large geode chunk or quartz piece sitting on one’s desk or bookshelf (which looks extremely high-end and chic…just ask Mitchell Gold + Bob Williams). But unfortunately these large hunks of rock just cost so darn much, they’re more an investment piece than something you can just get your hands on easily. I decided to go the DIY route, and make my own version of this ubiquitous geode decor – and use it as my own freeform paperweight for my desk. Plus, it’s waaaaaay cheaper than you might think! (Especially when you have some leftover quartz from other projects, like my DIY Free People Quartz Wrapped Bangle and DIY Free People Gold-Dipped Quartz Necklace.)
  Here’s how to make your own:
Materials:

polished quartz chunks (get yours from a rock shop in bulk…I got mine from Ed’s House of Gems in NE Portland) / plastic lid with a lip / Weldbond Adhesive (or other glue for rocks) / clear beach glass (found in the floral section at the craft store – it’s used as vase filler) / gold gilding liquid and brush (optional) / rubber bands (optional)
How To:
 1. Start by placing your beach glass pieces and favorite quartz pieces into your lid to create the base of the piece. Fit as many as you can so that they are stable on the lid. It’s best to vary the shape and size of the pieces, and mix the polished quartz in with the matte beach glass.

2. Once you’re satisfied with the arrangement, pick every other piece up and carefully add some generous glue along the edges where it touches the other pieces. Some you’ll pick up, others you won’t, but in the end you want all the pieces to have glue along their touching edges. Allow the base to dry.

3. Once the base is sturdy, spread a large amount of glue in all the crevices and gaps [the glue I chose dries clear]. Press stones into the gaps to fill out, paying attention to the overall shape and making it rough and organic-looking like a real geode would be.
4. Allow to dry. You may have to repeat this process a few times until you have built up the top of the piece, since each layer may get too heavy with rocks and they start sliding off before the glue has dried. Finish with a top layer mostly of quartz piece and allow to dry.
5. (not pictured) To make it look like a true rough-hewn geode piece, once dried flip the piece over and glue rocks to the bottom of the base so the base isn’t so perfectly round and the shape of the lid itself. Rubber bands can hold these pieces of rock onto the base until everything is dry.
6. (not pictured) If you so desire, you can give the bottom of the paperweight a layer of liquid gilding…I totally would have, except the lid to my gilding was fused closed and no amount of wrenching would get it off. So I decided the finished paperweight was better without the gold!!

And that’s it! Even though it’s technically just glass and quartz glued together…one would be very hard-pressed to actually figure out that it wasn’t just some cool-looking rock formation. 

(P.S. – the beautiful tea roses in the vase are actually one of my favorite Joss & Main purchases! I love their faux florals; these ones are the soft-petaled super-realistic ones.) Plus, the whole project cost me a total of $12.99 ($9 for the bag of quartz, which I had already used for other DIY’s…and $3.99 for the beach glass from Michael’s). I already had the Weldbond at home!
That sounds like a super-bargain, no?!
Hope your office or shelf looks snazzy and lovely with this chic and cheap upgrade. Happy DIY’ing!
xo
Carly
Save
Leave Comment
Oct 14, 2014 | DIY

What’s a MUST for a spooky, scary, FUN Halloween project? Anything that GLOWS in the dark – and Tulip glow paint is the perfect product to make your DIY Halloween projects light up! (more…)
Leave Comment
Sep 18, 2014 | DIY
 This DIY tutorial has likely been done already hundreds of times in the aftermath of Tom Binns releasing his neon cameo collection in Spring 2012 – but what’s once more? I love the juxtaposition of elegant, old-world cameos harkening back to the times of daguerrotypes and intaglio portraits…rendered in full-on neon for the modern age. You can make your own easily, with some paint, rhinestone chain, and a soft embossing metal as backing – with no one the wiser as to how your unique creation came about. Here’s how:
Materials:
1 cameo (and this place has the best selection!) / rhinestone cup chain / gold embossing metal / scissors / jump ring / pliers / wire-cutting pliers / jewelry glue (not pictured) / pin or awl (not pictured) / paint in 2 neon colors / primer or white paint / pen / paintbrush / matte sealant (optional, not pictured)
How To: 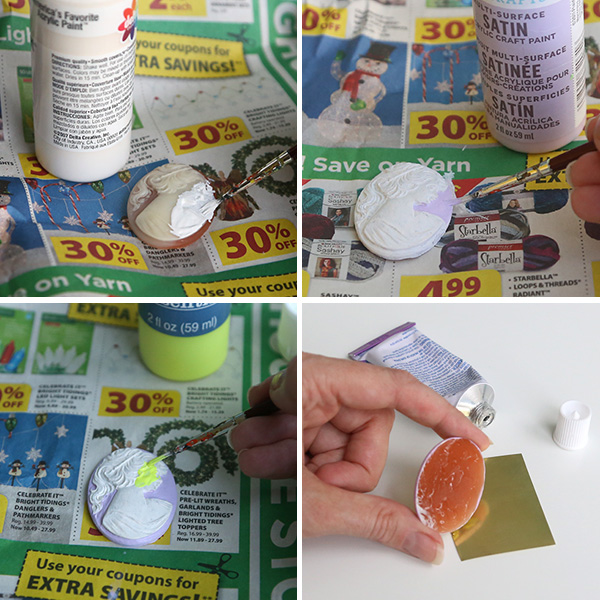 1. Since cameo colors are usually fairly opaque, you may want to prime your cameo first with a coat of primer, or just a coat of white paint. Allow to dry.
2. Paint the cameo. Usually it’s easiest to paint the lighter color first, than the brighter or darker color next. You may have to do a couple coats of each color to fully hide the color of the original cameo.
3. (optional) Paint a coat of sealant on he cameo to hide brushstrokes and prevent paint chipping. Allow to dry.
4. Glue the cameo onto a small piece of embossing metal.
5. Place the rhinestone chain around the cameo, and cut to desired length.
 6. Spread glue on the back of the rhinestone chain, and glue to the metal backing around the cameo.
7. When dry, poke a hole in the embossing metal with a pin or awl.
8. Trim the metal close around the chain, and use the side of the scissors to fold it to cup the chain so no sharp edges stick out.
 9. Thread a jumping through the hole you made, onto a necklace.
And you’re done!

Wear with something dark and modern for contrast, or pair with a pastel frilly corset for your best Marie Antoinette impression!
 Happy DIY’ing!
xo
Carly
Save
Leave Comment
Sep 7, 2014 | DIY
 Hello all!
I apologize for my week-long absence…things have been just crazy with Lil Tot going back to school and getting back into the school routine. And I have an announcement to make soon – can’t wait to share!
 I snapped up a Stylestalker Space Jam T-shirt style dress from Shopbop in February – I just couldn’t pass up the cool pattern on it. (All it needs is a kitten shooting rainbows out of its eyes and then its the perfect Dark Side of the Moon-style CD album artwork. Or something like that.)
  Unfortunately it was the last dress left and at a size 4 it was a little too tight here and there on me (at the time in February). The mantra I live by: [Tweet “Clothing needs to skim the body…not show where your bellybutton is!”] So I went about to alter it to be a little more skimming, and here’s how you could do the same to a straight-shaped dress that just needs a little extra something:
You Need: (more…)
Leave Comment


