Mar 15, 2011 | DIY
 I don’t think I ever posted the step-by-step tutorial for this. Woops!
Inspired by this neckpiece (actually a belt)…from the J. Crew Fall 2009 catalog.

A very simple, but effectively pretty, DIY. Seen in this outfit last…last year here.
You Need:
*8″ Pearl-edged Lace Ribbon
*36″ Cream Satin Ribbon
*15″ x 3″ wide cream-colored Scrap Fabric
*8 Assorted Shades of Silk Flowers
*1 Large Pom Pom
*1 Small fabric Rose
*18″ x 6″ wide Peach Satin Fabric
And…
*Sewing Machine
*Needle & Thread
*Hot Glue Gun
*Fray Stop
1. Create the backing for your piece. I used an 18″ x 6″ piece of peach satin voile – and turned the edges under, hemming so as to conceal the raw edges.
2. Cut your satin ribbon in half; stitch the end of each to each side of your fabric backing. Apply Fray-Stop or burn ribbon ends to keep from fraying.
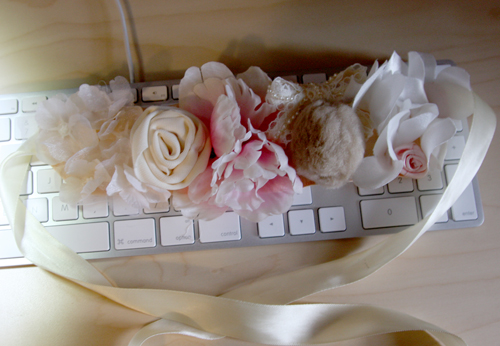 3. Add design elements with a hot glue gun onto your fabric backing. I added the flowers first, then squashed the pompon and small fabric rose (premade) in-between.
4. Create large fabric rose by rolling a piece of cream-colored scrap fabric, securing with hand-stitching. Glue onto backing.
5. Tie pearl-edged ribbon in a bow, and glue onto collar.
You’re done! You can wear it as a collar/necklace, as shown – or even wear it as a belt – which I love!
Happy DIY’ing!
xoxo
Carly
Leave Comment
Nov 24, 2010 | DIY, Fashion
LS Tee: Petit Bateau
Draped Rose Chiffon Skirt: DIY
Studded Cuff: Target
2-finger Pyrite Ring and Spike Ring: handmade by me
Diamond-pattern pale blue tights: unknown
Suedette Tie Shoes: Lela Rose for Payless (2009)
Quilted Bag: indio (Japan)
Pierced Rose Brooch: DIY
Day 21 in my 30 Days of Outfits Challenge: November 21.
Sunday at home recuperating from the long shoot from the day prior. But I still wanted to take a couple DIY items for a spin – and put together an outfit in dreamy pastels.
When I first saw luv aj‘s pieces, I thought they were a wonderful solution to connecting large statement pieces onto ring bases without soldering. Many jewelry artisans cannot solder (myself included). Not being able to do this simple construction method (though goodness knows I’ve tried!) often limits the designs you can create, especially when it comes to rings (which usually need to be soldered together lest the stone pop right off the base).
But wire-wrapping is an ingenious solution to the problem of connecting the top to the ring, and completely eliminates the need for soldering! I tested it out on a couple similar designs. (The drawback is the rings are incredibly uncomfortable on the fingers. I wonder if luv aj’s versions are easier to wear?)
This skirt I made from a curtain valance. Yes, a curtain valance!! If you ever check out Goodwill (or any thrift store that sells home items), you can probably find some curtain valances that have chiffon overlays to them. I was struck by how beautifully they were draped – so I bought the pair ($3.99) and made a skirt out of one. When I draped it onto my body I found the waistband wouldn’t sit right, so I did have to make some darts at the waist…and sew a front-seam and hidden fly. It’s not perfect – it’s DIY, after all!
But if you have any valances at home lying around, or spot any at the secondhand store – they really look lovely as a draped, twisted skirt – a style of skirt that is so popular now (just look at the recent collections of Alexander Wang, Burberry, and Celine, for example).
The Pierced Flower Corsage is so easy to make: just a silk flower from the craft store, with rings threaded through it, or grommets added and rings and ball beads through those. I made two and thought the rose one went better with this outfit.
Hope everyone had a great Sunday!
xoxox
Carly
~If you liked this post, please share it!~
Leave Comment
Sep 8, 2010 | DIY
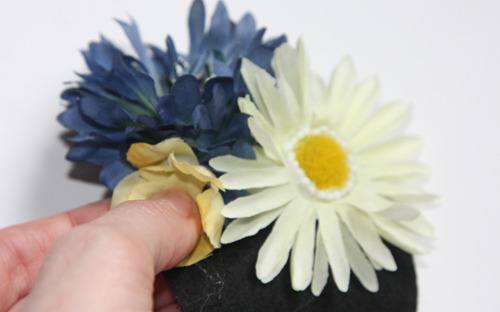
I have such a thing for accessories, and Japanese magazines such as Vivi never fail to supply an endless source of ideas and inspiration. Always torn between whimsically feminine and punky/edgy, I constantly vascillate back and forth in my own outfits…but when it comes to frilly, flowery, and girly pieces Japanese mags always beat the rest. This flowered hair clip (similar to one featured in Vivi May 2010) is super-easy to make, but lends a pretty and feminine vibe to anything you’re wearing.
You Need:
*silk flowers (mine were cornflowers, daisies, and forsythia…and a white plum or something but I’m not sure)
*tiny white seed beads
*stiff black felt
*hair clip
and…
*hot glue gun + glue stick
*hand-sewing needle
*black thread
*scissors
*toothpick
*craft glue
How-To:
1. Separate the silk flowers from their stems.
If the flowers have jutting base stems, cut those off.
2. Cut a small piece of the felt in a oval shape. Mine was about 4″ long by 3″ wide.
3. Spread a tiny amount of craft glue around the center of the main daisy. Use a toothpick to position the seed beads in a ring around the center. (You could also potentially do this after you’ve glued the daisy to the felt base, but I found it easier to do it first.) Allow to dry.
4. Use a needle and thread to anchor the hair clip to the felt oval. (Remove the center prong first and then loop the thread around the clip base.)
5. Spread some hot glue on the underside of a flower and press onto the felt. Add more flowers, clustering them close together. If the petals begin to separate, add more hot glue in-between the layers of petals.
Use the toothpick to prevent the petals from tangling on one another. 
6. Trim the edges of the felt base so it can’t be seen from the front.
And that’s it! Soft, slightly curled hair works best with this piece – or you could try this in front of a ponytail (again, going for the soft look).
If you want more security, you could also make this attached to a thin headband, or add a pin-back to use it as a corsage pin on a jacket or a bag.
I’d love to see your combination of flowers and colors on this little piece!
Happy DIY’ing!
xoxox
Carly
~If you liked this post, please share it!~
Leave Comment
Sep 1, 2010 | DIY
Since I’ve been attempting to write the tutorial for my Men’s Shirt to Romper project for the last 2 hours and I’m now going cross-eyed with no end in sight, I think I’ll instead share yet another project I submitted for Style Sample Magazine and New York Design Shop’s Create Couture Challenge.
Materials:
*White Rose Pin (leaves only)
*Cream Rose Pin (leaves only)
Additional Tools/Materials:

*chain earrings (basically just some french hooks and some lightweight chain)
*pliers
*2 jump rings
*scissors
*awl
How to:
1. Remove leaf sections from undersides of both rose pins.

Separate leaves and trim tops.
2. Stack 4 leaves atop one another and poke a hole in their tops using the awl. (You can also use small sharp scissors or a pin.)

3. Thread the bundle of leaves onto a jump ring.

4. Add jump ring to earring. Repeat Steps 2-4 for the remaining leaves and other earring.

Pretty easy, huh?
Fun, dangly, and lightweight – these are perfect for summer!
xoxox
Carly
~If you liked this post, please share it!~
Leave Comment
Aug 29, 2010 | DIY, From You

Reader Anna from Shy Shirley sent me this link to her version of the DIY Petal-Front Top that I created the tutorial for in the recent Create Couture Challenge.
I love the breezy, floaty nature to the top – and the little sprays of green from the flower petals.
What a fabulous and creative job!
And if you haven’t seen her blog, please pay her a visit – she has a couple GREAT tutorials for an Anthropologie and a Free People necklace, some cool Etsy stats, and some fashion terminology that is a must-know if you’re interested in being trendy and current! I can’t wait to see what else she comes up with…
Thanks for sharing, Anna!
xoxox
Carly
Save
Leave Comment