Jan 4, 2016 | DIY
 Oh metallic lurex thread, how I love thee!! It adds so much dimension, so much Wintry sparkle, so much glamour to just plain old fabrics. But it’s a demon to clean.
Once I found a beautiful silvery sweater at H&M on the clearance rack for a mere $8.95. And it happened to be in my size, too. I wore it often for many years. I wore it here, for example.
And then while at work one day I dropped my lunch on it. A small mouthful of leftover Thai drunken noodles. In oily brown sauce. And my favorite sweater was ruined forever.
 I washed it multiple times, in both cold and warm water, and tried every stain remover known to woman. But nothing got the stain out of acrylic. That brownish-yellow stain would not budge. I tried to wear it after the unfortunate incident, but the stain was too obvious, and I felt self-conscious. I thought about discarding the sweater (heck, I had only paid $8.95 for it so it wasn’t a huge investment)…but I wanted to save it if I could.
And then I had an epiphany…to combine that trend of one big word on your shirt…with my poor abused sweater…hence forever covering up that stain and allowing me to wear it again (or at least, until it got too pilled and stretched out to even resemble clothing anymore). Hence this DIY. Here’s how to cover up that horrible stain on your own shirt if it has befallen similar circumstances:
DIY Shine Word Sweater (or, How to Cover a Stain on Your Sweater)
You Need:
 sweater or top / black felt / fabric scissors / needle and matching thread / pins / graphic program to create your word if you’re not using the download below / printer (or print at an office store) / regular scissors
How To:

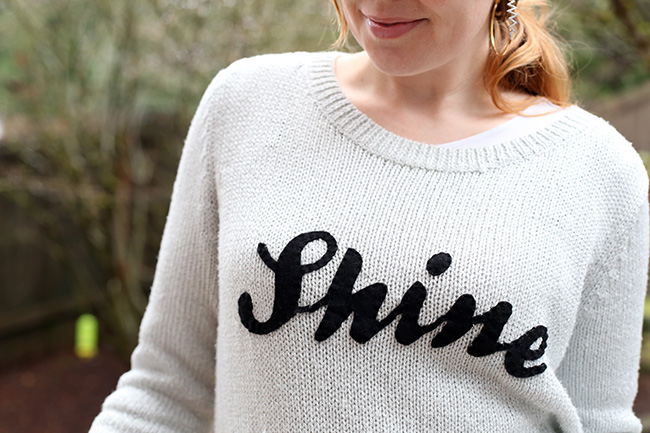
- Choose what word you’re going to put on your top. It took me forever to finally choose a word (and yes, I browsed Pinterest, blogs, and magazines for what seemed like ages). But I found it: Shine. Quite ironically literal. So I went with that, and typed it out in Photoshop using the Ballpark Weiner font and printed out a copy of the word to see if the spacing and font would indeed cover up the stain. It did so I went with that.

- Cut out the word using regular scissors. Don’t forget to cut out dots on i’s or punctuation as well. I didn’t cut out the negative space inside the letters at this point.

- Pin the word to your felt.

- Use fabric scissors to cut around your word carefully. You may need to make certain areas wider than the font so the felt doesn’t pull apart. For cutting the negative space out of the inside of loops, I just eyeballed it, cutting smaller than I needed to and then widening once I laid the cut-out on the original font.


- Place the the cut out felt word to the center of your top, and pin down so it is flat.


- Use a running stitch (looks like – – – – ) around the inside edges of the felt to secure the word to your top. This is long and tedious – make sure you have some Netflix or mindless TV to get you through. Also stitch on any i dots or punctuation as well. (If you’re dealing with a stretchy top like a sweater, be careful not to stretch the knit too much as you are sewing or else the finished word will pucker.)
 And that’s it! A pretty upgrade to a soiled mistake…and I’ve just saved a major piece in my wardrobe. How to cover a stain on your sweater is really as easy as a bit of felt, time, and thread!
 This is something you will need to hand-wash cold and lay flat to dry. You could also use suedecloth or any other fabric that doesn’t fray when you cut it – leather or vinyl I would think a little tough to hand-sew but you could always try it if you prefer that look.
Download my DIY Shine Word Sweater graphic here if you’d like to make your own “Shine” version (click below):
(77 KB PDF, sized at 300 dpi, for 8.5″ x 11″ paper)

 Shine on, my friends!
Ever had a stain on your shirt where you did something creative to cover it up? Do tell!
xo
Carly
Save
Leave Comment
Oct 14, 2014 | DIY

What’s a MUST for a spooky, scary, FUN Halloween project? Anything that GLOWS in the dark – and Tulip glow paint is the perfect product to make your DIY Halloween projects light up! (more…)
Leave Comment
Jun 3, 2014 | DIY
 It seems like an age since I posted I posted about Daisy-Print Inspiration here on the blog…but yes, this print is still trending amongst street style and retailers lately. I DIY’d an oversized sweatshirt in this neat pattern, and though it may be a little out of season by now, you can always do this on a more lightweight material.
  Plus you can customize the flowers exactly how you want! Here’s how:
You Need: (more…)
Leave Comment
Jan 9, 2014 | DIY
 As evidenced by my recent DIY Inspiration post, windowpane-print is everywhere! It’s a graphic, eye-catching statement that is reminiscent of checks and tartans, but feels oh-so-fresh this year. I wanted to find a way to mimic the look without splurging for it – and without messy fabric-painting; some way that would create crisp, bold lines in a cinch.
  And I figured out how to make it easily (with a little help from some trim and double-stick fabric tape). Here’s how:
You Need: (more…)
Leave Comment
Jun 30, 2013 | DIY
 Aiko Miyako started her blog Hapy Friends Shoppe last year, sharing DIY tutorials for adorable plushies and sweet, lacy pieces that look so pretty paired with pastels and structured blazers. Today she is joining us to share her DIY for a Laced-up Sunday Tee here on Chic Steals. It’s a great project to breathe life into an old T-shirt or tanktop and give it a bit of feminine flair. Take it away, Aiko!

Before and After of the T-Shirt
Why hello there everyone! My name is Aiko and I am going to share a simple DIY project perfect for Sundays! We will be making this sweet looking laced up T-Shirt. This is a simple project and is a great way to recycle old pieces and turn them into something new. Lace is a beautiful accessory to add to your plain T-shirts and dresses as it gives a romantic, vintage feel which I absolutely adore. This method can be re-created on longer T-shirts depending on preference.
Difficulty level: Intermediate
Things you will need: Old T-Shirt (short or long) / Scrap lace / Scissors / Needle / Thread in the similar colors to your fabric / Pearl beads
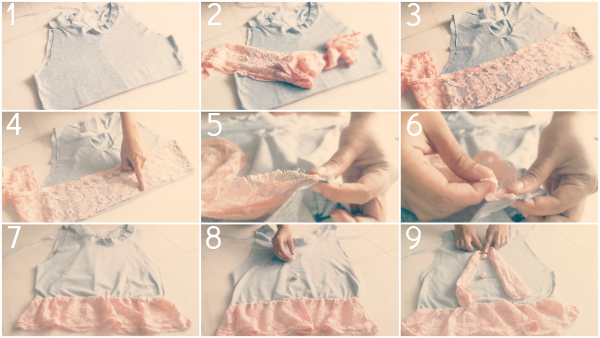 1.) Prepare any kind of T-shirt preferably a plain one. I used an old cropped tee I had lying around. Straighten the T-shirt out, leaving it flat on the floor.
2.) Prepare some scrap lace. In my case, I used scrap lace I had from a previous project. You will want to measure out the lace slightly more than the width of your T-shirt.
3.) Leave your shirt right side up and we are ready to start sewing.
4.) Line the lace parallel with the bottom of your T-shirt and sew 2cm (about 3/4″) above the bottom. Remember to hem the edges so that you have a neat line. (sewing machine only)
5.) If you are hand-sewing the lace on, grab both ends as shown in picture 5. Sew right at the bottom, using blanket stitching. This is a simple and fast method of hand sewing two pieces together and it creates a sturdy finish.
6.) Now let’s create some pretty pleats. Depending on how intricate you want your pleats to be, space them out and start folding the lace as shown in the picture. Sew onto the fold and you are done! Make sure you snip off any excess and hem the edges of the lace.
7.) This is what you should have once you are done with the lace. I only sewed lace on the front side of the T-shirt to give it some edge and left the back bare.
8.) Let’s pretty up this T-shirt. I used pearl beads to create fake buttons and sewed them on by hand using a back-stitch.
9.) Finally, I took some remaining scrap lace, folded it in half, and placed it at the top of the T-shirt. Sew it on using a back stitch and voila! You are done.
 Pair this blouse with a pair of distressed jeans shorts for some edge, slap on a straw hat and be on your way to a perfect Sunday picnic by the lake!
Thank you so much gorgeous people for having me here! It has been a blast!
Xoxo
Aiko
 Aiko Miyako has been blogging and sharing videos on Youtube for a little over a year now under the name Hapy Friends Shoppe. Her blog is built around fashion and craft, starting off with sharing little plush projects on her blog and YouTube channel. Once that took off, she decided to add more content to her blog by posting outfits inspired by the things around her. She adores fashion and DIY projects because she is able to share the things that she loves in hopes to inspire others.
Blog / Youtube / Facebook / Twitter / Instagram / Chictopia
Leave Comment


