Apr 9, 2015 | DIY
 Hi friends! It’s been awhile since I’ve shared a DIY here, for many reasons.
Life took over for awhile.
But I’m back – with a fun and easy DIY for you all to try out!
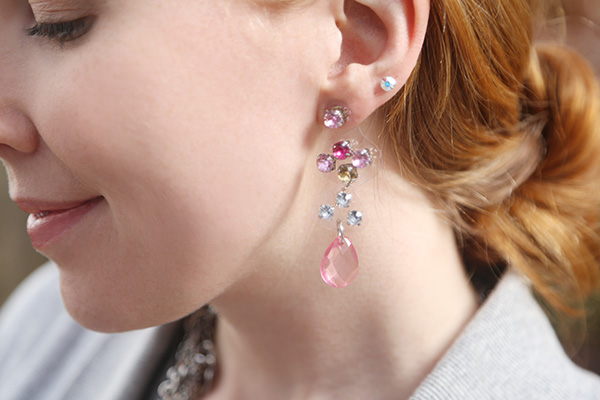
Big, bejeweled pendant chandelier earrings have been on-trend for awhile now…but unless you’re planning on whipping out that soldering torch and applying to your rhinestones…they’re a little hard to make.  Enter translucent vinyl PVC as a backing – plus some strong glue – and you don’t ever need to pick up that pesky torch. Here’s how to make your own designer-style illusion jeweled chandelier-style dangle earrings:
You Need:
PandaHall Acrylic Beads (I used the Mixed Color Transparent Acrylic Faceted Drop Pendants in light pink / PandaHall Mixed Acrylic Rhinestone Montee Beads in light pink, hot pink, and champagne / earring pads with backs / large jumprings (I actually used 2 per earring so 4 total) / transparent PVC vinyl / pliers and jumpring tool / glue for plastics and metals (I recommend Loctite but had run out when I made this project!) / awl or needle / scissors (smaller scissors are better I found, like nail scissors)
How To:  1. Lay out the beads on a flat surface to determine placement of the rhinestones.
 2. Use a generous dab of glue on the back of each rhinestone to glue it onto the transparent PVC vinyl. Space your rhinestones apart to allow for cutting them into separate pieces if you desire.
3. Once dry, use scissors to cut around the rhinestones. (I chose to cut around some clusters of rhinestones separately so I could join them with jumprings for more dangle.) Make sure to round your corners.
 4. Glue the earring pad onto the back of the earrings, and allow to dry.
5. Use an awl to pierce the vinyl for each separate rhinestone cluster that you want to connect, and at the middle of the bottommost rhinestone cluster, near the edge.
6. Connect a Drop Pendant to the bottom of the earring with a large jumpring.
7. Connect all the pieces with jumprings to complete your earrings.

And that’s it! They’re surprisingly stable and will withstand some wear (though I wouldn’t recommend running obstacle courses in them).
I also made some alternate-colored ones in the trendy asymmetrical earring style.

I love how they look disconnected – almost floating – above your shoulders – utterly utterly chic with a backswept ‘do and a pretty necklace for Spring.
 Happy DIY’ing!
xo
Carly
Save
Leave Comment
Apr 23, 2014 | DIY
 Hello lovely readers! Today I’d like to share the DIY tutorial for the Gem Pendant Necklace I designed for Wander & Hunt. It was inspired by an over-the-top, bejeweled and utterly gorgeous Dannijo pendant – and so I couldn’t help myself but re-create all that glittery goodness.
 Here’s how:
You Need: (more…)
Leave Comment
Jul 6, 2009 | DIY

Designers appear to have reached into their desk drawers for inspiration this spring, pulling out the New Wave accessory du jour: staples, pins, and zippers utilized in a variety of different ways: exposed, in contrast-color, haphazardly applied as trim, or twisted into 3D shapes. Interestingly, the largest zipper manufacturer in the world, YKK, was one of the official sponsors of Mercedes-Benz Fashion Week in NYC (even the lanyard for the press badge was a zipper). From the staples on Victor & Rolf’s beautifully cut wool jackets to Sex Pistols-style safety pins and cheeky punk jewelry by Tom Binns – thanks to this hot 2009 trend, low is the new high, and the functional…fabulous.
The hardware-heavy, craftsy felt-flower cuff by Marc Jacobs inspired us to staple, zip, and pin our own…here’s how:
 WHAT YOU’LL NEED:
– large piece of stiff black felt (8.5″ x 11″)
– black thread
– decorative thread or staples in gold (check the scrapbooking section of the craft store)
– 1 decorative button
– heavy-duty gold snaps (2 sets)
– gold soutache braided trim
– 1 heavy-duty jacket zipper (black with gold teeth)
– gold safety pins (1 large, 15 small)
– clear, flexible plastic (like from a vinyl tabletop cover)
TOOLS:
– snap setting pliers/hammer+die for the snaps
– stapler
– needle
– felt or fabric glue
INSTRUCTIONS:

1. MAKE THE PARTS Cut the felt into 2 abstract, oblong flower “petals” 2 flower “petals”. To make the triangle-shaped petals, cut the plastic into 2 diamond shapes. Cut the zipper into 3 lengths, each piece measuring 10″ long. Fold each length in the center to make a rounded petal shape; secure the inside with 2 gold staples (or hand-sew stitches in decorative thread).

2. MAKE THE CUFF AND BASE From the felt, cut out the base of your flower parts: a circle measuring approximately 1.25″ in diameter. Then cut a 2″ wide strip that is long enough to go around your wrist plus a 3/4″ for overlap for the snaps. Use snap-setting pliers (like Dritz), or hammer and die to set 2 snaps (and their counterparts) into the ends. Because they are strong, we chose shanked snaps; alternatively, you could use sew-on snaps.

3. ADD THE EMBELLISHMENT Using a needle and thread, hand-sew your parts onto the felt base. Start with a felt petal, then a zipper petal, then a plastic petal in a corkscrew design; repeat, attaching each new petal on top of the previous one. Wind the braided trim in and out of the petals in a figure-8 pattern, securing in the center with a few stitches. Then hide all of your stitching with a button sewn into the center. Pin safety pins haphazardly around the edge of one of the felt petals; thread 10 smaller pins onto the larger pin and attach. Complete the look by adding yet more staples or decorative thread.

4. ATTACH BASE TO CUFF Glue felt base to the center of the cuff. Secure further by sewing around edge of the circle base with decorative thread.
To let the cuff rock out on its own, wear with something demure…or do a full-on Marc Jacobs style, with a nipped-in shrunken jacket, mismatched obi belt, super-long denim pencil skirt, and teeny porkpie straw hat set akilter.
Still have questions? Email me at CarlyJCais AT FashionTribes.com. Otherwise, happy DIY-ing!
– Carly J. Cais
(runway photos via style.com)
(As posted on FashionTribes.com)
Save
Leave Comment


