Feb 17, 2011 | DIY

Yesterday I coveted it, so today I’m going to show you how to make it. It’s DIY in 5 – minutes, that is. The easiest, quickest ways to take a piece from blah to fab and update it to current trends.

From left to right: Giambattista Valli, Alexis Bittar, Giorgio Armani, VPL Victoria Bartlett.
photo credits: Style.com, Wireimage.com; photo array by me.
With the coming of Spring, jewelry tends to go lighter, translucent, and more plastic-y…and the bib necklace is no exception. But finding just the right clear acrylic piece for a necklace is pretty tough; jewelry supply stores usually don’t sell large bib-style acrylic pieces, for one thing. You could always design it yourself and have it cut by Ponoko.com – but there’s a steep learning curve for the design software, usually multiple prototypes are necessary before you reach your final design, the service is pretty expensive for just once, and hiring out lasercutting seems a bit over-the-top for just a single piece for yourself. No, fast, cheap, and easy is the name of the game, so when I spied a set of acrylic purse handles at Jo-Ann Fabrics and Crafts store, I figured one would be perfect for a necklace.
Project Difficulty: (Easy/Beginner)
You Need:
 *1 acrylic purse-handle

*2 silvertone rectangle rings or D-rings (also found in purse-making section)
*1/2″ wide satin ribbon
*2 silvertone scrapbooking brads (not pictured)
And…
*pliers (optional: wirecutting pliers)
*scissors
*awl
*lighter/flame
How-To:
 I love how it looks like the purse handle is smiling at you. Happy Handle!:-D
1. Use the pliers to remove the top rings from the handle – usually I find these rings, being sized for purses, are too big and bulky in relation to the size of the handle to use as-is for a necklace. (It literally looks like you’ve slung a purse handle around your neck…something I don’t want to be too obvious in the finished piece.)

2. Attach the rectangles or D-rings that you got separately to the ends of the handle with the pliers – twisting apart and then re-closing like a jump ring with 2 sets of pliers. (If you couldn’t find any rings or don’t like that look, you can always skip this step and just thread the ribbon ends through the holes in the ends of the handle instead.)

3. Cut two long pieces of ribbon and thread each through the rectangles/D-rings. (Make sure each ribbon piece when doubled-over, is still long enough to tie behind your neck.)

Cut the ends at an angle and heat-seal them with a lighter or open flame.

4. Use an awl or the scissors to poke a hole through the ribbon center near the rectangle/D-rings. Attach a scrapbooking brad through the hole and fold over the brad legs. (You can also trim them if they stick out beyond the width of the ribbon by using wirecutting pliers.)

The doubled ribbon ends you then tie behind your neck in a knot or a bow depending on your preference.
Wear paired with brighter-than-bright colors for a Spring 2011 feel, or over bare skin for a more upscale vibe.

Happy DIY’ing!
xoxox
Carly
~If you liked this post, please share it!~
Save
Leave Comment
Dec 22, 2010 | DIY
After seeing this post on one of my new favorite blogs, A Pair and a Spare, I decided to make my own sweater by combining two that had coordinating colors. I loved the combination of striped and chunky cable-knit sleeves!
I wore my finished creation for Day 23 in my 30 Days of Outfits Challenge last month. So here’s how to make your own:
Difficulty: (Medium)
You Need:
*2 sweaters in coordinating colors (I think one of mine is men’s – it honestly doesn’t matter as long as you can fit into both)
*thread matching sweaters
And…
*seam ripper
*pins
*sewing machine ( if you do not have a sewing machine, this can also be sewn by hand, though it will take a little longer)
*machine needle (for knits or wovens; it doesn’t matter)
How-To:
1. Separate the sleeves from each sweater. You need to find the thread that binds the sleeve to the armscye, and cut it with the seam ripper, opening up the seam a little.
Then, working from the center of the seam, try to pull the thread from in-between the sleeve and the armscye. If you get it just at the right area where the thread end is in-between the two (it’s a little tricky), you can pull the thread and the whole seam will come apart – zzzzzpth!! (*that’s my sleeve-coming-apart sound effect*). It’s a lot easier than going all the way around the seam on the outside, picking and ripping each stitch as you go.
2. Pin the sleeves from one sweater to the armscyes of the other sweater, matching the side seams, and easing any fullness (sweaters are stretchy, so easing is…well, easy!). Pin from the inside, with sleeve inside the body of the sweater, right sides together.
3. Stitch on your machine around the armscyes, using a shorter stitch. If you like, going over the edges again with a zigzag stitch or overcast stitch will add extra strength.
If you’ve sewn close to the edges, the new seam will be virtually indistinguishable from the outside.
4. Wear and enjoy! Don’t forget to dry flat whenever you wash your piece – you don’t want undue stress on the arm seams ripping your new arms off! (although that visual makes me a little squeamish…;-)
Happy DIY’ing!
xoxox
Carly
~If you liked this post, please share it!~
Leave Comment
Nov 29, 2010 | DIY
Earlier this month I wore it in an outfit, today I’m going to show you how to DIY it. It’s DIY in 5 – minutes, that is. The easiest, quickest ways to take a piece from blah to fab and update it to current trends.
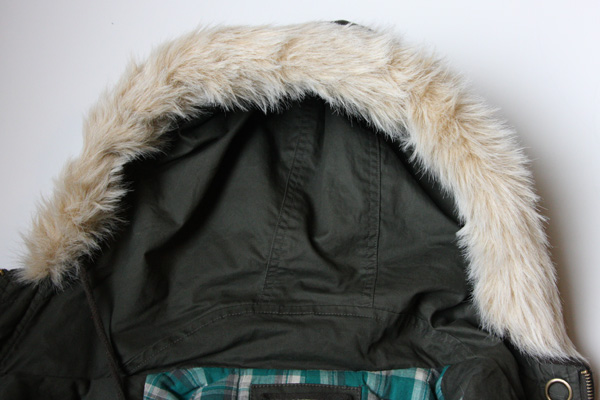
Fur trim is applicable for anything hooded: a sweater, hoodie, or jacket. (Or even on pocket edges, lapels, flaps…you get the idea!;-) As the temperatures drop, the need to bundle up increases – and adding a layer of furry material adds a ton of warmth. I always shop cheap when I can – but often affordable prices mean skimpy manufacturing techniques and minimal trim and details. Add more value to your bargain pieces by adding a quick-and-easy line of faux fur trim to your favorites.
You Need:
*hooded piece to embellish
*faux fur trim long enough to go around the hood – mine was 5″ wide (or a strip cut from faux fur by the yard)
And…
*scissors
*measuring tape
*sewing machine and thread matching fur
*hand-sewing needle and thread matching your hooded piece
*skewer, knitting needle, or chopstick
How-To:
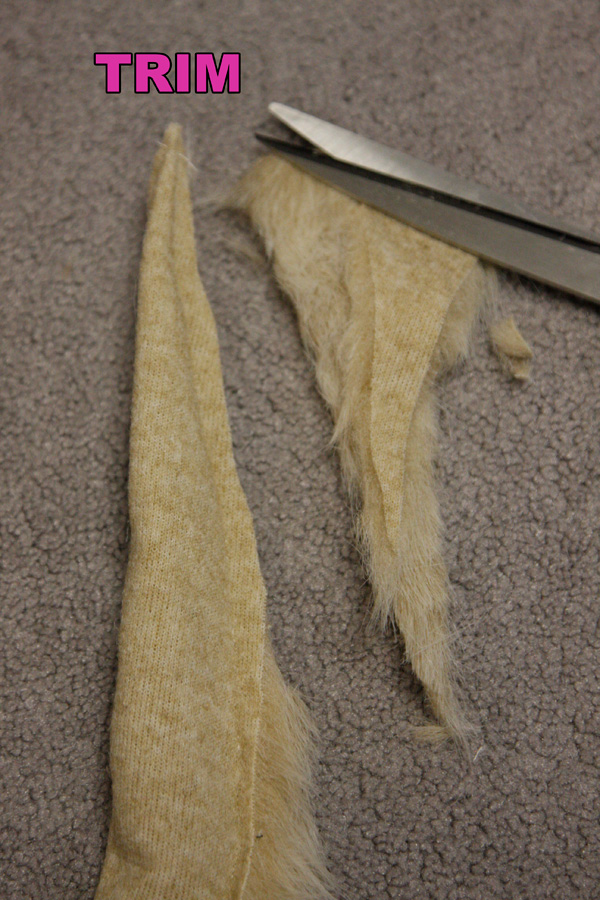
1. Measure around your hood to find out how long your trim needs to be. (Add about 3/4″ to each end so you have enough trim for the seam allowance.) Cut trim according to measurement.
2. Fold the trim over on itself lengthwise and sew into a tube on your sewing machine, leaving about 2″ unsewn in the center of the seam. Taper the ends.
3. Trim the excess at the ends.
4. Turn right-side-out using a skewer, knitting needle, or chopstick.
5. Use the skewer to pull any fur our of the seam if it was caught in there while sewing.
6. Use a hand-sewing needle to stitch the trim around the edge of the hood, stitching the opening in the trim tube closed as you go.
This is a super-easy way to add some wintery furriness to your favorite jacket or hoodie – and even if it takes more than 5 minutes to complete – it will most certainly take no longer than 15!
Happy DIY’ing!
xoxox
Carly
~If you liked this post, please share it!~
Leave Comment
Nov 18, 2010 | DIY
This post contains affiliate links – and I receive a small commission on sales from readers clicking through these links. My full
Disclosure Policy is here.
So to break up the monotony of my 30 days of outfits…I thought to share with all of you this cute and easy DIY.
I first saw this on Ramblings from the Sunshine State, where Wendy shared her how-to for a 6 Scoop T-Shirt for her daughter’s ice-cream-themed 6th birthday party.
I loved the idea of adding brightly-colored quilting fabric to a t-shirt!
I’m always dreaming of screenprinting designs into tees…The colors! The vibrant blacks! The limitless designs!…But face it, screenprinting ONE t-shirt (even with a Yudu) is a huge time commitment. There isn’t much point if you’re just going to make one.
Fabric paint I don’t like very much, as even the “soft” fabric paint adds stiffness to the shirt, and you can’t get very crisp lines.
The iron-on transfers they sell at the sewing store also leave a distinct and ugly “sheen” to them…it’s obvious you’ve stuck something on your shirt. No thanks.
But applique?! Never thought of that!
Now the world is my oyster…or at least, the design possibilities are limitless when you start to think of re-creating your favorite screened t-shirt design with cutouts of bright fabric and patterns. The edges to the appliques are crisp, and the applying is so easy! (Plus it’s a great way to experiment with color and pattern…and use up the scraps of fabric you may have laying around in your scrap bag.)
You Need:
a t-shirt (I originally was going to use the white one above, and changed my mind after I took the photo) / brightly-colored fabric for your design (I picked out some quilter’s fat quarters at my local Jo-Ann Fabrics, paying attention to the coordination of the patterns and prints) / black fabric for your details (mine is a woven lightweight cotton suiting)
double-sided fusible web for applique / (optional) black embroidery thread
Tools
scissors / iron & ironing board / pen / paper to make your pattern
How-To:
1. Make a pattern for your ice cream cones. I made one that I used for each scoop, one for the cherry, one for the chocolate sauce, one for the ice cream cone, and one for the smile.
2. Place your pattern on your fabric (folded over). Trace and cut 2 pieces for each part of the ice creams, and one piece for the smile.
3. Follow the instructions for fusing the pieces to the front of your shirt. (Usually sticking the applique onto the sticky front, peeling off the back, pressing to the shirt, and ironing for 15 – 30 seconds, applying pressure and making a few passes. The instructions said to stick the entire piece of fabric onto the sticky front of the web and cutting through both layers just once…I don’t think it really matters how you do it.)
4. (Optional) To make your creation more “polished,” you could go over the edges of each fabric piece in a satin stitch (closely-spaced zigzag stitch on your machine), in black embroidery thread. (I didn’t because I was feeling lazy.) This will make your tee look (from a distance) like a cartoony ice cream face, without all the hassle of the screenprinting!
But even without the outlining, it looks pretty cute as is!
Cool down on a hot summer’s day quickly in this…or just have a sweet sense of humor while relaxing at home.
Happy DIY’ing!
xo
Carly
Leave Comment
Oct 6, 2010 | DIY

So this is the last of my submissions for Style Sample Magazine and New York Design Shop’s Create Couture Challenge back in early August! Whew! Can’t believe it’s taken me this long to post them all…I wanted to make a final DIY piece from the box of materials I received and my eye lit upon the beautiful “NEW YORK DESIGN SHOP” printed ribbon. I love white, pink, and black together! So I crafted up this sweet, modernist design pin – that could easily be used as a hair accessory, bag charm, ring, you name it – just by varying the size, shape, and finishing. (The weaving of the ribbon does take awhile, but the results are fantastic!
You Need:

*NYDS Branded Ribbon (or any 1/4″ wide satin ribbon) – the NYDS-branded ribbon comes wrapped around the box when you place an order with New York Design Shop!
Additional Tools/Materials:
*scissors
*fabric glue
*stiff felt
*pin back
*lighter
*iron (optional)
*piece of paper (optional)
[prep: iron ribbon if kinked or curled; draw a shape as a template on a piece of paper]
How to:
1. Cut ribbon into eighths to start out.
2. Seal ends of two of the ribbons with an open flame.
3. Glue two ends of ribbons together, overlapping them at a right angle.
4. Seal the ends of more of the ribbons, and glue them parallel to the first ribbon, alternating the underlap and overlap of their edges.
5. When you have enough ribbons to work with, start weaving in ribbons in the opposite direction, heat-sealing and gluing down the ends as you add them in.
6. When you’ve run out of ribbons, start trimming the ones you’ve already woven, in order to create the desired shape.
7. Continue with trimming, heat-sealing, gluing, and weaving until your shape is what you like. Make sure all edges are glued together.
8. Cut piece of felt slightly smaller than your woven shape, and glue together with fabric glue.
9. Hot-glue pin back to wrong side.
Now anyone can wear their heart on their sleeve…or on their NYDS-branded tote!!
xoxox
Carly
Save
Leave Comment