Mar 19, 2011 | Media

Forgot to mention this – I was featured on craft-tutorial sharing site Cut Out + Keep a couple weeks ago, as a Crafty Superstar!
 Since I was feeling sort of black-and-white at the time and wanted to share a range of projects that utilized a variety of techniques, I contributed four projects (click the name to go straight to the how-to):


Thanks so much to Cat and whole team at Cut Out + Keep – I’m so thrilled to have been featured!
What do you all think of the projects? Anything that you’d like to try out?
xoxox
Carly
~If you liked this post, please share it!~
Leave Comment
Mar 5, 2011 | DIY
 My hubby has a ton of white shirts that have seen better days…and sometimes I steal one or two of them to makeover for myself. But men’s shirts are so shapeless and boxy, and I want something that isn’t as boring as it looks straight out of the package! With a few strategically-placed hooks and some elastic cord, this is a quick DIY makeover that will turn any boxy and shapeless top into a form-fitting gathered tunic or dress. Minimalist sex-appeal at its best!
You Need:
 *white tunic-length t-shirt (mine is XXL)
*8 hooks from sew-on hook-and-eye sets
*white thread & hand-sewing needle
*white elastic cord
*marking chalk (not shown)
*measuring tape or ruler
How To:
 1. Lay your t-shirt flat, back side up. Measure about 2.5″ down from below where the sleeves meet the sides. (This is what worked for me – you may want to try the shirt on you to make sure this is the area where you want the corseting to end.) Mark.
 2. Measure below that mark 1.5″ and make another mark at each side. Repeat twice so you have 4 marks total, evenly-spaced at 1.5″ apart.
 3. Hand-sew the hooks on at each part. Since we’re sewing onto the back and the t-shirt fabric will be pulled to the front, make sure the hooks are facing outwards.

 4. Try the shirt on. Take the elastic cord , fold it in half, and match its center to your bellybutton. Keep these lined up, thread either side of the cord into the bottom hook on either side of the shirt.
 5. Pull to the front, pulling the shirt fabric with it. Cross the cord over at your center, then back into the next hooks above.
 Continue to lace the corset-front in this manner, and rearrange the extra fabric of the tee as you go to look neater and more tucked-in to the corset area.


 6. Tie the ends of the cords at the top of the corseting in a bow; trim the ends.
Wear with something not overtly sexy – this shirt has all the sex appeal you need!
This project was featured in a recent Crafty Superstar interview on the tutorial-sharing site Cut Out + Keep…
click here to read the interview questionnaire & my other projects!
(I’ll be re-posting all of them here on my blog soon.)
Thanks to Cat and the whole COAK team for the interview! I’m so flattered to have been featured:-)
Happy DIY’ing!
xoxox
Carly
~If you liked this post, please share it!~
Leave Comment
Jan 14, 2011 | DIY
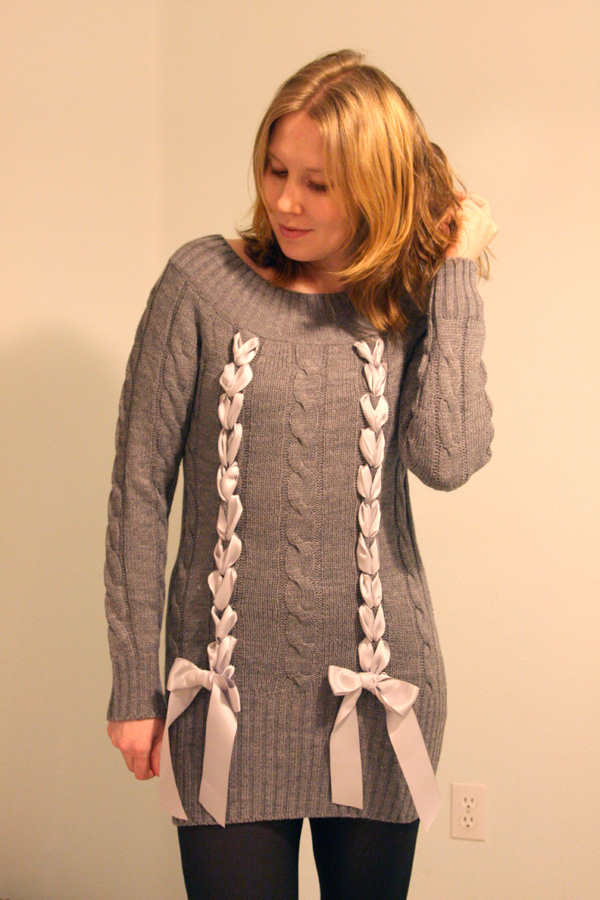
Seen on the runway in John Galliano’s Christian Dior Fall 2010 RTW Collection were whimsical, feminine knitwear pieces with satin ribbons woven and braided throughout.
Photos: Monica Feudi, GoRunway.com
Within weeks of appearing on the runway, many Japanese clothing brands picked up on the design, re-interpreting the idea and selling them en masse to a demanding public, creating a micro-trend stat.
In the U.S. I haven’t seen any clothing brands create their own version of this – which is just begging to be DIY’d! (Check out Outsapop and A Pair and a Spare for their coverage of this idea; and The Hearabouts’ DIY version.) It’s amazingly simple, and the best part is that next year when fashion marches on…you can just pull out the ribbon, fluff out the yarns in your sweater, and nothing’s the worse for wear. The only thing that’s better than a DIY is a DIY that is only permanent as long as you need it to be!
Difficulty: (Easy/Beginner)
You Need:
*chunky-knit sweater (I chose one with cabling, from YesStyle.com. If you can find something with mohair or angora blended in, it adds a soft femininity to the piece.)
*double-face satin ribbon (I chose 1.5″ wide)
*tape
And…
*scissors
*measuring tape
*hand-sewing needle & matching thread (not pictured)
How To:
1. First, even before buying your ribbon, you need to measure your sweater to find out how much you will need. Use a flexible measuring tape and, starting at the bottom of the sweater, start measuring upwards, zigzagging the tape back and forth to mimic how the ribbon will cross over once woven.
At the top of the track of weaving, note the measurement on the tape. Double it to get the full length of ribbon for the weaving part.
If you are going to create bows at the bottom of the weaving track, create a bow in the measuring tape and add that length to the total length of the track. That is the entire length of ribbon you will need for one woven area. I chose 2 areas of ribbon; thus I doubled the measurement for the total amount of ribbon I needed to buy. (But since I’ll be doing two rows, I’ll need 2 continuous lengths for each track – something to keep in mind when you’re doing your calculations.)
2. Cut your ribbon into the length you need for one row of weaving (+ a little more if you can). Wrap a piece of tape around both cut ends tightly, into a cone shape. This should work in place of a needle for your ribbon (though you can use a large-eye needle, yarn needle, or a safety-pin for your ribbon if you want).
3. Start at the top of the woven row, in the center of one of the cables, from the back of the sweater. Poke a small hole between the knit on either side of the cable, and bring the ends of the ribbon to the front of the sweater.
4. Poke a small hole at the bottom of the first cable knot, in the center. Bring both the ribbon ends into the hole and to the inside of the sweater.
5. Repeat to create a ladder of “V’s”, made in ribbon, down the front of the sweater. As you go, fluff out the ribbon that shows on the front periodically, and flatten the sweater so that you aren’t “scrunching” the cable too much.
6. At the bottom of the row, tie ribbon into a bow.
7. Repeat for the other side.
8. Try your piece on, and eyeball where you want the ribbon ends to fall. Cut, and then seal the cut ends with a flame.
9. To make the bows more permanent, hand-sew a couple stitches into the backs of the bows so they don’t loosen on you as you wear it. Hand-wash and lay flat to dry when it’s time for the laundry.;-)
Pretty easy, right?
Let me know if you try this out…I’d love to see your version!
Happy DIY’ing!
xoxox
Carly
~If you liked this post, please share it!~
Leave Comment
Dec 22, 2010 | DIY
After seeing this post on one of my new favorite blogs, A Pair and a Spare, I decided to make my own sweater by combining two that had coordinating colors. I loved the combination of striped and chunky cable-knit sleeves!
I wore my finished creation for Day 23 in my 30 Days of Outfits Challenge last month. So here’s how to make your own:
Difficulty: (Medium)
You Need:
*2 sweaters in coordinating colors (I think one of mine is men’s – it honestly doesn’t matter as long as you can fit into both)
*thread matching sweaters
And…
*seam ripper
*pins
*sewing machine ( if you do not have a sewing machine, this can also be sewn by hand, though it will take a little longer)
*machine needle (for knits or wovens; it doesn’t matter)
How-To:
1. Separate the sleeves from each sweater. You need to find the thread that binds the sleeve to the armscye, and cut it with the seam ripper, opening up the seam a little.
Then, working from the center of the seam, try to pull the thread from in-between the sleeve and the armscye. If you get it just at the right area where the thread end is in-between the two (it’s a little tricky), you can pull the thread and the whole seam will come apart – zzzzzpth!! (*that’s my sleeve-coming-apart sound effect*). It’s a lot easier than going all the way around the seam on the outside, picking and ripping each stitch as you go.
2. Pin the sleeves from one sweater to the armscyes of the other sweater, matching the side seams, and easing any fullness (sweaters are stretchy, so easing is…well, easy!). Pin from the inside, with sleeve inside the body of the sweater, right sides together.
3. Stitch on your machine around the armscyes, using a shorter stitch. If you like, going over the edges again with a zigzag stitch or overcast stitch will add extra strength.
If you’ve sewn close to the edges, the new seam will be virtually indistinguishable from the outside.
4. Wear and enjoy! Don’t forget to dry flat whenever you wash your piece – you don’t want undue stress on the arm seams ripping your new arms off! (although that visual makes me a little squeamish…;-)
Happy DIY’ing!
xoxox
Carly
~If you liked this post, please share it!~
Leave Comment
Nov 18, 2010 | DIY
This post contains affiliate links – and I receive a small commission on sales from readers clicking through these links. My full
Disclosure Policy is here.
So to break up the monotony of my 30 days of outfits…I thought to share with all of you this cute and easy DIY.
I first saw this on Ramblings from the Sunshine State, where Wendy shared her how-to for a 6 Scoop T-Shirt for her daughter’s ice-cream-themed 6th birthday party.
I loved the idea of adding brightly-colored quilting fabric to a t-shirt!
I’m always dreaming of screenprinting designs into tees…The colors! The vibrant blacks! The limitless designs!…But face it, screenprinting ONE t-shirt (even with a Yudu) is a huge time commitment. There isn’t much point if you’re just going to make one.
Fabric paint I don’t like very much, as even the “soft” fabric paint adds stiffness to the shirt, and you can’t get very crisp lines.
The iron-on transfers they sell at the sewing store also leave a distinct and ugly “sheen” to them…it’s obvious you’ve stuck something on your shirt. No thanks.
But applique?! Never thought of that!
Now the world is my oyster…or at least, the design possibilities are limitless when you start to think of re-creating your favorite screened t-shirt design with cutouts of bright fabric and patterns. The edges to the appliques are crisp, and the applying is so easy! (Plus it’s a great way to experiment with color and pattern…and use up the scraps of fabric you may have laying around in your scrap bag.)
You Need:
a t-shirt (I originally was going to use the white one above, and changed my mind after I took the photo) / brightly-colored fabric for your design (I picked out some quilter’s fat quarters at my local Jo-Ann Fabrics, paying attention to the coordination of the patterns and prints) / black fabric for your details (mine is a woven lightweight cotton suiting)
double-sided fusible web for applique / (optional) black embroidery thread
Tools
scissors / iron & ironing board / pen / paper to make your pattern
How-To:
1. Make a pattern for your ice cream cones. I made one that I used for each scoop, one for the cherry, one for the chocolate sauce, one for the ice cream cone, and one for the smile.
2. Place your pattern on your fabric (folded over). Trace and cut 2 pieces for each part of the ice creams, and one piece for the smile.
3. Follow the instructions for fusing the pieces to the front of your shirt. (Usually sticking the applique onto the sticky front, peeling off the back, pressing to the shirt, and ironing for 15 – 30 seconds, applying pressure and making a few passes. The instructions said to stick the entire piece of fabric onto the sticky front of the web and cutting through both layers just once…I don’t think it really matters how you do it.)
4. (Optional) To make your creation more “polished,” you could go over the edges of each fabric piece in a satin stitch (closely-spaced zigzag stitch on your machine), in black embroidery thread. (I didn’t because I was feeling lazy.) This will make your tee look (from a distance) like a cartoony ice cream face, without all the hassle of the screenprinting!
But even without the outlining, it looks pretty cute as is!
Cool down on a hot summer’s day quickly in this…or just have a sweet sense of humor while relaxing at home.
Happy DIY’ing!
xo
Carly
Leave Comment