Jun 13, 2017 | DIY

This post contains affiliate links, wherein I make a small commission if you click through and buy something. My FTC Disclosure is here.
Lately there’s been a plethora of crafty accessories all over the stores. Colorful tassels, fringe, pompons, and embroidery evoke a 70’s Summer with an 80’s pop flair. This means that any wily DIY’er can easily create the look for less and craft up accessories that look fresh, fun, fantastic, and on-trend this Summer without breaking the bank.
Take this Loeffler Randall Tassel Pouch – a big, trendy investment at $225. (And now totally sold out – for good reason! Similar in beige with silver tassels here.)
Why not be inspired to create your own fun version at a fraction of the cost?
BUY – Original
Loeffler Randall Tassel Pouch, $225 (similar here)
DIY – Your Own Version
YOUNA Small Leather Crossbody Purse, $15.99
1/10yd Custume DIY Craft Leather Fringe Tassel trims, $0.99 per 1 yard piece
Loctite Vinyl, Fabric, and Plastic Adhesive, $10.50 for 2
Pick up some suede tassel trim from your local crafts, notions, or leather working store – or from eBay here. (At $0.99/yard – plus a little wait for shipping – eBay is definitely the most affordable options_though if you can buy local, go for it!) If you’re buying on eBay I recommend these colors from the seller to truly recreate the Loeffler Randall look: Yellow, Watermelon Red, Blue, Orange, Purple, Dark Purple, Pink, and Beige.
Use a plain black zip pouch as your base (or try my DIY Leather Laptop Sleeve to make from scratch – just add a zipper closure to the top instead of an elastic!)
Roll up the tassel trims, spreading some Loctite Adhesive at the base to hold the rolls. When you feel the roll is full enough, cut off the remainder. Allow to dry, holding closed with a piece of tape.
One dry, fan out the pompons (you may need to trim the end of the tassels shorter) and use a generous dab of Loctite on the base to secure to the pouch. If you’re worried about adhesion, a hand-stitch using black polyester waxed thread and a leather hand-sewing needle will secure those suckers on there!
Pair with some natural wedges, some washed skinny jeans, and a wrap top make of striped shirting – and you have yourself a foolproof day-to-night Summer outfit!
Happy DIY’ing!
xo
Carly
Leave Comment
Jul 3, 2014 | DIY
 Tassels, tassels, everywhere! I officially declare 2014 the Year of the Tassel. They’ve been having a HUGE moment again, and I love their undone, boho-chic feel. Casual and cool at the same time. It’s very easy to make your own tassels – or even better yet, make your own fun colorblocked tassel NECKLACE (just like this $128 Anthro Fanned Botanique Necklace [no longer available]). Here’s how:
You Need:
 embroidery thread in 4 colors (I chose cobalt blue, navy blue, goldenrod, and metallic gold) / 3/8″ diameter natural rope, 1 yard long / 1 1/4″ goldtone D-ring / scissors / tape / glue / toothpick (optional)
How To:  1. Start wrapping the embroidery thread around the bottom of the D-ring, using 2 fingers to create the right length. Wrap around many times until you get a thick bundle.
2. Slide your fingers out from the bundle.
3. Snip a short piece of thread and tie around the bundle, close to the D-ring.
 4. Wrap both ends of the thread multiple times around where you tied, and tie the ends together with a double knot. Leave the ends loose for now.
5. Use scissors to trim the bottom of the tassel flat.
 6. Fluff out the threads in the bottom of the tassel.
7. Repeat Steps 1-6 for 2 more tassels in your first color. Repeat for 3 tassels in your second color. Repeat for 3 tassels in your third color. For the third tassel in that color, I made it using half metallic threads (since the metallic thread frays easily but isn’t as “fluffy” as the regular embroidery thread).
8. Use a dab of glue on each double knot you made in Step 4.
 9. Snip off the ends of the threads close to those knots once dry.
10. Place the D-ring with the tassels in the center of your rope piece.
11. Use the metallic thread to wrap around each side of the straight part of the D-ring, many times, to secure the ring to the rope.
 12. Finish each wrap by double-knotting the thread at the back. Dab with glue, and snip off the ends.
13. Try on the necklace and decide how long you want it. Use a piece of tape wrapped around the rope pieces to secure it to the length you like.
14. Cut off the excess rope.
15. Use a contrasting thread color to wrap around the rope ends and completely conceal them. End using a double knot, dab on glue, and cut the threads.
 You’re done! A bright, bold accessory for breezy tops and easy dresses this season is only a couple wraps and snips away. You can you any combination of fun colors, and totally switch up the look of the piece by adding pompons, charms, or other accoutrements to make it all your own!


How will YOU wear your Colorful Tassel Necklace?
 Happy DIY’ing!
xo
Carly
Save
Leave Comment
Dec 18, 2013 | DIY
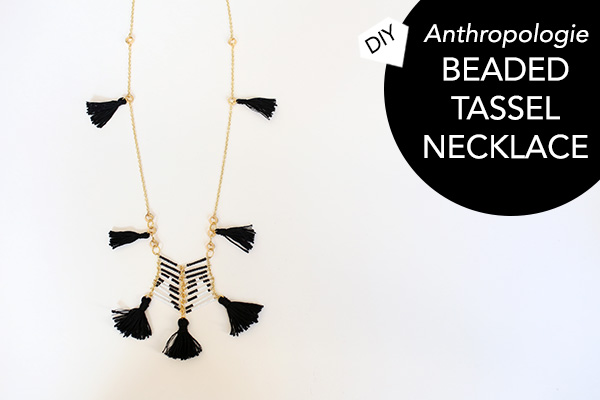 Anthropologie, season after season, comes up with the most fabulous items in their stores – and so many of them look homemade and crafty: the perfect fodder for DIY.
  I noticed this beaded ladder tassel necklace during early Fall (part of Anthro’s Bijouterie necklace collection), and after clipping the photo and hunting for supplies, I finally sat down and made a DIY version. It was a bit fiddly, but incredibly rewarding to find the finished necklace looked just as amazing as the original in the catalog. (And at an $8 investment, pretty affordable too!) Here’s how to make your own:
You Need: (more…)
Leave Comment
Jun 2, 2012 | DIY
 Lately neon’s been the IT color of the season…and I’m particularly drawn to bright yellow. DIY tassel earrings have been making the rounds for some time on the blogosphere (see …love, Maegan’s version or Studs n Pearls’ version), so I decided to spice up my version with a bit of elegant rhinestone chain around the tops of the tassels. The great thing about using neon embroidery thread for this project? For some reason the quality of the thread is such that it unravels in a heartbeat…particularly annoying for friendship bracelet projects…but perfect for DIY tassels!! Here’s how to make them:
Materials: (more…)
Leave Comment


