Jan 4, 2016 | DIY
 Oh metallic lurex thread, how I love thee!! It adds so much dimension, so much Wintry sparkle, so much glamour to just plain old fabrics. But it’s a demon to clean.
Once I found a beautiful silvery sweater at H&M on the clearance rack for a mere $8.95. And it happened to be in my size, too. I wore it often for many years. I wore it here, for example.
And then while at work one day I dropped my lunch on it. A small mouthful of leftover Thai drunken noodles. In oily brown sauce. And my favorite sweater was ruined forever.
 I washed it multiple times, in both cold and warm water, and tried every stain remover known to woman. But nothing got the stain out of acrylic. That brownish-yellow stain would not budge. I tried to wear it after the unfortunate incident, but the stain was too obvious, and I felt self-conscious. I thought about discarding the sweater (heck, I had only paid $8.95 for it so it wasn’t a huge investment)…but I wanted to save it if I could.
And then I had an epiphany…to combine that trend of one big word on your shirt…with my poor abused sweater…hence forever covering up that stain and allowing me to wear it again (or at least, until it got too pilled and stretched out to even resemble clothing anymore). Hence this DIY. Here’s how to cover up that horrible stain on your own shirt if it has befallen similar circumstances:
DIY Shine Word Sweater (or, How to Cover a Stain on Your Sweater)
You Need:
 sweater or top / black felt / fabric scissors / needle and matching thread / pins / graphic program to create your word if you’re not using the download below / printer (or print at an office store) / regular scissors
How To:

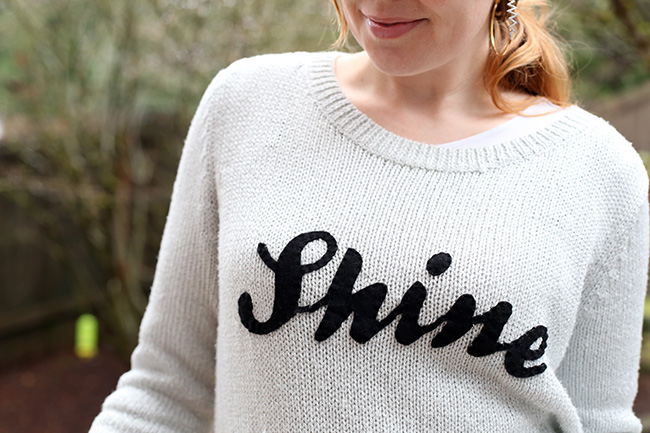
- Choose what word you’re going to put on your top. It took me forever to finally choose a word (and yes, I browsed Pinterest, blogs, and magazines for what seemed like ages). But I found it: Shine. Quite ironically literal. So I went with that, and typed it out in Photoshop using the Ballpark Weiner font and printed out a copy of the word to see if the spacing and font would indeed cover up the stain. It did so I went with that.

- Cut out the word using regular scissors. Don’t forget to cut out dots on i’s or punctuation as well. I didn’t cut out the negative space inside the letters at this point.

- Pin the word to your felt.

- Use fabric scissors to cut around your word carefully. You may need to make certain areas wider than the font so the felt doesn’t pull apart. For cutting the negative space out of the inside of loops, I just eyeballed it, cutting smaller than I needed to and then widening once I laid the cut-out on the original font.


- Place the the cut out felt word to the center of your top, and pin down so it is flat.


- Use a running stitch (looks like – – – – ) around the inside edges of the felt to secure the word to your top. This is long and tedious – make sure you have some Netflix or mindless TV to get you through. Also stitch on any i dots or punctuation as well. (If you’re dealing with a stretchy top like a sweater, be careful not to stretch the knit too much as you are sewing or else the finished word will pucker.)
 And that’s it! A pretty upgrade to a soiled mistake…and I’ve just saved a major piece in my wardrobe. How to cover a stain on your sweater is really as easy as a bit of felt, time, and thread!
 This is something you will need to hand-wash cold and lay flat to dry. You could also use suedecloth or any other fabric that doesn’t fray when you cut it – leather or vinyl I would think a little tough to hand-sew but you could always try it if you prefer that look.
Download my DIY Shine Word Sweater graphic here if you’d like to make your own “Shine” version (click below):
(77 KB PDF, sized at 300 dpi, for 8.5″ x 11″ paper)

 Shine on, my friends!
Ever had a stain on your shirt where you did something creative to cover it up? Do tell!
xo
Carly
Save
Leave Comment
Oct 18, 2012 | DIY, Life
 As some of you may recall, in early Spring this year I attempted to DIY a puffball sweater I saw in Vivi Magazine.

This is what I was trying to dupe.

This is what I ended up with.
Why did it happen?
Well, I chose my materials badly. I figured this was just a pompon sweater, so I used acrylic pompons out of a bag I bought at Jo-Ann’s, in the doll-making and felt section.

BIG mistake. If you look closely at my inspiration photo, the balls are actually felted wool balls, all a little rough-looking and slightly different in size. I thought the sweater was super-cute with those pompons on it…but failed to realize that it was the material of the pompons that took it from a kid’s craft project to something a grownup could wear. (Okay, I know some people might debate me on that, but still!!)
AND I chose the wrong method for the job. As I was gluing down the pompons, I was feeling that it wasn’t looking as cool as in the picture. The pompons weren’t attached properly, and the glue was seeping and soaking in all over the place. It was visible even around my pompons, leaving a ring of WHITE hardened glue. I did the front of the sweater and one sleeve, then let it dry overnight to see if I felt any better about it in the morning.
I didn’t. I then ripped all the pompons off, out of the hardened glue, and tried to peel off the glue. After pulling and peeling and ripping for over an hour, I had a blistered thumb and only managed to remove the outer layer of a couple glue blobs. I was frantic. I really liked the sweater; it was soft, the color was perfect, and it was an amazing bargain at my local Goodwill for only $4.99. I didn’t want to let it go!! So I soaked the sweater in water and delicates to detergent to see if the glue would soften up. More pilling and crumbling glue ensued, but I still couldn’t get it off. The next day I called the Customer Service line for the glue product and asked how to get it out of my sweater. There was a pause. “Well, it’s permanent. You can’t really ‘get it out.'” I finally got a “well, you could try Goo Gone on it, some of our customers have said they’ve had some success with that.” So I sprayed Goo Gone on all the spots (which you can see in the above photo). Oh my. Petrochemicals all over my sweater. It smelled like GASOLINE. The fumes were heinous. I had to lock it in the laundry closet to sit or else I would have gotten high from it. I let the Goo Gone soak in overnight and found that it had hardly done anything. I was back to pulling and peeling and ripping – though now everything was slimy and smelly from the Goo Gone and the glue spots were exceedingly difficult to grasp. I managed to get one spot off completely after pulling at it for 45 minutes. Some of the others I was able to remove 30-60% of the glue. But at that point, after 4 hours of working on it, I threw in the towel (figuratively) and threw the sweater in (literally) to the wash. I had to launder it twice to get the stench out. And I was still left with a sweater with hardened spots of glue all over it. Oh what a tragic story!!
So why do DIY FAILS happen? Here are the 3 main reasons:
FAIL REASON #1:
You choose materials that look too cheap.
Materials that are cheap are a totally different story. There are so many ways to get your hands on affordable raw materials – from shopping Goodwill for pristine-condition clothing to use as your starting point, using online coupons to shop M&J Trimming or Jo-Ann Fabrics, sourcing embellishments and trims from pieces you have in your closet already, swapping with a friend, or buying wholesale and in bulk. The great thing about DIY’ing is that so many of the raw materials are so affordable, much more so than the finished product. However, if you choose materials that look cheap, no matter what their actual price point, your entire project will be dragged down. Tip: Don’t ever choose materials that you’ve seen on kids’ accessories (no plastic rhinestones, EVER!), or in Halloween costumes. The only thing that can save latex, lame, spandex, and medium-weight poly/cotton jersey is the cutting and the silhouette…and unless you’re fairly adept at those things, best to stay away (unless it actually is Halloween!)
FAIL REASON #2:
You chose the wrong [or too cheap] tool for the job.
There are so many different ways of getting from point A to point B in a DIY project, and sometimes our decisions on what method or tool to use are based solely on “what will be fastest?” Sometimes you’re guessing, saying “I think I can do this and get the same result as my inspiration.” Both methods are certainly legit and are ways of evaluating your project and how to do it. It all depends on what you’re going for – and if quick and easy are what you want then by all means choose the quickest way and the tools you have at your disposal. But sometimes the best method isn’t necessarily the fastest, and sometimes using a certain tool can absolutely NOT replicate using the right tool for the job. Sometimes you do have to study up on how similar pieces are made, like checking out what’s on the shelves at stores or on websites instructing industry professionals how to make that piece. Sometimes you do have to be the expert in order to get your finished piece to look professional, polished, long-lasting, and rivaling anything you see on the market. In my Spore Sweater FAIL I thought gluing the pompons on would be fastest; the glue was too messy, and was IMPOSSIBLE to remove fully from the sweater when I wanted a do-over. Even though sewing the balls on took way longer, that’s probably how the original sweater was made…and that technique makes my re-do look a heck of a lot more finished than by gluing. Tip: Brush up on your techniques so you know what to do, and actively learn about the different tools you can use for the job. (E6000 glue vs. 2-part Devcon epoxy, overlocker vs. regular sewing machine, awl vs. X-acto blade.) Check out what other people use to do the job, and mimic their techniques. And definitely get the best tools you can afford; this is not the place to skimp on quality!
FAIL REASON #3:
You actually, truly messed up.
Whether it be sewing a line crooked, cutting off part of a skirt unintentionally, or painting acrylic paint globby, sometimes it can be lack of a skillset or just a plain ol’ mistake that creates disaster. You can always improve your skills by mere practice, or by taking classes (locally or even online). However, if you have enough ability to fix your mistake , fix it immediately, while still in the process. And know how to fix it – always have a Plan B just in case!! If fixing it is beyond your abilities, try camouflaging it or changing your design a bit to make it look intentional. Remember, the greatest art comes from the worst mistakes. And DIY’ing definitely is an art! Tip: Take every opportunity to improve your skills in order to not mess up again. Pick an expert’s brain, take a class, practice creative problem-solving to transform a bummer project into a stunner project.
Needless to say, I re-evaluated my materials, hand-made better, more organic-looking pompons, and attached them to my sweater more professionally.
Plus the new felted wool balls cover up all the spots of glue I couldn’t get off the sweater…camouflaging my mistake!

Hope that helps you guys proactively prevent DIY FAILs before they happen…and make every project you do something you’re proud of!
xoxox
Carly
P.S. DIY tutorials for Hand-Felted Wool Balls and Cute Kitty Beret coming soon!
Photo sources: 1 (and for the record these hats were made by Stephen Jones for the Kinder Aggugini S/S 2011 show as runway statement pieces, and I do think they work pretty well in that very specific context; however they are indeed made of cheap materials and duct tape looks like duct tape no matter what you do.), 2, 3
Leave Comment
Oct 1, 2012 | DIY
 So I totally messed up on a DIY of a pompon sweater I saw in a Japanese magazine back in March…and I was left with a sad, soggy sweater all covered in patches of glue, reeking of Goo Gone (i.e., the lovely odors of petrochemicals), and flaky bits of sticky glue I’d managed to scrape off.
  What an unhappy mess!
But, like most of my DIY projects, I refused to give up…
…and I removed as much of the glue as I could…
…but when I couldn’t remove everything decided to try the DIY again…

…And after crafting my own pompons from felted wool roving (a fun process I can’t wait to share with you all!)…
…I have about 20 pompons to sew on and then I think I’m back in business.
All hail the Resurrected Pompon Spore Sweater! The finished product soon to be shared, promise…;-)
xoxox
Carly
Leave Comment
Apr 26, 2011 | Fashion
 Have you guys seen Fabulous on a Budget? It’s a FABULOUS website all about being creative (with not a lot of cash), run by two DIY mavens: Mary Darling and Leah Ashley. I love their fun and glamorous aesthetic – and you may have also seen them on TV! They also have created videos for Style TV for the Look for Less! (Remember that show??? I LOVED it!)
 When they contacted me asking if I’d like to guest-blog for them, I said heck yeah! I even went the extra mile and edited and laid out my photos in a Photoshop collage instead of just editing them like I normally would.
With just a bit of sewing and some glue, it’s super-easy to update a boring old cardigan into something Springy and fun. Please check out their website for the full how-to!

Hope you guys like it!
xoxox
Carly
~If you liked this post, please share it!~
Leave Comment
Jan 14, 2011 | DIY
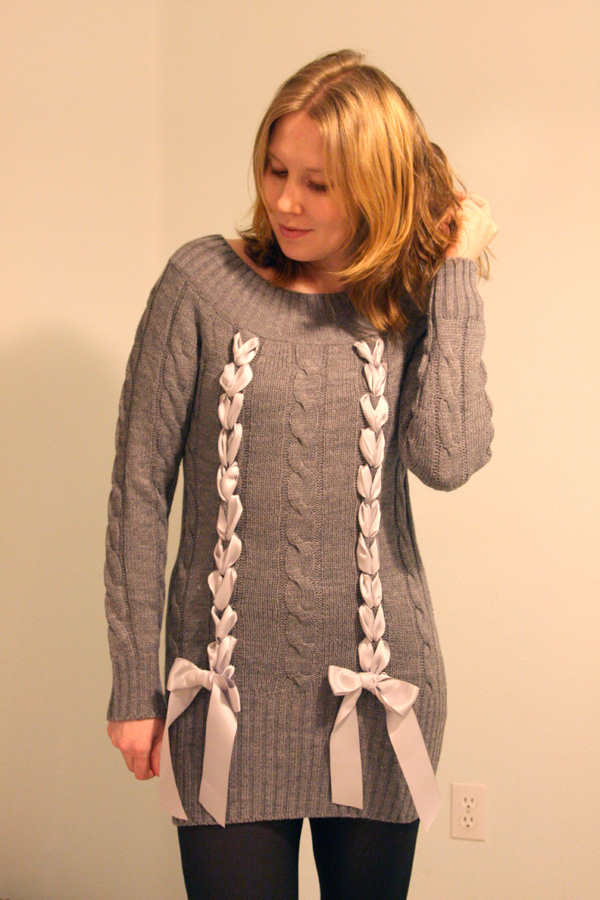
Seen on the runway in John Galliano’s Christian Dior Fall 2010 RTW Collection were whimsical, feminine knitwear pieces with satin ribbons woven and braided throughout.
Photos: Monica Feudi, GoRunway.com
Within weeks of appearing on the runway, many Japanese clothing brands picked up on the design, re-interpreting the idea and selling them en masse to a demanding public, creating a micro-trend stat.
In the U.S. I haven’t seen any clothing brands create their own version of this – which is just begging to be DIY’d! (Check out Outsapop and A Pair and a Spare for their coverage of this idea; and The Hearabouts’ DIY version.) It’s amazingly simple, and the best part is that next year when fashion marches on…you can just pull out the ribbon, fluff out the yarns in your sweater, and nothing’s the worse for wear. The only thing that’s better than a DIY is a DIY that is only permanent as long as you need it to be!
Difficulty: (Easy/Beginner)
You Need:
*chunky-knit sweater (I chose one with cabling, from YesStyle.com. If you can find something with mohair or angora blended in, it adds a soft femininity to the piece.)
*double-face satin ribbon (I chose 1.5″ wide)
*tape
And…
*scissors
*measuring tape
*hand-sewing needle & matching thread (not pictured)
How To:
1. First, even before buying your ribbon, you need to measure your sweater to find out how much you will need. Use a flexible measuring tape and, starting at the bottom of the sweater, start measuring upwards, zigzagging the tape back and forth to mimic how the ribbon will cross over once woven.
At the top of the track of weaving, note the measurement on the tape. Double it to get the full length of ribbon for the weaving part.
If you are going to create bows at the bottom of the weaving track, create a bow in the measuring tape and add that length to the total length of the track. That is the entire length of ribbon you will need for one woven area. I chose 2 areas of ribbon; thus I doubled the measurement for the total amount of ribbon I needed to buy. (But since I’ll be doing two rows, I’ll need 2 continuous lengths for each track – something to keep in mind when you’re doing your calculations.)
2. Cut your ribbon into the length you need for one row of weaving (+ a little more if you can). Wrap a piece of tape around both cut ends tightly, into a cone shape. This should work in place of a needle for your ribbon (though you can use a large-eye needle, yarn needle, or a safety-pin for your ribbon if you want).
3. Start at the top of the woven row, in the center of one of the cables, from the back of the sweater. Poke a small hole between the knit on either side of the cable, and bring the ends of the ribbon to the front of the sweater.
4. Poke a small hole at the bottom of the first cable knot, in the center. Bring both the ribbon ends into the hole and to the inside of the sweater.
5. Repeat to create a ladder of “V’s”, made in ribbon, down the front of the sweater. As you go, fluff out the ribbon that shows on the front periodically, and flatten the sweater so that you aren’t “scrunching” the cable too much.
6. At the bottom of the row, tie ribbon into a bow.
7. Repeat for the other side.
8. Try your piece on, and eyeball where you want the ribbon ends to fall. Cut, and then seal the cut ends with a flame.
9. To make the bows more permanent, hand-sew a couple stitches into the backs of the bows so they don’t loosen on you as you wear it. Hand-wash and lay flat to dry when it’s time for the laundry.;-)
Pretty easy, right?
Let me know if you try this out…I’d love to see your version!
Happy DIY’ing!
xoxox
Carly
~If you liked this post, please share it!~
Leave Comment