Feb 16, 2015 | DIY
 So it’s still Winter and I wanted a (p)leather skirt – midi length, so demure, yet made of a material that’s a little reminiscent of biker gangs. That’s just how I roll.
Midi-length leather and pleather skirts have been a Winter staple for awhile – and I love that the quilting pushes it into Chanel-esque territory without being anywhere near that price-point. Plus quilting can hide fabric (or pleather) that is actually quite cheap and force it to look more expensive. And no hemming required! Here’s how:
You Need:
(more…)
Leave Comment
Aug 2, 2014 | By Carly J. Cais, DIY
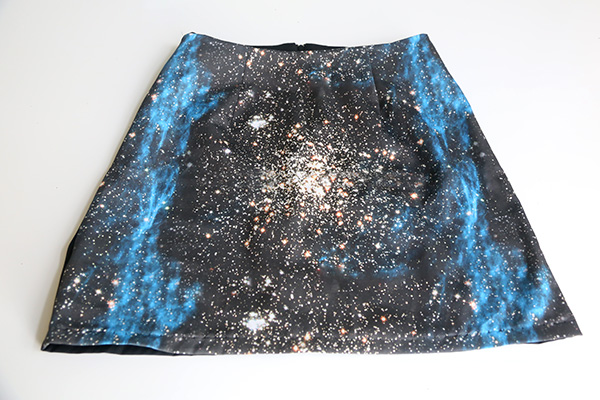
 A couple years ago I was desperately wanting some galaxy-print fabric since clothing featuring photorealistic prints of stars was just about everywhere. But I couldn’t find any fabric sellers that sold this particular print!! So I just Did It Myself, and designed a number of fun galaxy-print fabrics on Spoonflower.com, utilizing licensed Hubble Telescope images of star fields, quasars, Red Giants, planets, and galaxies. I worked on them in Photoshop to adjust the colorization and created seamless repeating patterns so they would be perfect for fabric (or even wallpaper!).
 In order to offer them for sale in my shop, I had to order test swatches to check the color and printing. For one of the designs I ordered a fat quarter of Organic Cotton Sateen (upper right in the photo above), not quite sure what I wanted to make with it but certain that I wanted a good enough amount to make something neat. And I finally hit upon a little mini-skirt (though had I ordered 1 yd, I would have had enough for front AND back!).

 As it was I had to use some black cotton sateen for the back, but it turned out pretty well regardless and I’m just as pleased with it as if it had been galaxy-print all the way around.
 I used Butterick Pattern 6834, chopping the length at View E (since that’s all the galaxy-print fabric I had). (I believe the pattern is no longer available.)
 Here are some similar patterns you could use:
 It sewed up quickly and was pressed and hemmed in no time, and now I have a fun mini-skirt for Summer!
If you’re looking for this same galaxy fabric, it is here:
Or other galaxy print fabrics: (click through to access my shop on Spoonflower)

They look great as blouses, T-shirts, even leggings (on stretch cotton jersey!!)
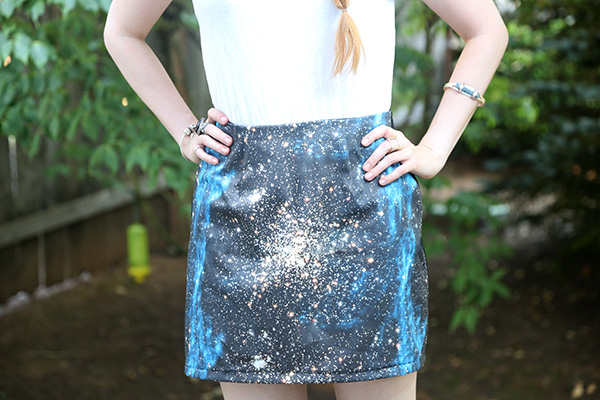 Stay tuned for my outfit featuring this skirt, coming soon to the blog.
Happy DIY’ing!
xo
Carly
Save
Leave Comment
Feb 27, 2014 | DIY
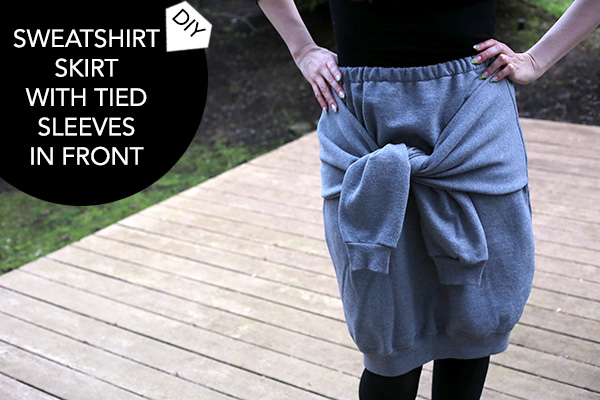 As I posted (quite awhile ago now!), skirts and dresses with faux sleeves tied in the front are a mini-trend that has made it all the way from the runways of Celine to everyday street style. It’s a cute way to define the waist and yet add a casual twist to any outfit.
  I figured it would be super-easy to re-purpose a sweatshirt into a little skirt with the sleeves as non-functional accessories. With 5 straight seams to sew, it’s also fairly quick and easy, even for sewing beginners. Here’s how to make your own version of this look: (more…)
Leave Comment
Apr 2, 2013 | DIY
 I love lurking on street-style blogs for many reasons, one of which is the MAJOR DIY inspo I can find there. Looking at the variety of other people’s outfits always gets my creativity wheels a-churning, thinking “oh, I could do this to a skirt I already have!” or “use an applique and you’d be able to make that!” etc. I find that the street-style blogs geared towards a younger audience (Lookbook.nu and Chictopia.com, for example) are such a treasure trove of inspiration for embellishment, cutting, studding, and clothing alteration that you can’t find anywhere else (and that you can easily make yourself). Given that Spring is in full swing already and skirt hemlines are rising, here is some mini-skirt inspiration sourced from Chictopia’s member style photos and shopping section:
Tibet Cross Skirt, $47
If you’re one for embroidery, you can embroider little crosses all over a chiffon skirt like in Hetterson’s Embroider a Pine Tree Dress for Frolic! Tutorial. You could also use fabric cut into cross-shapes, backed with Heat ‘n’ Bond…or even tiny cross appliques.
 from user MARSELL
A DIY tutu is no problem…you just need a couple yards of tulle, a little time, and this great DIY Tulle Skirt tutorial from Cotton & Curls.
 from user STYLELIMELIGHT
Looks like that white Zara wrap skort is suddenly having a moment. You could totally DIY something similar with a bit of white, stiff fabric using my DIY Simple Wrap Skirt tutorial.
 Vintage 90s Corduroy Zip-Up Skirt, $30
Create a zipped-up look to any skirt by tacking a zipper down the front.
 Aloha Peplum Skirt, $34
Make this yourself by using A Matter of Style’s DIY Peplum Skirt tutorial – it’s so detailed and the finished product is amazing.
 from user THECOVERTBOUTIQUE
You could totally change the look of any skirt you own by throwing on a removable peplum over it…I did a tutorial for a puffy DIY Jil Sander Gathered Removable Peplum awhile back, and ...love, Maegan has a great tutorial for a flippy, soft removable peplum of leather (easily converted to use with your favorite fabric).
 from user ZEANVO
I love this pretty yellow skirt with this contrasting black print! You could DIY this by hand-painting trees onto the bottom of a skirt with fabric paint…or even going the extra mile and making your own DIY Screenprinted Tree Skirt (and my tree image is available here if you’re interested).

Punching Leather Skirt in Black, $58
To DIY this takes a great deal of time and precision…but you could do it to a thrifted leather skirt, using a leather punch and Syl and Sam’s DIY Scalloped Skirt tutorial.
 from user TWENTY7THINGS
Easily make a wrap-style tulip skirt from a large scarf like Lions, Tigers, and Fashion Oh My!. Perfect for a beach cover-up or a chic boho look to any outfit!
What are your favorite mini-skirt tutorials?
Happy skirting!
xo
Carly
Leave Comment
Jan 1, 2010 | DIY
 Okay, maybe not the easiest skirt in the history of the world…but pretty darn simple nonetheless!
It took me about an hour and a half to make – tops! And it’s a simple, sweet party skirt that also works great for the everyday.
You Need:
*1 yd. of medium to heavy-weight satin, sateen, satin peau, or taffeta
*7/8″ width woven no-roll elastic (length of elastic = your waist circumference – 1″)
*matching thread
*scissors
*pins
*measuring tape
*iron & ironing board
*sewing machine
*sewing needle for wovens
*1 safety pin/bodkin
*overlocker/serger (optional)
How To: (sorry no step-by-step photos)
(I think this size will work on Small-Medium-Large…for a Small, the skirt will be fuller and more cinched in at the waist. If you want more width to the skirt, increase the width of the panels. My waist is 27″; hips are 34.5″. Cutting directions, marker, and yield are using a 60″ wide piece of fabric.)
CUT PIECES
1. Cut two rectangles on-grain for the front and back pieces: both are 21.75″ long; the front piece is 14 3/16″ (that’s fourteen and three-sixteenths, if the way I’ve typed it is confusing). For the width of the back piece rectangle, add 1/2″ (therefore width of back piece = 14 and 11/16″).
2. Cut 2 rectangular side panels on-grain: both 21.75″ long and 11.125″ (eleven and 1/8″) wide.
3. Cut 2 pockets: both are the same width as the side panels (11 and 1/8″) and are 9″ high. (The front, back, and side panels you can all fit side-by-side on a 60″ wide piece of fabric, but the pockets can’t fit and will have to be placed above this row when cutting. So technically, when using a 60″ wide piece of fabric, you only need 30.75″, not really a whole yard. For a 45″ wide piece of fabric, you can only fit the front, back, and one side panel side-by-side; the next row up you could place the other side-panel on-grain and thereby require 43.5″ of fabric (about 1 yd. and a quarter), or, alternatively, you could place one side panel on the crossgrain and only use 11 1/8″ + 21.75″ = just about a yard total. This is what I did because I thought I had bought a piece of 60″ wide fabric but it turned out to be only 45″ wide – so I had to conserve fabric. In satin, I honestly think on-grain vs. crossgrain difference is negligible.)
4. Overlock/zigzag stitch on top and bottom edges of pockets.
FINISH TOPS OF POCKETS
5. Fold 1″ under on tops of pockets. Iron to set the crease. Stitch seam at 3/4″ down from top of crease.
SEW POCKETS TO SIDE PANELS
6. Start by placing pocket on top of side panel, right sides together. Align top of pocket about 4″ above bottom of side panel, and align pocket side edges to side panel side edges. Stitch 3/8″ below top of pocket, through both layers, from side to side.
7. Fold pocket up, taught against the seam you just sewed; iron to set the crease. Pin side edges of pocket to side edges of side panels – then staystitch the pocket to the side panels a scant 1/4″ from side edges.
ASSEMBLE THE SKIRT
8. Overlock or sew each side panel to either side of the front piece; join back piece in the same way.
HEM THE SKIRT
9. Overlock/zigzag bottom edge of skirt all the way around.
10. Turn up 3.25″ from bottom of skirt; iron to set the crease. Stitch hem at 3″ up from crease.
ADD THE WAISTBAND
11. Overlock/zigzig top edge of skirt all the way around.
12. Turn under top of skirt 1.25″ from top edge. Iron to set the crease. Stitch at 1″ from crease – leaving 2″ unsewn, to create the waistband casing.
13. Attach safety pin or bodkin onto end of elastic. Thread elastic through the waistband casing, entering and exiting through the unsewn area.
14. Overlap ends of elastic by 1/2″. Pull elastic ends out of the unsewn gap in the casing, and stitch a square shape on the top of the elastic to secure.
15. Tuck elastic back into casing area – then sew the last 2″ of the casing closed.
You’re done!
This skirt is super-cute and can be worn in a casual ensemble.
 Or you can dress it up and pair it into a party outfit – layer over a corset, for instance, or under a sequined vest.
People will feel a strange attraction to it when you wear it.

Everyone will love it unconditionally!
Happy DIY’ing…and Happy New Year!
xo
Carly
Leave Comment


