Feb 17, 2011 | DIY

Yesterday I coveted it, so today I’m going to show you how to make it. It’s DIY in 5 – minutes, that is. The easiest, quickest ways to take a piece from blah to fab and update it to current trends.

From left to right: Giambattista Valli, Alexis Bittar, Giorgio Armani, VPL Victoria Bartlett.
photo credits: Style.com, Wireimage.com; photo array by me.
With the coming of Spring, jewelry tends to go lighter, translucent, and more plastic-y…and the bib necklace is no exception. But finding just the right clear acrylic piece for a necklace is pretty tough; jewelry supply stores usually don’t sell large bib-style acrylic pieces, for one thing. You could always design it yourself and have it cut by Ponoko.com – but there’s a steep learning curve for the design software, usually multiple prototypes are necessary before you reach your final design, the service is pretty expensive for just once, and hiring out lasercutting seems a bit over-the-top for just a single piece for yourself. No, fast, cheap, and easy is the name of the game, so when I spied a set of acrylic purse handles at Jo-Ann Fabrics and Crafts store, I figured one would be perfect for a necklace.
Project Difficulty: (Easy/Beginner)
You Need:
 *1 acrylic purse-handle

*2 silvertone rectangle rings or D-rings (also found in purse-making section)
*1/2″ wide satin ribbon
*2 silvertone scrapbooking brads (not pictured)
And…
*pliers (optional: wirecutting pliers)
*scissors
*awl
*lighter/flame
How-To:
 I love how it looks like the purse handle is smiling at you. Happy Handle!:-D
1. Use the pliers to remove the top rings from the handle – usually I find these rings, being sized for purses, are too big and bulky in relation to the size of the handle to use as-is for a necklace. (It literally looks like you’ve slung a purse handle around your neck…something I don’t want to be too obvious in the finished piece.)

2. Attach the rectangles or D-rings that you got separately to the ends of the handle with the pliers – twisting apart and then re-closing like a jump ring with 2 sets of pliers. (If you couldn’t find any rings or don’t like that look, you can always skip this step and just thread the ribbon ends through the holes in the ends of the handle instead.)

3. Cut two long pieces of ribbon and thread each through the rectangles/D-rings. (Make sure each ribbon piece when doubled-over, is still long enough to tie behind your neck.)

Cut the ends at an angle and heat-seal them with a lighter or open flame.

4. Use an awl or the scissors to poke a hole through the ribbon center near the rectangle/D-rings. Attach a scrapbooking brad through the hole and fold over the brad legs. (You can also trim them if they stick out beyond the width of the ribbon by using wirecutting pliers.)

The doubled ribbon ends you then tie behind your neck in a knot or a bow depending on your preference.
Wear paired with brighter-than-bright colors for a Spring 2011 feel, or over bare skin for a more upscale vibe.

Happy DIY’ing!
xoxox
Carly
~If you liked this post, please share it!~
Save
Leave Comment
Jan 14, 2011 | DIY
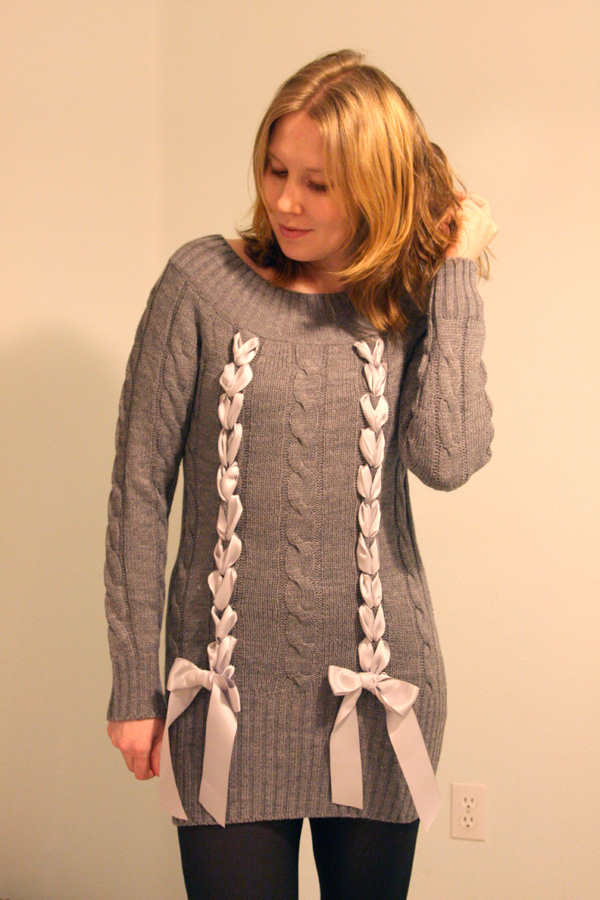
Seen on the runway in John Galliano’s Christian Dior Fall 2010 RTW Collection were whimsical, feminine knitwear pieces with satin ribbons woven and braided throughout.
Photos: Monica Feudi, GoRunway.com
Within weeks of appearing on the runway, many Japanese clothing brands picked up on the design, re-interpreting the idea and selling them en masse to a demanding public, creating a micro-trend stat.
In the U.S. I haven’t seen any clothing brands create their own version of this – which is just begging to be DIY’d! (Check out Outsapop and A Pair and a Spare for their coverage of this idea; and The Hearabouts’ DIY version.) It’s amazingly simple, and the best part is that next year when fashion marches on…you can just pull out the ribbon, fluff out the yarns in your sweater, and nothing’s the worse for wear. The only thing that’s better than a DIY is a DIY that is only permanent as long as you need it to be!
Difficulty: (Easy/Beginner)
You Need:
*chunky-knit sweater (I chose one with cabling, from YesStyle.com. If you can find something with mohair or angora blended in, it adds a soft femininity to the piece.)
*double-face satin ribbon (I chose 1.5″ wide)
*tape
And…
*scissors
*measuring tape
*hand-sewing needle & matching thread (not pictured)
How To:
1. First, even before buying your ribbon, you need to measure your sweater to find out how much you will need. Use a flexible measuring tape and, starting at the bottom of the sweater, start measuring upwards, zigzagging the tape back and forth to mimic how the ribbon will cross over once woven.
At the top of the track of weaving, note the measurement on the tape. Double it to get the full length of ribbon for the weaving part.
If you are going to create bows at the bottom of the weaving track, create a bow in the measuring tape and add that length to the total length of the track. That is the entire length of ribbon you will need for one woven area. I chose 2 areas of ribbon; thus I doubled the measurement for the total amount of ribbon I needed to buy. (But since I’ll be doing two rows, I’ll need 2 continuous lengths for each track – something to keep in mind when you’re doing your calculations.)
2. Cut your ribbon into the length you need for one row of weaving (+ a little more if you can). Wrap a piece of tape around both cut ends tightly, into a cone shape. This should work in place of a needle for your ribbon (though you can use a large-eye needle, yarn needle, or a safety-pin for your ribbon if you want).
3. Start at the top of the woven row, in the center of one of the cables, from the back of the sweater. Poke a small hole between the knit on either side of the cable, and bring the ends of the ribbon to the front of the sweater.
4. Poke a small hole at the bottom of the first cable knot, in the center. Bring both the ribbon ends into the hole and to the inside of the sweater.
5. Repeat to create a ladder of “V’s”, made in ribbon, down the front of the sweater. As you go, fluff out the ribbon that shows on the front periodically, and flatten the sweater so that you aren’t “scrunching” the cable too much.
6. At the bottom of the row, tie ribbon into a bow.
7. Repeat for the other side.
8. Try your piece on, and eyeball where you want the ribbon ends to fall. Cut, and then seal the cut ends with a flame.
9. To make the bows more permanent, hand-sew a couple stitches into the backs of the bows so they don’t loosen on you as you wear it. Hand-wash and lay flat to dry when it’s time for the laundry.;-)
Pretty easy, right?
Let me know if you try this out…I’d love to see your version!
Happy DIY’ing!
xoxox
Carly
~If you liked this post, please share it!~
Leave Comment
Oct 6, 2010 | DIY

So this is the last of my submissions for Style Sample Magazine and New York Design Shop’s Create Couture Challenge back in early August! Whew! Can’t believe it’s taken me this long to post them all…I wanted to make a final DIY piece from the box of materials I received and my eye lit upon the beautiful “NEW YORK DESIGN SHOP” printed ribbon. I love white, pink, and black together! So I crafted up this sweet, modernist design pin – that could easily be used as a hair accessory, bag charm, ring, you name it – just by varying the size, shape, and finishing. (The weaving of the ribbon does take awhile, but the results are fantastic!
You Need:

*NYDS Branded Ribbon (or any 1/4″ wide satin ribbon) – the NYDS-branded ribbon comes wrapped around the box when you place an order with New York Design Shop!
Additional Tools/Materials:
*scissors
*fabric glue
*stiff felt
*pin back
*lighter
*iron (optional)
*piece of paper (optional)
[prep: iron ribbon if kinked or curled; draw a shape as a template on a piece of paper]
How to:
1. Cut ribbon into eighths to start out.
2. Seal ends of two of the ribbons with an open flame.
3. Glue two ends of ribbons together, overlapping them at a right angle.
4. Seal the ends of more of the ribbons, and glue them parallel to the first ribbon, alternating the underlap and overlap of their edges.
5. When you have enough ribbons to work with, start weaving in ribbons in the opposite direction, heat-sealing and gluing down the ends as you add them in.
6. When you’ve run out of ribbons, start trimming the ones you’ve already woven, in order to create the desired shape.
7. Continue with trimming, heat-sealing, gluing, and weaving until your shape is what you like. Make sure all edges are glued together.
8. Cut piece of felt slightly smaller than your woven shape, and glue together with fabric glue.
9. Hot-glue pin back to wrong side.
Now anyone can wear their heart on their sleeve…or on their NYDS-branded tote!!
xoxox
Carly
Save
Leave Comment
Sep 21, 2010 | DIY
Another one of my submissions for Style Sample Magazine and New York Design Shop’s Create Couture Challenge back in early August – this time, a bag makeover!
Materials:
*Pink Ethnic Stripe Sash
*Brown Ethnic Stripe Sash
*pin back
*Cream Gardenia
Additional Tools/Materials:
*ugly old clutch handbag
*scissors
*fabric glue
*hot-glue gun
*small piece of scrap fabric
How-to:
1. Squeeze out a generous amount of glue onto the flap of the clutch, and press the Pink Stripe Sash onto it. Allow about a 1/2″ overhang on each side, and cut.
2. Add more pieces of stripe sash, overlapping the edges slightly as you go all around the clutch.
3. For the back add the contrasting color stripe for interest.
4. Fold under the overhang of the Sash, securing with the glue gun.
5. Hot-glue the pin onto the back of the Cream Gardenia, and glue a small piece of fabric over the pin back to secure it.
6. Cut two ribbons (like prize ribbons) from the leftover Sash.
Glue together with fabric glue.
7. Pin Cream Gardenia over prize ribbons, and pin to front of clutch.
What do you think? Does it look better now?
Everyone deserves a makeover!
xoxox
Carly
~If you liked this post, please share it!~
Leave Comment
Sep 15, 2010 | DIY
Project #9 in my submissions for Style Sample Magazine and New York Design Shop’s Create Couture Challenge back in early August.
You Need:
*Victoria Lace
*Cream Ruffle Stretch Trim
*Brown Sweater Style Stretch Trim
*Baby Single Face Satin Ribbon in Brown
*Large Iron-On Butterfly
*White Rose Pin (pin back only)
Additional Tools/Materials:
*scissors
*fabric glue
*hand-sewing needle
*matching thread
*black felt
*lighter
*iron
*sewing machine (optional)
[prep: iron ribbons and trim if kinked or curled]
How-to:
1. Cut Victoria Lace in half.
2. Place each side onto the edges of a piece of the Sweater Style Stretch Trim. You can either glue them down with fabric glue, or sew them down.
4. Trim the end off the Sweater Style Stretch Trim.
5. Sew or glue down the Cream Ruffle Stretch Trim in the center, covering up the Sweater Style Stretch Trim. I cut the Ruffle Trim a little shorter so it wouldn’t go completely all the way around my waist.
6. Cut the Satin Ribbon in half, on an angle. Seal the ends with an open flame.
7. Hand-stitch the un-angled ends of the Satin Ribbon to the underside of each end of the Ruffle trim.
8. Iron the Butterfly on to the felt.
9. Trim the felt around the butterfly carefully.
10. Remove pin back from White Rose.
11. Hot-glue pin back to the wrong side of the butterfly, and pin to the belt.
A pretty and vintage-fabulous result for a pretty simple process!
You can wear this piece as a belt or as a headband – and the butterfly as a separate pin.
Choices, choices…
Happy DIY’ing!
xoxox
Carly
~If you liked this post, please share it!~
Leave Comment