I was beyond thrilled to be invited back to Oregon’s KATU Afternoon Live show last month – to demonstrate how to make these beautiful DIY gemstone-topped jewelry boxes (for Valentine’s Day…or any other gift-giving occasion really!)
Watch below as I demonstrate with host Tra-Renee how to make your own to rival those $45+ boxes you see at the home decor stores!
How to DIY Your Own Gemstone- (or Agate, or Geode) Topped Jewelry Box
DIY Supplies for Making Your Own Agate Jewelry Box That I Mentioned in the Video:
Boxes: unfinished wooden boxes found at Michael’s. You could also buy them online here.
Sliced Agate:Ed’s House of Gems (store on Sandy Blvd. in NE Portland, OR to buy lovely rocks and sliced agate pieces) // Amazon.com
Silver Titanium Heart Crystal: (I mistakenly called it “hematite” in the video, oops) Etsy.com (search results for heart crystal since the exact one I featured is no longer available)
Gold Calligraphy Pen:this is the type I used for painting the raw edges of the boxes; it creates a lovely metallic finish
2-Part Epoxy: you can use any kind as long as it’s clear, I used this one and it’s never EVER coming off that box!
Mod Podge Dimensional Magic (for a glossy, resin-like finish): Michael’s, Jo-Ann Crafts, or online here
Hi friends, I couldn’t resist a bit of shameless self-promotion and let you know that I’m going to be a guest on KATU’s Afternoon Live show with Tra-Renee, this Thursday.
Apparently the show is live (*gulp*) where I’ll be sharing closet organization tips for the New Year – plus 2 fun DIY’s (if there’s time) to give your closet storage and display areas a makeover.
As far as I know the show only airs in Oregon and isn’t syndicated nationally, but if you’re in Oregon you can watch it on channel 2 (or 16, depending on your cable provider). If you aren’t in Oregon or don’t have cable it seems you can catch it live here:
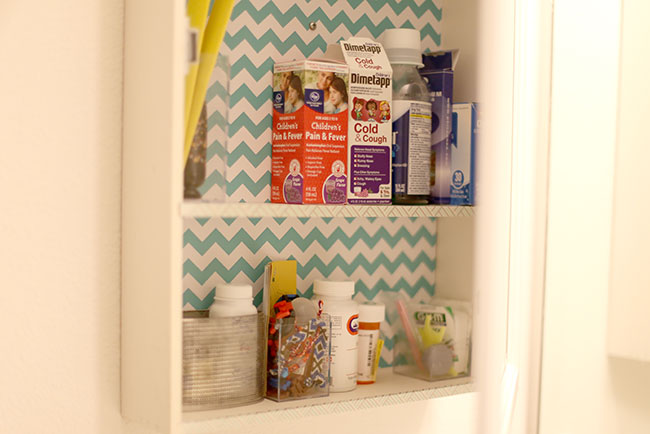
It’s super-easy to do the same – and it provides amazing results. Here’s how to give yourself a little pop of happiness each time you open the medicine cabinet:
DIY Pretty Patterned Bathroom Cabinet Makeover with Shelf Liner Paper
You Need:
sticky-back shelf liner paper (or removable wallpaper!)…I believe my shelf liner paper was actually from a recent trip to HomeGoods / washi tape / sharp Xacto knife or box cutter / scissors / measuring tape
How To:
My bathroom cabinet was a mess – overflowing with expired meds, unused items, and general junk. (If yours is only half as bad I’ll feel slightly better. I mean, who keeps a bottle of silly putty slime from their son’s 7th birthday party in their medicine cabinet??! (My son is now 10 and a half.) But I digress.) The first step in a makeover is to remove!
Remove everything and go through it mercilessly.
2. Wipe down the inside of the cabinet and remove the shelves (if you can). Apply a pretty washi tape to the edges of the shelves, cutting the ends flush with the ends of the shelves.
3. Measure the inside of the cabinet and cut a piece of shelf paper that matches in size. Remove the backing to the paper and, starting at the top inside of the cabinet, start applying the paper, smoothing down as you go.
4. My cabinet had screws in the center of the back, so I used a box cutter to carefully cut out a round hole for each screw as I encountered it. I then carefully smoothed the shelf paper around it to remove bubbles and lumps.
5. Once the paper was flush with the back of the cabinet and secure, I replaced the shelves.
And the pared-down pile of junk I still wanted to keep in there!
It looks a lot better, no? All in all – it took my about 15 minutes – and it makes me grin every day when I open it and see how pretty it is on the inside. I chose not to do the sides of the cabinet or the inside of the door just yet…because I think I want to do something different with the back of the door!
Here’s one more time, before…
and after! A huge improvement, and I’m totally happy with it.
Tell me: Have you gone crazy and papered the inside of your cabinets yet?
So…sliced agate bookends are a big THING…but they can be ridiculously expensive. Just browse One King’s Lane or Joss & Main (and those are discounted to around $66, sheesh!) to see what I mean. Or Z Gallerie to see the full-priced version at $99. Even Target released a pair as part of their Threshold line…and of course the pair is about at the $25 mark. That’s still a price I think I can beat, so I began searching for how to create these lovely bookends for less.
Unfortunately to get good-quality sliced and polished matching agate chunks, you’ll have to pony up some cash, there’s no way around that. If you can score a pair on eBay for cheaper, that’s awesome…just be aware to factor in shipping to make sure you’re getting a good deal (those things can be heavy). Amazon has some great agate bookend options…similar to the lower pricepoint I found mine at – so I’d recommend buying through them!) Personally, I like to source my gems at local rock shops since I can get a pretty good deal depending on what they have in stock – and a favorite of mine is Ed’s House of Gems in NE Portland (don’t look at their website, it doesn’t begin to do this amazing store justice). Needless to say, I managed to find a beautiful pair of agate bookends there recently for a mere $18 – and set out to spice them up and make them look as nice as the Target (or the more expensive!) versions. (You could also cover the rough sides in actual gold or silver leaf if you wanted…but I had some spray paint on hand and figured that would be easiest.)
1. Spread painter’s tape over the flat sides of each bookend, extending the tape beyond the side.
Press firmly at the edge where the flat polished side meets the rough, rocky edge to prevent seepage.
2. Place on newspapers outside, and spray the rough, rocky sides gold. 1-2 coats should suffice.
3. Allow to dry.
4. (Optional) Hit the gold-painted side with a coating of acrylic sealer if you’re concerned about the gold rubbing off.
5. (Optional) Place sticky-back felt dots on the underside of the agate pieces to keep your shelving safe.
And there you have it!
You could easily just place the agate pieces as-is on your shelves and none would be the wiser…but I wanted some more finished pieces. They would also make a fabulous gift that looks oh-so-expensive…and you never have to tell anyone that you crafted them for a steal!
Happy DIY’ing!
If you’ve made your own version of these popular sliced DIY agate bookends – how did they work out for you? Let me know in the comments!
Ever wanted to display all those beautiful photos from your Instagram feed into a craft easily and at home?
This is a fun project to turn Instagram photos into magnets commemorating a fun event or time. (AKA an “Instacation!”)
They’re surprisingly easy to make at home (and a number of the supplies used in this project are on sale right now!) Plus, you don’t have to use a 3rd part for the printing – you can just use a regular printer to print your images on cardstock. Print, cut, and stick and that’s it!
Carly J. Cais I am a DIY’er, designer, sewist, maker, and marketer. Chic Creative Life is where I share what I do, and help others bring their unique style into their own lives.


 So…sliced agate bookends are a big THING…but they can be ridiculously expensive. Just browse


