Mar 6, 2014 | DIY
 Spring is headed our way, and what better way to embrace it than to whip up some quick DIY hair adornments? Here are some ideas for fun and fabulous pieces to add the crowing touch to your warm weather outfits.
For the above look at Dolce & Gabbana, wrap a thin wire headband with a string of gold beads, securing here and there with dabs of hot glue. Pull apart sprays of white and light pink silk blossoms from the craft store, and attach to a long piece of soft jewelry wire, wrapping the wire around the base of each flower. Once your hair is styled into a braided bun, poke one end of the wire into the underside of the bun, wrap around the top of the head and back down again, and finish by wrapping around the bun and tucking the end in. Complete the look by hot-gluing large gold coin buttons onto a hair clip, and clipping it just above the bun at the back.
 Go totally boho like at Anna Sui by hot-gluing distressed silk blossoms onto a bundle of long velvet ribbons. Also glue on a bridal applique in the center flower at the forehead. Tie at the back so the ribbons trail down into the hair.
 The super-luxe headbands at Tanya Taylor are easy to re-create with clusters of rhinestones and jewels, or vintage buttons or brooches, clipped along wide black satin-covered headbands.
 Valentino‘s studded headbands could be made by covering a headband base with maroon leather and gluing gold buttons in rows along the top and sides.
 The pretty flowers at Zac Posen could be made with silk or paper blooms run through with bobby pins and pinned straight into a messy updo at intervals.
 To make the interesting top clips at Elie Saab: on a stretchy gold headband base, attach a slightly curved flat gold barrette using thread to loop it onto the base. Just go around the bottom part of the clip numerous times until it won’t budge from the stretchy headband. (Goody makes an excellent dupe of that gold clip.)
 Tiny pretty flowers dotted the hair at Honor: and to make your own, I’d suggest using dimensional scrapbooking stickers (or tiny paper or silk flowers found in the same section). If the sticky side isn’t sticky enough to stick into your hair, snip a tiny piece of fine-toothed sticky-back velcro and attach to the backs of the blooms.
 The wide minimalist ponytail holders at Jason Wu could be made with some gold leather and a hair elastic (just hand-sew each end of the leather piece to the hair elastic, and slide it over a secured ponytail).
 You could make a similar ponytail holder just like the above to mimic the look at Helmut Lang. In this case I believe you should use a larger rectangle of black leather and attach sticky-back velcro to both sides of it; secure the ponytail with an elastic, and wrap the leather around it, closing with the velcro.
 For Jenny Packham‘s ethereal clips, just glue or wire a vintage insect brooch, finding, or charm onto the end of a matching bobby pin in silver or gold.
Happy DIY’ing!
xo
Carly
Images via Fashionising. Read their full rundown of Spring Hair Accessories here (which also includes how to style the hair in the above hairstyles).
Leave Comment
Nov 13, 2012 | Fashion, Life
 So the $10 million dollar question is…are you going to wait in line for the Maison Martin Margiela collection at H&M?
I’m debating whether to swing by the mall on Thursday and check out a couple pieces, though probably not buy. It’s not like I need them after all.
What do I need want are the color variations of the perfect metallic hair-ring…I picked up gold the other day, and now I’m kicking myself for not picking up silver and copper.  Similar to what was seen on the Dries Van Noten runways for S/S 2012, H&M has put out their version (which looks similar to a couple plastic ones with metallic foil on them I’ve had since the 80’s…I think they were Goody, originally.) Deliciously minimalist, problem-solving construction so your hair isn’t falling out of your DIY napkin ring/copper plumbing piece you’re making do with. Sometimes DIY is not always the answer to a basic construction problem…and buying at retail price will save you a lot of time and frustration.
  I have fine hair and find that anything metal and heavy will slip right out of it. The H&M piece has an inner ring that secures the hair elastic, and a snap closure that’s easy to apply, and is only $4.98.
By strange coincidence, all the metal I was wearing today was H&M…gold metal hair-ring and copper choker bought Sunday, and gold elongated pyramid earrings purchased back in June or so. Nails are suede-finish Amber by Julep, a perfectly-matte, velvety-finish dull gold.
As for the Margiela collection, I’m thinking possible DIYs for that hitched-up turtleneck (safety-pins applied under the hem to hitch things up)…that trompe l’oeil bodysuit (just tack on a black bra to a nude long-sleeved leotard)… …that glove clutch (attach gloves to your clutch bag with some leather glue
 )…those skirted trousers (throw a similar-colored skirt over a pair of wide-leg trousers)…
 …those hand-painted loafers (paint your black loafers with some white latex [not acrylic, and not leather] paint)…that pieced-together coat (2 different coats, stitched together into one)…
…and those plexi wedge pumps…though I’m questioning whether time and effort is better spent just buying those heels as-is. Sometimes just plunking down the $4.98…or in the case of the plexiglass heels, $299…is an actual cost-savings when it comes to something that needs to bear weight and be flexed multiple times in a day, like shoes…
Also, the $20 million dollar question: Will you buy something knowing that it is extremely recognizable [and may remain so for years] in the collective conscious as from a certain collection, store, or designer?
xoxox
Carly
Margiela for H&M Collection photos from Refinery29.com. See the whole collection here.
Leave Comment
Feb 25, 2012 | Fashion
 I just love it when a company takes something fairly entrenched in our culture – and makes a design improvement upon it. Case in point: these Goody DoubleWear hair elastics and headbands I recently spied at my local Target.
 I’ve been growing my hair out for awhile, and it seems almost every day I’m wandering around with a hair elastic around my wrist and a headband on, since I just like having my hair up and off my face most of the time (but I’m determined to wear it down since I went to all the trouble of growing it out). But yes, the elastic around my wrist looks like precisely that…a boring black bit of elastic…and my headband often hurts my head after awhile but I can’t just slip it off when I’m out and about and stick it in my pocket or something. (I go through plastic headbands like candy because I always misplace them somewhere and then sit on them or snap them in half somehow.)
 Enter these lovely things – actually chic, affordable (around $4.99 for a set!), surprisingly well-made elastics that sport a thin metal tube. The headbands come in a set of gold and silver – and the hair elastics come in black with silver, black with gold, or shades of blue with silver. (There may be more, I just haven’t found them yet!) They look amazing with a plain white blouse, or even dressy when worn with an LBD. A
 nd they look fabulous stacked with other jewelry too! I can easily pull my hair back with them when I want things off my face. And then drop them back onto my neck or my wrist when my hair needs to come down for awhile.
They’re just brilliant. And you can buy them anywhere that Goody is sold. (Like Target!)
I’m just loving their minimalist, chic sleekness!!
xoxox
Carly
~If you liked this post, please share it!~
Leave Comment
Jan 6, 2010 | DIY
 $498 for a piece of fabric with some spikes on it??? Wow.
Jennifer Behr’s couture headbands have been featured in countless magazines (including Vogue) and TV (on Gossip Girl, for instance). Beautiful and distinctive, they are a favorite of brides and Hollywood starlets. They’re hand-made in New York City.
And they’re very, VERY expensive. Take the turban above, for instance.
It’s silk with patent leather and stainless steel spikes, and $498. Come on.
Obviously I’m in a bad mood this morning, noshing on Cheese Straws. Note to self: DO NOT EVER BUY CHEESE STRAWS AGAIN.

Cheese straws: the work of the Devil.
But back to this “turban” headband.
Lately turbans are experiencing a revival: evidenced in part by Forever21 offering up a turban last month on their site – no, not towel wrap for drying your hair, folks…a real, live turban – as fashion accessory. Plus the girls at BleachBlack blogged about wanting one awhile back (I’m just too stuffed with cheese straws lazy to find the link). Eek.
Friendly reader Kay sent me the photo above saying that the Jennifer Behr piece reminded her of my DIY’s. I do like me them studs, heh heh!
So, here’s the DIY if you’re curious…
You Need:
*20-pc bag of 1/2″ cone spikes ($5.59, Studsandspikes.com)
*100-pc bag of 3/8″ cone studs ($2.89, Studsandspikes.com)
*strip of stretchy black fabric (I used a Lycra swimsuit fabric)
Tools: fabric scissors / matching thread / sewing machine / hand-sewing needle / pliers / awl / Phillips screwdriver
How To:
 1. Cut a piece of fabric long enough to go around your head and then some. Mine was about 8″ wide and a yard long.
 2. Fold cut piece in half horizontally, right sides together, and stitch along long edge.
 3. Turn piece right side out and you now have a long tube.
 4. Wrap the tube around your head and pin at the correct length. (I made a single twist in the fabric at the front center.) Make sure the tension is correct – you need it a little looser than what you would think is a good tightness for a headband/wrap, lest you get a headache after wearing it all day.
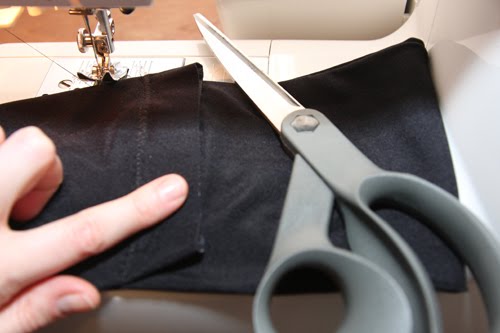 5. Sew ends of wrap together (right sides together). (not pictured) Then fold seam allowance to inside of wrap, cut excess. This will give you a clean seam on the outside of your wrap. Sew one more time vertically down that seam allowance to secure it down. (not pictured)
—>If you just want a plain twisted-front turban like the Olsen twins below…you’re done! If you want to spike it and stud it like Jennifer Behr’s piece, keep reading… Tutorial continued…

6. Try on head-wrap; bunch it up in a couple places and pin. 7. Hand-tack the bunched-up areas so the piece has a “gathered” look to it.
 8. Now we stud! I slipped the turban over my leg and sat it on my knee for stability. I pushed the prongs of the cone studs into the fabric, and folded them over on the underside of the fabric using pliers.
 9. Then use an awl to pierce the holes for the cone spikes, which have a thick screw that needs to pass through the fabric. (The easiest way to do this is to poke the hole thru from the right side – then thread the spike screw in from the wrong side, following the awl as you pull it out.) Then attach the cone spike tops, and use a screwdriver to secure from the underside. (not pictured)
As you can see above, it turned out kind of like a wide headband!
You’re done! I didn’t add quite as many spikes ‘n’ studs as the Jennifer Behr version – simply because I got tired of it. I actually made a second layer to the piece so the center twist wouldn’t be so narrow and I could stud and spike through the upper layer only. This ensured no scratchy stud prongs would be directly against my forehead, but it turned out that the inner layer was a no-go since the spikes wouldn’t sit properly when there was fabric sitting underneath them. If you do choose to add another piece of fabric inside the headwrap (making it shorter than the headwrap and stitching its edges to the headwrap edges so it’s like a little stitched-down flap inside); I’d recommend studding the cone studs in the upper layer of fabric, but setting the spikes through both layers so they sit right. I know that sounds confusing!
 The fabric’s stretch is a bit of a problem – some spikes may fall out if you pull the piece too much, so this requires care when handling. FRA-GEE-LEH as they say in Italian! (Okay, I guess I’ve seen A Christmas Story way too many times…;-)
What do we think? Does this work? Is this a no-go? Do I look like I am about to join a biker gang?

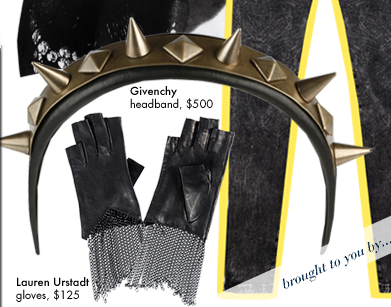 If you need further proof that studded headbands are all that this season, this Givenchy studded headband was featured in WhoWhatWear’s December holiday gift guide. Loving the chain gloves too!
But I’m a little wary of the studs-around-the-head look…they remind me of something quite Biblical. Ah, who’m I kidding?? It’ll be my next DIY, guarantee ya. (DIY available here.)
Happy DIY’ing!
xoxox
Carly
Save
Leave Comment


