Dec 1, 2014 | Fashion
 Who loves fresh flowers around the home? Hands up if you do! And if you do, you’re probably aware of how costly that can be to maintain. And how hard fresh flowers are to come by at certain times of the year. And the toll they can take on the environment (depending on where you get them). The answer to that: The Bouqs Co. (the new floral kid-on-the-block with awesome South American flowers picked from the side of an active volcano). Yup, you read that right: an active volcano. And yet they offer a huge variety of flowers, delivered FREE (always!), fresh to your door.
 The Bouqs Co. kindly sent me my choice of bouquet to review. I chose the Peace Bouq, since I love white flowers in the Wintertime. The website was super-easy to order from and way more intuitive than most floral order websites…you know the ones I’m talking about (that look like they’re been around since 1994). Within 10 days of ordering the flowers were at my door (and you can of course specify what date you’d like them delivered on).

Above is how the flowers come wrapped, to protect them on their journey all the way from South America. The box was very sturdy and the flowers were not crushed in the least from transport.
 They had some preservative gel on their cut ends to prevent them from drying out, which easily wiped off. Though some had wilted a bit on the way, once in water they perked right up again.

 Fragrant, luscious, environmentally-friendly, FREE SHIPPING…what’s not to love?
Here’s the amazing array of all the flowers Bouqs has to choose from:

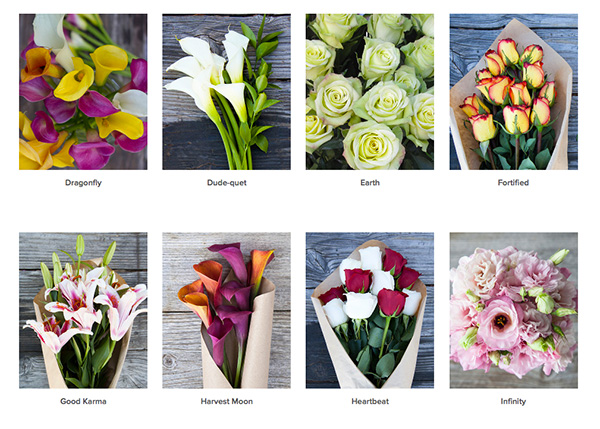


See any that strike your fancy? For today, Cyber Monday, you can select any Original-sized Volcano Bouq and use code DOUBLEBOUQ to get DOUBLE the flowers (the Deluxe-size for free!). Valid until the end of 12/1/14.
Also, other promotions going on for Cyber Monday (valid until 12/3/14):
Send at least 4 Bouqs, get 25% with code CYBERBOUQ
Buy a gift card to The Bouqs Co., and save up to 20% off the retail price
You can knock off all your holiday gift-giving, or be super-organized and schedule out your Valentine’s Day, Mother’s Day, friends’ birthdays, and new baby bouquets all in one go.
Definitely try out The Bouqs Co. and see what it’s like – you’ll be impressed with the quality of fresh flowers, year-round, delivered to your door for no hassle.
xo
Carly
FTC Disclosure: I was provided an Original-sized Bouq for review purposes. I have received no other compensation for this post. The above opinions are my own. This post contains affiliate links, which means I receive a small commission if you click on a link and purchase something. To read my full Disclosure Policy, click here.
Leave Comment
Jun 1, 2014 | DIY
 Happy June! Father’s Day is coming up soon, and I’m in a DIY mood. What better way to show that special Dad in your life some love than something handmade you’ve put your time and energy into? Here are a couple ideas to get you going: (more…)
Leave Comment
May 14, 2014 | DIY
 Now I’m sure you guys have heard of that amazing crafting supply that does practically everything: Mod Podge. There are major devotees to this glue/decoupage medium/finisher, and for good reason! Because it’s nontoxic, cheap, provides a variety of finishes, and it just plain flat-out works!
Amy Amderson, the amazing and multi-talented blogger brand representative of Mod Podge (and the brainchild behind the cool blog Mod Podge Rocks!) sent me a package from her brand-new Mod Podge Peel & Stick Stencils line, designed exclusively for PLAID Enterprises. I had a blast playing with the stencil, and I fashioned this chic patterned update to an old photo frame I had. Check out how I did it:
You Need:
photo frame / Mod Podge Peel & Stick stencil (mine is in Tangier) / foam pouncer / Mod Podge (matte) / silver leaf / gloss spray acrylic sealer / paintbrush (not pictured)
How To:
1. Place your stencil onto your photo frame. (If your photo frame is very smooth, you may need to rub it with fine grit sandpaper to give it some surface to the Mod Podge to stick evenly on to.)
2. Pour out some Mod Podge and dip the foam pouncer into it, wiping off excess.
3. Dab the pouncer on top of the stencil.
4. Peel off the stencil and allow the Mod Podge to sit for a few minutes to become tacky.
5. Place some silver leaf onto where the Mod Podge was applied.
6. Use a soft, dry paintbrush to remove the excess silver leaf.
7. Once one side is fully leafed, repeat placing the stencil, applying the Mod Podge, and applying the silver leaf in sections across the photo frame.
8. Finish wish a spray of acrylic sealant to keep that silver leaf looking gorgeous!

And that’s it! I love how designer-y and high-end the photo frame now looks…even though it was a super-cheap piece from IKEA. I also love the worn look of the silver leaf and the great pattern that emerged as I applied it. The stencil was super-easy to work with, and sticky enough that I could wipe it off each time and re-use it on different parts of the frame, no problem. The perfect addition to this frame was a photo of Lil Tot practicing his best flying ninja stab jump with my rake. Stab that leaf pile!!
You can find Mod Podge Rocks! Peel & Stick Stencils in craft stores such as Jo-Ann Fabrics and Michael’s, or at the PLAID store online here. I guarantee, they will take your Mod Podge projects to the next level!
 Thanks Amy and the team at PLAID! It was so fun to make this little project 🙂
Happy DIY’ing!
xo
Carly
FTC Disclosure: I was sent a Mod Podge stencil, 2 small tubes of glitter, and 2 foam pouncers courtesy of PLAID Enterprises. I have received no compensation for this post. The above opinions are my own. To read my full Disclosure Policy, click here.
Save
Leave Comment
Feb 14, 2014 | Life
 It’s the last minute, and maybe you’re stuck for some ideas what to do for your loved one. Here are some great ideas for a low/no cost time at home together.
Happy Valentine’s Day, everyone!
xo
Carly
Image source
Leave Comment
Feb 9, 2014 | DIY
 Last week I shared how to make some easy pastel-colored French macarons, and today I’m going to share what to do with the ones you’ve made. You don’t want them just sitting around, right? How about making them into something even better, like a cute little stack holding a message of love for your sweetheart? It looks adorable sitting on a desk, makes a great gift for children or teachers, and is quite easy to make as the clay is soft enough to poke holes into without power equipment. Here’s how:
You Need: (more…)
Leave Comment