Jan 19, 2016 | Fashion

FTC Disclosure: The post is part of a partnership with PandaHall, who purchased a banner advertising slot in my sidebar. If you are interested in purchasing a banner ad (or sponsored post) coming up on the editorial calendar, click here. Small businesses welcome! My full Disclosure Policy is here.
Hi friends!
To start 2016 off with a bang, I’m looking at stocking up for many projects on the horizon. (It’s going to be a huge year in many ways!!) Here are a couple of my favorite projects for the New Year (with [affiliate] links to the beads you need):
1. J. Crew Beaded Rose Bracelet
Such an elegant little bracelet, you could make it (and the similar necklace) using this brass link bracelet as the base, these Rose Quartz Gemstone Cabochon drops as the petals, and these rhinestones as the centers.
2. ModCloth How’s the Feather Up There? Necklace
A pretty and delicate layered necklace with feather charms, you could make this using these Electroplate Glass Bead Strands and these Tibetan Antique Gold Feather Pendants.
3. Anthropologie Valence Drops
These refined gemstone earrings could be DIY’d in a similar method to these DIY Illusion Jeweled Rhinestone Chandelier Earrings that I made, and using these supplies: Mixed Acrylic Rhinestone Montee Beads, Brass Lever Back Hoop Earrings, Glass Rhinestone Montee Beads, and clear PVC vinyl.
4. Free People Luxe Triple Necklace
Another layered necklace, this could be made with the Black Agate Bullet Big Pendant, Howlite Round Gemstone Bead Chain, Tibetan Style Latin Cross, Natural Black Rutilated Quartz Beads.
5. Pearl and Chain Spike Choker Necklace
Last time I worked with PandaHall I created this tutorial using their Non-Magnetic Hematite Rectangle Beads, Silver Color Aluminum Twisted Curb Chain, 6mm White Glass Imitation Pearl Beads, and Aluminum Twisted Curb Chain. See the full DIY tutorial here.
Hope these ideas prove inspirational to you!
What’s on your to-do list for fabulous jewelry this year? Do tell!
xo
Carly
Leave Comment
Feb 25, 2015 | By Carly J. Cais, From You
As you may know, I designed some fabrics awhile ago and offer them for sale by the yard through my shop on Spoonflower.
 At first I created them because I couldn’t find any galaxy-print fabrics that I liked, and I wanted to play with the trending print. After I opened my shop though, people that I didn’t even know began purchasing my designs and using them in their own projects. I was so thrilled to see other creators designing with fabrics that I had spent so long laboring over their designs, their colors, their pattern repeat until my eyes were practically crossed!
Some people were kind enough to share with me some projects they had made:
 Source
Like Yannick who goes by @yansev on Instagram, who made this amazing wakeboard cover using my palm tree fabric. (He’s working on a line of wakeboard covers coming in Summer 2015 – follow him on Instagram for updates!!) Whoever thought of making a wakeboard cover with Spoonflower fabric…isn’t that cool??!
 And Maria, who made this galaxy-print tote she offers for sale in her Etsy shop 162Pens.
 She also made this cute little pencil case/makeup pouch too.
Her craftsmanship is just beautiful…you should definitely check out the other pretty designs in her shop to ogle!
Thank you everyone for sharing your amazing projects with me! I’m so happy that you found these fabrics useful and fun for you:-)
 Just to share some more ideas, I made this DIY Flat Bottomed Zip Pouch with my Sideways Palm Tree Tropical Photo Print in organic cotton sateen…

…this DIY Galaxy-Print Mini Skirt with my Alternate Blue Galaxy Print in organic cotton sateen…

…and this scrunchie with my Red Star Field Galaxy Print in silk crepe de chine.
In addition to fabrics, you can also get any of these prints available for sale as wallpaper or gift wrap too!
I’m so happy that something like Spoonflower exists, where fabric designers can made beautiful fabrics come to life, and people like me, who just like playing with pattern and color, can even aspire to be a fabric designer.
If any of you have used my Spoonflower fabrics for anything, please share your projects with me! I’d love to showcase them on Chic Steals 🙂
xo
Carly
Leave Comment
Jan 30, 2015 | DIY, Life

1 / 2 / 3 / 4 / 5 / 6 / 7 / 8 / 9 / 10 / 11 / 12 / 13
Adding embellishments to pieces (crystals, studs, trim, iron-ons etc.) is one of the easiest ways to breathe life into your clothing and accessories and give them a whole new makeover. I’ve done a number of DIYs in the past that involve different materials and techniques (like my DIY Vinyl Eyelash Applique T-Shirt, DIY Sequin Trompe L’oeil Peter Pan Collar T-Shirt, and DIY Jennifer Behr Spiked Turban for example). I’ve found a number of tools are extremely useful in adding all those bits ‘n’ bobs (they save a ton of time!) – and here are my faves:
1. Hardwood Handle Awl
For poking holes for studs and screw-spikes, you need an awl. Period. This will make tiny precise holes (NOT slits like scissors) and the spike screw-thread will do the enlargening itself. Much better to cause as minimal damage to the fabric as possible. The hardwood handle allows for long usage without fatigue in your hands (and if you’re embarking on a large-scale studding or spiking project, you know exactly what I’m talking about!).
2. Chain Nose Pliers
For bending the studs teeth at the back, I always use pliers – though there are also stud prong press tools available for this specific purpose.
3. Creative Crystal BeJeweler Pro Embellishment Tool
For adding hotfix crystals or nailheads to your projects one-by-one: completely necessary for precision and beautiful designs.
4. Dual Duty Plus Button Thread
TOTALLY different from regular cotton mercerized or polyester thread. Did you know? I didn’t for a long time – and I’d been sewing on buttons using completely the wrong thread for like FOREVER. It’s thicker, stronger, and more durable than the regular threads, so get this if you are sewing on any buttons or button-like embellishments.
5. Dritz Fray Check
You’ll need this as a double-security for the ends of trims that could fray when washed. If they can’t be heat-sealed with an open flame (like they have beads, sequins, or are mostly cotton) then add a daub of this on the ends to prevent fraying.
6. Chalk Pencil
Marking chalk set – I use this SOOOO much! I can mark with a different color than for the sewing lines or matching lines when making a piece, and it stays fairly sharp and accurate. I really love this little tool.
7. Dritz Curved Needles
For sewing rhinestones in settings (with sewing holes in the back) onto fabric surfaces easily.
8. Aleene’s Jewel-It Embellishing Glue
For gluing crystals or other embellishments that don’t have sewing holes. Not ideal, but sometimes you have to cut corners.
9. Leathercraft Pyramid Rivet Studs Setter
If you’re doing large-scale studding on leather this will save your hands from massive pain.
10. Martha Stewart Multi-Purpose Cutting Heat Tool
I use this mostly for the mini-iron capabilities. Not completely necessary (in a pinch I’ll just grab my regular size iron and be really, really careful) – but this works great for larger iron-on embellishments that don’t fit the Hotfix iron tip, and for small appliques. I don’t particularly like the hotfix tip (not enough options), but the cutting tip is useful for cutting stencil vinyl.
11. June Tailor Non-Stick Pressing Sheet (18″x18″ size)
For appliques and fusibles. You could also use a regular 100% cotton pressing cloth, but the non-stick one is better for fusibles.
12. Beadaholique Perfect Positioner/Jewel Setter Tool
Needed for rhinestone placement and setting. And when you’re going through a lot of stones in an intricate design, this will really cut your workflow time in half.
13. Variety of Machine Feet
Multi-foot set – if you’re doing embellishments that require a sewing machine (like adding ruffles, or leather pieces, or pearl piping) — you will need a ruffler foot, piping foot, or Teflon foot to deal with these different materials and make the whole process faster. (the pack pictured is for low-shank machines)
And of course a screwdriver for tightening screw-spikes, a lighter for heat-sealing trims, and a pair of scissors for cutting.
Need more Must-Have Tool Sets? Check out my Must-Have Tools for Sewing DIY’s and my Must-Have Tools for Jewelry DIY’ing!
xo
Carly
FTC Disclosure: This post contains affiliate links, which means I make a small commission if you click and buy something through one of the links above. My full Disclosure Policy is here.
Leave Comment
Aug 29, 2014 | DIY, Fashion
 The time to return back to school is upon us – and Darby Smart has some fun back-to-school DIY kits that will get you set for another year of academic success. How about a:
Top row: Leather Tassel Keychain / Scrabble Tile Mousepad / Leather Infinity Scarf
Middle row: Cross Stitch Tote / Build a Clock
Bottom row: Gold Statement Stack of Bracelets / Studded Cobalt Clutch / Painted Bamboo Phone Case
And my DIY Agate Keepsake Box Kit is also still available!

And Happy Back to School!!
xo
Carly
Leave Comment
Apr 9, 2014 | By Carly J. Cais, DIY
 I’ve just completed a super-fun collab with DIY kit shop Wander & Hunt – and designed 2 special DIY projects just for them.

 The first, the DIY Radiant Rhinestone Belt, was actually inspired by a rhinestone belt I spied on Anthropologie.com this past Winter, and figured it would be a snap to re-create. For $29 you get the ribbon base, felt for attaching the rhinestones, glue, a skewer, and an absolutely HUGE amount of rhinestones to deck out your waist embellishment. Gorgeous over a plain shirtdress or even a light coat, this will be an accessory you reach for again and again to dress up your outfits.
Check out the DIY Radiant Rhinestone Kit Here
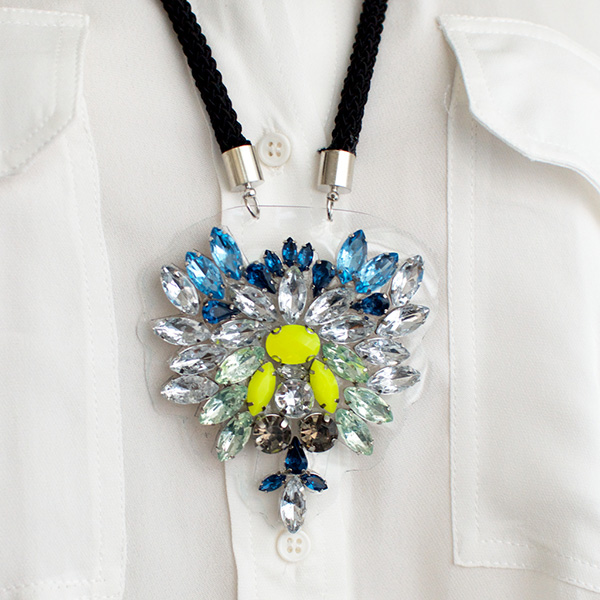 For the second project, the DIY Gem Pendant Necklace kit, I drew inspiration from a Dannijo bejeweled pendant I saw on Pinterest. Again, for just $29 you receive a bevy of gems, glue, a skewer, PVC plastic, endcaps, jump rings, and a rope for the necklace. The design is super-chic – and creates a fabulous statement!
Check out the DIY Gem Pendant Necklace Kit Here
You can also check out all the other DIY kits available at Wander & Hunt here (everything under $70!), as well as all the other supplies and materials that they offer. They have a ton of tutorials on the site as well, so you can get your DIY on without even buying a kit. Standard shipping is also free worldwide!

Thanks so much to the team at Wander & Hunt for making this happen! I had a blast designing these projects. 🙂
What do you guys think of these kits? Have you ever bought a DIY project kit – and was it worth it? Let me know in the comments!
xo
Carly
Leave Comment


