Apr 15, 2014 | DIY
 Hello friends! Today I am sharing the DIY tutorial for the Radiant Rhinestone Belt kit I designed for Wander & Hunt. It’s a fun little project with maximum impact, and you can place your stones however you like to get totally different looks.
  (My version is less symmetrical and more random, as you can see.) Here’s how:
You Need: (more…)
Leave Comment
Apr 9, 2014 | By Carly J. Cais, DIY
 I’ve just completed a super-fun collab with DIY kit shop Wander & Hunt – and designed 2 special DIY projects just for them.

 The first, the DIY Radiant Rhinestone Belt, was actually inspired by a rhinestone belt I spied on Anthropologie.com this past Winter, and figured it would be a snap to re-create. For $29 you get the ribbon base, felt for attaching the rhinestones, glue, a skewer, and an absolutely HUGE amount of rhinestones to deck out your waist embellishment. Gorgeous over a plain shirtdress or even a light coat, this will be an accessory you reach for again and again to dress up your outfits.
Check out the DIY Radiant Rhinestone Kit Here
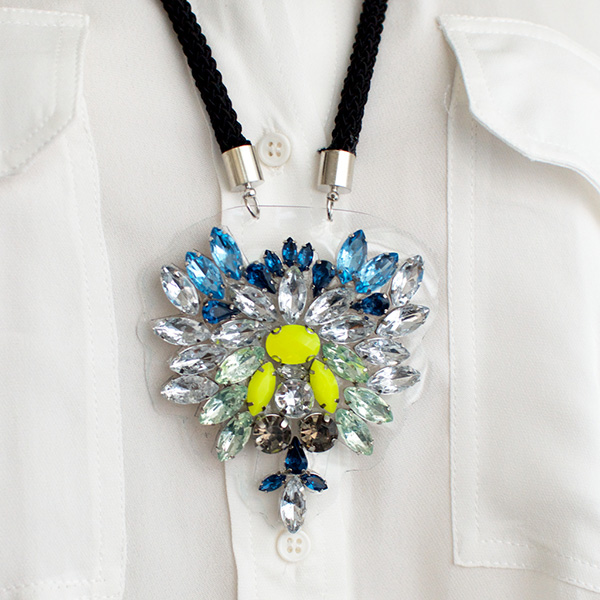 For the second project, the DIY Gem Pendant Necklace kit, I drew inspiration from a Dannijo bejeweled pendant I saw on Pinterest. Again, for just $29 you receive a bevy of gems, glue, a skewer, PVC plastic, endcaps, jump rings, and a rope for the necklace. The design is super-chic – and creates a fabulous statement!
Check out the DIY Gem Pendant Necklace Kit Here
You can also check out all the other DIY kits available at Wander & Hunt here (everything under $70!), as well as all the other supplies and materials that they offer. They have a ton of tutorials on the site as well, so you can get your DIY on without even buying a kit. Standard shipping is also free worldwide!

Thanks so much to the team at Wander & Hunt for making this happen! I had a blast designing these projects. 🙂
What do you guys think of these kits? Have you ever bought a DIY project kit – and was it worth it? Let me know in the comments!
xo
Carly
Leave Comment
Jan 26, 2012 | DIY
 A super-easy addition to any outfit, this sweet little gathered peplum is reminiscent of the Jil Sander S/S 2011 collection (the one with all the bright-colored gathered maxi-skirts evoking tulips and flowers). You can wear it with the coordinating maxi-skirt, or alone over jeans, a pencil skirt, or an LBD. It’s also super-easy to make! Here’s how:
You Need:
(more…)
Leave Comment
Mar 15, 2011 | DIY
 I don’t think I ever posted the step-by-step tutorial for this. Woops!
Inspired by this neckpiece (actually a belt)…from the J. Crew Fall 2009 catalog.

A very simple, but effectively pretty, DIY. Seen in this outfit last…last year here.
You Need:
*8″ Pearl-edged Lace Ribbon
*36″ Cream Satin Ribbon
*15″ x 3″ wide cream-colored Scrap Fabric
*8 Assorted Shades of Silk Flowers
*1 Large Pom Pom
*1 Small fabric Rose
*18″ x 6″ wide Peach Satin Fabric
And…
*Sewing Machine
*Needle & Thread
*Hot Glue Gun
*Fray Stop
1. Create the backing for your piece. I used an 18″ x 6″ piece of peach satin voile – and turned the edges under, hemming so as to conceal the raw edges.
2. Cut your satin ribbon in half; stitch the end of each to each side of your fabric backing. Apply Fray-Stop or burn ribbon ends to keep from fraying.
 3. Add design elements with a hot glue gun onto your fabric backing. I added the flowers first, then squashed the pompon and small fabric rose (premade) in-between.
4. Create large fabric rose by rolling a piece of cream-colored scrap fabric, securing with hand-stitching. Glue onto backing.
5. Tie pearl-edged ribbon in a bow, and glue onto collar.
You’re done! You can wear it as a collar/necklace, as shown – or even wear it as a belt – which I love!
Happy DIY’ing!
xoxo
Carly
Leave Comment
Sep 15, 2010 | DIY
Project #9 in my submissions for Style Sample Magazine and New York Design Shop’s Create Couture Challenge back in early August.
You Need:
*Victoria Lace
*Cream Ruffle Stretch Trim
*Brown Sweater Style Stretch Trim
*Baby Single Face Satin Ribbon in Brown
*Large Iron-On Butterfly
*White Rose Pin (pin back only)
Additional Tools/Materials:
*scissors
*fabric glue
*hand-sewing needle
*matching thread
*black felt
*lighter
*iron
*sewing machine (optional)
[prep: iron ribbons and trim if kinked or curled]
How-to:
1. Cut Victoria Lace in half.
2. Place each side onto the edges of a piece of the Sweater Style Stretch Trim. You can either glue them down with fabric glue, or sew them down.
4. Trim the end off the Sweater Style Stretch Trim.
5. Sew or glue down the Cream Ruffle Stretch Trim in the center, covering up the Sweater Style Stretch Trim. I cut the Ruffle Trim a little shorter so it wouldn’t go completely all the way around my waist.
6. Cut the Satin Ribbon in half, on an angle. Seal the ends with an open flame.
7. Hand-stitch the un-angled ends of the Satin Ribbon to the underside of each end of the Ruffle trim.
8. Iron the Butterfly on to the felt.
9. Trim the felt around the butterfly carefully.
10. Remove pin back from White Rose.
11. Hot-glue pin back to the wrong side of the butterfly, and pin to the belt.
A pretty and vintage-fabulous result for a pretty simple process!
You can wear this piece as a belt or as a headband – and the butterfly as a separate pin.
Choices, choices…
Happy DIY’ing!
xoxox
Carly
~If you liked this post, please share it!~
Leave Comment


