Jul 4, 2011 | DIY
 For the Fourth of July I’m sharing two tutorials over at Cocktails with Mom: one for a Patriotic-themed Double Pinwheel Corsage, and the second for a regular paper pinwheel. Please head on over there and check them out!

Happy Fourth, everyone! Hope it’s a great one!:-D
xoxox
Carly
~If you liked this post, please share it!~
Save
Leave Comment
Oct 6, 2010 | DIY

So this is the last of my submissions for Style Sample Magazine and New York Design Shop’s Create Couture Challenge back in early August! Whew! Can’t believe it’s taken me this long to post them all…I wanted to make a final DIY piece from the box of materials I received and my eye lit upon the beautiful “NEW YORK DESIGN SHOP” printed ribbon. I love white, pink, and black together! So I crafted up this sweet, modernist design pin – that could easily be used as a hair accessory, bag charm, ring, you name it – just by varying the size, shape, and finishing. (The weaving of the ribbon does take awhile, but the results are fantastic!
You Need:

*NYDS Branded Ribbon (or any 1/4″ wide satin ribbon) – the NYDS-branded ribbon comes wrapped around the box when you place an order with New York Design Shop!
Additional Tools/Materials:
*scissors
*fabric glue
*stiff felt
*pin back
*lighter
*iron (optional)
*piece of paper (optional)
[prep: iron ribbon if kinked or curled; draw a shape as a template on a piece of paper]
How to:
1. Cut ribbon into eighths to start out.
2. Seal ends of two of the ribbons with an open flame.
3. Glue two ends of ribbons together, overlapping them at a right angle.
4. Seal the ends of more of the ribbons, and glue them parallel to the first ribbon, alternating the underlap and overlap of their edges.
5. When you have enough ribbons to work with, start weaving in ribbons in the opposite direction, heat-sealing and gluing down the ends as you add them in.
6. When you’ve run out of ribbons, start trimming the ones you’ve already woven, in order to create the desired shape.
7. Continue with trimming, heat-sealing, gluing, and weaving until your shape is what you like. Make sure all edges are glued together.
8. Cut piece of felt slightly smaller than your woven shape, and glue together with fabric glue.
9. Hot-glue pin back to wrong side.
Now anyone can wear their heart on their sleeve…or on their NYDS-branded tote!!
xoxox
Carly
Save
Leave Comment
May 4, 2010 | DIY
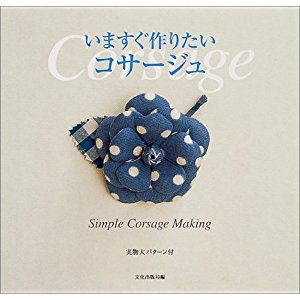
 With Spring officially here and Mother’s Day just around the corner, I’ve had flowers on the mind. But not just the ones growing in my garden – handmade ones, using scraps of fabric from a number of past projects. I’ve posted before about one of my favorite flower-making books, “Ima Sugu Tsukuritai Co-saju” [“Corsages I Want to Make Right Now” Bunka Publishing, 2006].
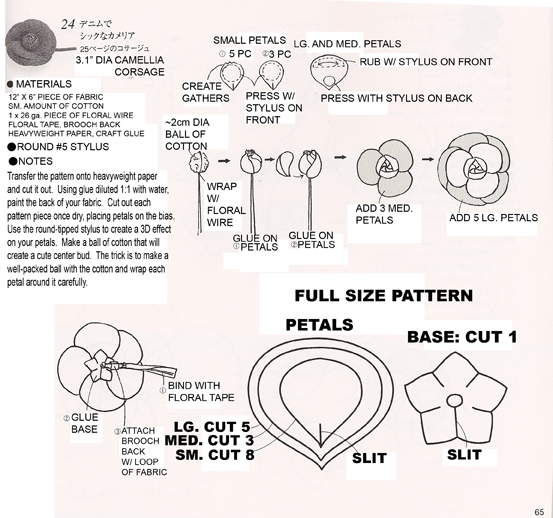
I shared the camellia flower pattern before, so I’ve reposted it below for you guys:
My English translation is above. The book page is 8 1/8″ wide by 7 7/8″ high if you want to print it out, in order to make sure the petal pattern is sized correctly. The pattern requires the use of a round-headed stylus (also called a “cup”) in order to create the rounded, 3D-effect to the petals. Not completely necessary, but it helps create a finished, professional look to your corsage.
From last year’s Men’s Shirt to Cute Summer Shirt Dress tutorial that I wrote, I used some extra leftover fabric to make a carnation corsage.
Here is the how-to and pattern below:
Here are a couple more projects in the book…a dahlia:
And a lush camellia:

Okay…I’m all translated-out!
If you would like to check out more reference books in English for making fabric flowers, two of my favorites are Heirloom Ribbonwork , which constructs flowers out of ribbons, and Handmade Flowers from Paper and Fabric
 , which has more paper flower projects than fabric, but the projects can easily be adapted.


Both are incredibly inspiring and have you making different types of fabric flowers than just roses (which have how-to tutes all over the internet already)…but ribbon daffodils? velvet bouvardia? If you were patient and had a lot of time – they would make a beautiful bouquet for Mother’s Day, that lasts forever. Lovely blooms will break up any DIY monotony.
Have a flower-filled day!
xoxox
Carly
~If you liked this post, please share it!~
Leave Comment
Jul 28, 2009 | DIY

I have a love/hate relationship with Jo-Ann Fabrics. It’s the only fabric/notions store around; it’s more affordable than my local Mill End Store; it’s easy to get to. It also never seems to have exactly what I’m looking for and the notions are mostly for crafters: cheap, fall apart easily, aren’t made to industrial standards or to withstand heavy usage (don’t even get me started on their selection of snaps, buckles, and sewing machine needles for leathers…inevitably Dritz and inevitably crappy), and, compared to what I could be spending at an online wholesale place (or in NYC on fabric row!!), fairly expensive. I can definitely blow through $40 with almost nothing in my basket. $5.95 for a zipper???? 2″ wide sew-on velcro for $7.99 a yard?? I mean, come on. I understand they are a retail store and need to set the prices as such out here on the West Coast in order to make a profit…but with no alternative supply store here it makes my habits very expensive. It’s also populated with…erm…people who usually have a few decades on me and are thronged around the quilting section. But it’s always there when I really need something – and I can often improvise in their findings/notions section when I can’t find what I want.
My other quibble with them is that the majority of the free project sheets around the store are usually for projects that don’t seem…particularly fashion-forward or youthful. How to make a quilted tea-cozy, for instance. A how-to sheet on attaching 1/2″ red loop fringe to the bottom of your kid’s jeans. I guess they know their current market (which doesn’t seem to be people who are interested in trends or fashion-forward designs).
So I was pleasantly surprised to come across the project sheet above, for a zipper corsage. (Jo-Ann’s Corporate seems to be putting out more trendy products as of late, and has a variety of new and fashionable trims in, like chain, long fringe, and rhinestone chain, more fabric embellishments like sew-on rhinestones and heat-set studs, punky iron-on appliques and transfer sheets, the line of
Project Runway supplies [though no draping tape of course -oooooh! >:( ], as well as younger-looking people featured on the project sheets and more trendy projects in general. Me likey these new developments!!) So here’s the how-to for this on-trend zipper corsage (though pls ignore Ms. Dallas Texas circa 1992 modeling the look above):

Hope it’s big enough to red!
Happy DIY’ing!
-Carly J. Cais