Mar 11, 2013 | DIY
 For Spring 2013 Chanel showed a number of butterfly motifs on their accessories: and this sweet quilted leather bag was no exception.
  From the Pick Your DIY pinboard that we set up for the Pick Your DIY Bloggers Collaboration Week, the Chanel butterfly bag image (pictured above) received a ton of likes and repins. So here is how to make an approximation of it:
You Need: (more…)
Leave Comment
Oct 13, 2011 | Fashion
 I do so love it when an affordable brand takes a trend and re-interprets it for the masses, rather than producing a direct knockoff. Extrapolation on an idea is always fun, and I love to see thoughts flow in a new direction. What would also be cool with these chain earrings available at Macy’s would be if the designers had explored perhaps different color combinations than just black-and-gold, which strongly evoke the Chanel version. (Or maybe it’s just the pieces that were chosen for the ad, and there are a ton of other variations available in-store.)
What do you guys think?
Too much alike, or just hitting that right spot?
xoxox
Carly
*scan from a Macy’s ad placed in a November 2011 U.S. magazine. Runway photo from the DailyJewel.com
~If you liked this post, please share it!~
Leave Comment
Jul 7, 2010 | DIY
After a fairly uneventful flight (no passing out in the aisle this time; the only thing that happened was the entire left side of the plane from row 35 back had no armrest power – so no light, no attendant call button, no radio, and no sound to the overhead movies, which made passing the 10 hours on the plane pretty much like pulling teeth)…I have finally arrived in Japan. It’s like wall-to-wall humidity that plasters your hair to your face and has mosquitoes swarming on you the moment you step out the door. Lil Tot has, amazingly, suddenly become incredibly talkative and can actually carry on an intelligent, logical conversation in the 2 weeks he’s been here. His comprehension, vocabulary, and maturity skyrockets whenever he spends time here.
Anyway, I wanted to share with you what I made before I left Oregon.
I was playing around on the computer the other day and made these.
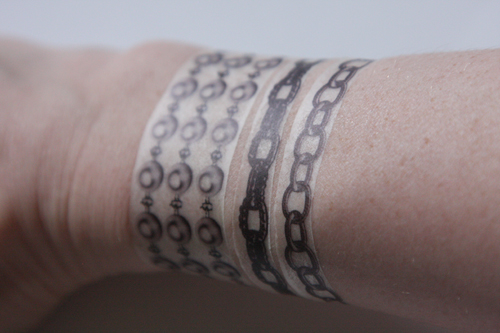
I’ve had a pack (a measly 3 sheets for $10!!) of printable inkjet tattoo paper for awhile and had been undecided on what to make. (I’m not really a tattoo person – I’ve always felt that since I have freckles I really don’t need any more marks on my body;-) …But once in awhile I’ve liked wearing a stick-on tattoo, just to change things up.) 
Collage from Fashiontribes.com
Since the Fall ’09 Chanel Couture Runway show, I’ve been coveting those pearl necklace and chain bracelet tattoos…but there’s no way I’m going to blow $75 on the set now available at retail. So… (surprise, surprise) I decided to make my own with the printable tattoo paper. I found some tattoo images online here at Inkwear Tattoos, and collaged them together with other images from the Inkwear catalog.
I was sooooo psyched since the final printed product looked pretty awesome. But my good mood ended when I cut out the tattoos and tried to apply them.
I always thought that if I ever did decide to get a tattoo, I would have the word *lifeline* tattooed on my right wrist. My hands are the source of all my creativity!
They’re stickers. No matter how closely you trim the tattoo, it’s made up of this clear film that’s extremely obvious and tacky. (Also visible in any gaps in the image.) White spaces will of course, not print. You do not apply with water – you just peel and stick – which means that they will come of the next time you take a shower. Oh, and you can’t get any water or moisture on the image because, since it’s inkjet ink, it will just smudge.
You can see the edges lifting up already.
What a junky product! As I wore throughout the day, the stickers just got increasingly wrinkled and lifted up at the edges, snagging in my clothing and hair.
What a disappointment. By the end of the day, I peeled some of them off before I took a bath, but the wrist tattoos I decided to remove as per the instructions: soap and water. BIG MISTAKE. They dry tattoos peeled off fine, but once I used soap and water, the tattoos when wet became a gluey, sticky, smudgy, runny mess, and my skin got really red where I had to rub to abrade them off.
Utterly sad. I would definitely NOT recommend these Cre8 Ink Jet Tattoo Sheets at all.
I did find online there are some e-stores that will print temporary tattoos for you – though I wonder if they’re the same, single-use stickers? (From the online description is appears they are not.) Does anyone have any experience with this?
(And if you are wanting to purchase from Inkwear Tattoos to get the original images I used, they deliver worldwide, so you could potentially buy some sets from them and get them delivered to you instead of going the DIY route!)
xoxox
Carly
Save
Leave Comment
Jul 1, 2010 | DIY
Uber-simple. (So simple you don’t even need step-by-step photos to illustrate!)
You Need:
*2 silk flowers (I chose cream-colored peonies)
*small piece of stiff felt
*2 shoe clips
*scissors
*glue gun
How To:
1. Pull the flowers off their stems and trim off any jutting plastic from the underside.
2. Cut two small circles from the felt – large enough to become the base for each flower, but small enough to not show through in-between the petals.
3. Use glue gun to attach each felt circle to the underside of each flower and press the felt to cup the flower’s shape. In order to stop the top layers of petals from falling off, you may also need to glue in-between each layer, near the center.
4. Open the shoe-clips, place a daub of hot glue on the felt (I chose near the top of the circle to minimize the amount the flower protrudes from the edge of the shoe), and press the non-toothed side of the shoe clip into the glue. Squeeze more glue over that part to firmly attach it to the felt.
5. Allow to dry and remove gluey strings.
I’m liking this girly look on chunky clogs at the moment – found this pair at my local Goodwill and wanted to soften them up for the romantic look that’s so in right now. I love the flower as juxtaposition to the organic wood of the soles. Speaking of clogs, I also have a different pair [brown] of size 7 Nine West clogs up for sale here if anyone is interested.
Happy DIY’ing!
xoxoxo
Carly
~If you liked this post, please share it!~
Leave Comment
Oct 9, 2009 | DIY
(Jacket from Japan; scarf from I forget; Claire’s wristbands, necklace, and armwarmers; handmade studded ring; DIY Chanel tee; Paris Blues Jeans; DIY’d GoJane boots)
It’s that time of year again when the leaves change color, Fall activities are well underway, and Portland Fashion Week presents 5 days of local and sustainable collections, presented in some warehouse practically off the map in a NW corner of the city. I skipped out on attending Day 1, so here I am on Day 2 of the Collections, as I like to say, since it sounds more frou-frou and New-York-wannabe.
I made this shirt the morning before the madness started – with a fabric pen. Because life definitely needs more cavorting! (The real version says “Cavour Roma” in case you were wondering – here’s a piccy below:)
 (sorry I don’t remember the site I saw this on)
 Actually it was on KnightCat, I remembered, and a reader mentioned it was originally from Lookbook.nu. Thanks Danni!

I know armwarmers went out of style (or never came into style) like a decade ago, but my hands get cold easily and I often add them to an outfit. Yes, inside of me is a fashion-challenged 12-year old. With warm hands.
Even though it’s Fashion Week, when you’re covering the shows my best piece of advice is:
Wear comfortable shoes!
I wrapped a long strip of ultrasuede around these flat, scrunchy boots from GoJane and tied the ends. I’m all tied up!
Fashion Show coverage coming soon!
Have a lovely Friday!
xoxo
Carly
DIY Update: For those of you who were wondering how to make the shirt…
1. Take a white Men’s XL t-shirt and a black fabric pen (I used a FabricMate Chisel Tip ). Place your shirt over a piece of cardboard and apply a liberal spraying of Spray Laundry Starch
 to make it literally “flat as a board.”
2. I used Photoshop to create the lettering (and added my initials as the double-C logo in the middle, haha), printed out the image, and placed the paper underneath my t-shirt on top of the board. Then I simply traced the letters and filled them in with the fabric marker (took awhile).
3. I cut off the hem a little higher in the front and lower at the sides so it makes “side-tails,” cut off the neck ribbing and the sleeves, and stretched the cut edges until they rolled slightly.
4. Then I washed it on the delicate cycle in the wash and laid flat to dry, to get rid of the starch and “set” the fabric marker paint.
So super-easy to make! I’d love to see everyone’s DIY versions!
Leave Comment