Jul 3, 2014 | DIY
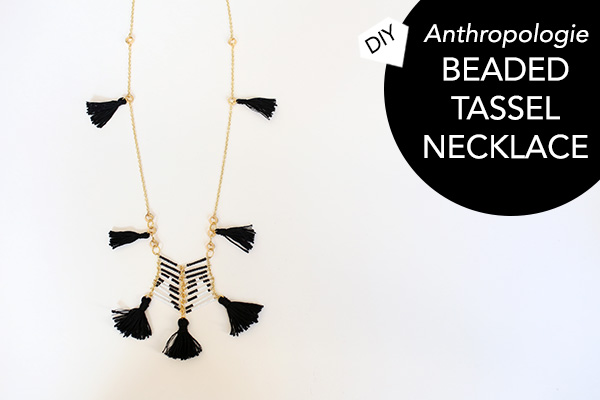
 Tassels, tassels, everywhere! I officially declare 2014 the Year of the Tassel. They’ve been having a HUGE moment again, and I love their undone, boho-chic feel. Casual and cool at the same time. It’s very easy to make your own tassels – or even better yet, make your own fun colorblocked tassel NECKLACE (just like this $128 Anthro Fanned Botanique Necklace [no longer available]). Here’s how:
You Need:
 embroidery thread in 4 colors (I chose cobalt blue, navy blue, goldenrod, and metallic gold) / 3/8″ diameter natural rope, 1 yard long / 1 1/4″ goldtone D-ring / scissors / tape / glue / toothpick (optional)
How To:  1. Start wrapping the embroidery thread around the bottom of the D-ring, using 2 fingers to create the right length. Wrap around many times until you get a thick bundle.
2. Slide your fingers out from the bundle.
3. Snip a short piece of thread and tie around the bundle, close to the D-ring.
 4. Wrap both ends of the thread multiple times around where you tied, and tie the ends together with a double knot. Leave the ends loose for now.
5. Use scissors to trim the bottom of the tassel flat.
 6. Fluff out the threads in the bottom of the tassel.
7. Repeat Steps 1-6 for 2 more tassels in your first color. Repeat for 3 tassels in your second color. Repeat for 3 tassels in your third color. For the third tassel in that color, I made it using half metallic threads (since the metallic thread frays easily but isn’t as “fluffy” as the regular embroidery thread).
8. Use a dab of glue on each double knot you made in Step 4.
 9. Snip off the ends of the threads close to those knots once dry.
10. Place the D-ring with the tassels in the center of your rope piece.
11. Use the metallic thread to wrap around each side of the straight part of the D-ring, many times, to secure the ring to the rope.
 12. Finish each wrap by double-knotting the thread at the back. Dab with glue, and snip off the ends.
13. Try on the necklace and decide how long you want it. Use a piece of tape wrapped around the rope pieces to secure it to the length you like.
14. Cut off the excess rope.
15. Use a contrasting thread color to wrap around the rope ends and completely conceal them. End using a double knot, dab on glue, and cut the threads.
 You’re done! A bright, bold accessory for breezy tops and easy dresses this season is only a couple wraps and snips away. You can you any combination of fun colors, and totally switch up the look of the piece by adding pompons, charms, or other accoutrements to make it all your own!


How will YOU wear your Colorful Tassel Necklace?
 Happy DIY’ing!
xo
Carly
Save
Leave Comment
Apr 15, 2014 | DIY
 Hello friends! Today I am sharing the DIY tutorial for the Radiant Rhinestone Belt kit I designed for Wander & Hunt. It’s a fun little project with maximum impact, and you can place your stones however you like to get totally different looks.
  (My version is less symmetrical and more random, as you can see.) Here’s how:
You Need: (more…)
Leave Comment
Apr 9, 2014 | By Carly J. Cais, DIY
 I’ve just completed a super-fun collab with DIY kit shop Wander & Hunt – and designed 2 special DIY projects just for them.

 The first, the DIY Radiant Rhinestone Belt, was actually inspired by a rhinestone belt I spied on Anthropologie.com this past Winter, and figured it would be a snap to re-create. For $29 you get the ribbon base, felt for attaching the rhinestones, glue, a skewer, and an absolutely HUGE amount of rhinestones to deck out your waist embellishment. Gorgeous over a plain shirtdress or even a light coat, this will be an accessory you reach for again and again to dress up your outfits.
Check out the DIY Radiant Rhinestone Kit Here
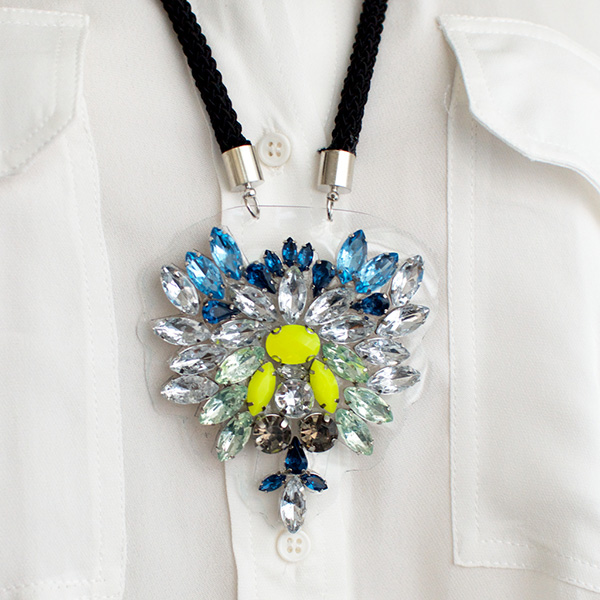 For the second project, the DIY Gem Pendant Necklace kit, I drew inspiration from a Dannijo bejeweled pendant I saw on Pinterest. Again, for just $29 you receive a bevy of gems, glue, a skewer, PVC plastic, endcaps, jump rings, and a rope for the necklace. The design is super-chic – and creates a fabulous statement!
Check out the DIY Gem Pendant Necklace Kit Here
You can also check out all the other DIY kits available at Wander & Hunt here (everything under $70!), as well as all the other supplies and materials that they offer. They have a ton of tutorials on the site as well, so you can get your DIY on without even buying a kit. Standard shipping is also free worldwide!

Thanks so much to the team at Wander & Hunt for making this happen! I had a blast designing these projects. 🙂
What do you guys think of these kits? Have you ever bought a DIY project kit – and was it worth it? Let me know in the comments!
xo
Carly
Leave Comment
Dec 18, 2013 | DIY
 Anthropologie, season after season, comes up with the most fabulous items in their stores – and so many of them look homemade and crafty: the perfect fodder for DIY.
  I noticed this beaded ladder tassel necklace during early Fall (part of Anthro’s Bijouterie necklace collection), and after clipping the photo and hunting for supplies, I finally sat down and made a DIY version. It was a bit fiddly, but incredibly rewarding to find the finished necklace looked just as amazing as the original in the catalog. (And at an $8 investment, pretty affordable too!) Here’s how to make your own:
You Need: (more…)
Leave Comment
Nov 28, 2011 | DIY, Media

Oh, Anthro – such a source for DIY inspiration, as always! Though Alicia from Dismount Creative was similarly inspired by the latest catalog, I wanted to post a few more things that could be DIY’d straight out of the pages of Anthropologie’s most recent offerings. And besides, who wants to pay $500 for a sweater? (Or $2,175 for a box set of books, for that matter??…marked down to a mere $1400 on the website, I now note.)

Use neon fabric paint and masking tape to liven up a bland clutch with a bright stripe.

Add candy-colored lace edging to a neutral cardigan for a Jason Wu-inspired feel.

Easily DIY those boots by gluing some printed fabric onto the shafts of some vintage boots. And the earrings? Snake chain on french hooks, with clipped feathers hanging off the bottom. (Use a glue-in cord end to connect the feathers to the chain.)

Pretty up a chunky cropped sweater with hand-sewn clusters of crystals.

DIY some party booties with a handful of tulle and some sparkly beads.

DIY a formed bangle with some white Polyshrink plastic, forming the curve while still warm and wearing oven mitts.

Make a bustier extra-special with the addition of velvet ribbon and gold nailheads.

Make slippers all your own by hand-sewing vintage keys or buttons onto the toes.

Dress up your favorite mocs with the addition of some pretty trims, tied in a bow.
xoxxo
Carly
~If you liked this post, please share it!~
Leave Comment


