Don’t Buy, DIY!: Woven Ribbon Sweater
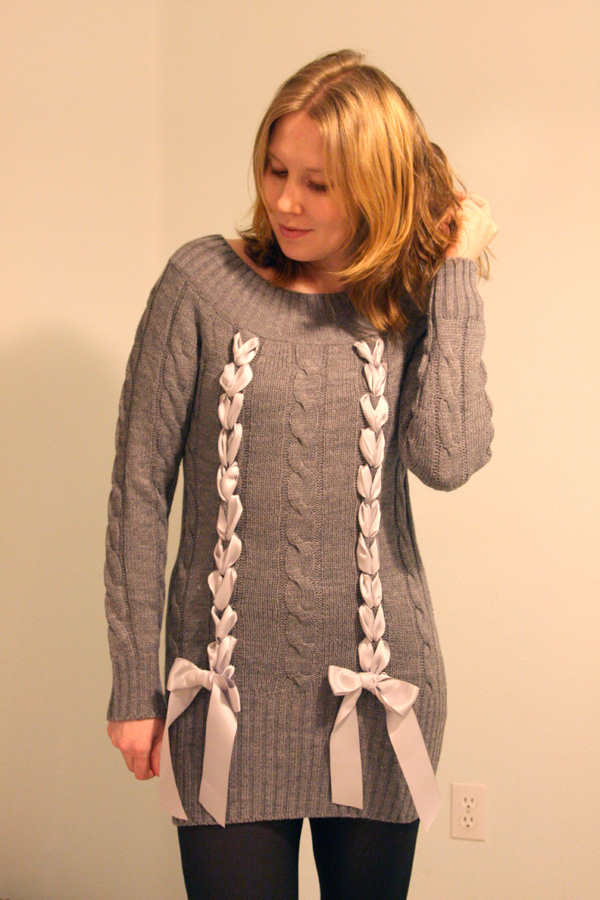
F-DNA Cable-Knit Sweater Dress, YesStyle.com. Woven Ribbon: DIY by Me!
Seen on the runway in John Galliano’s Christian Dior Fall 2010 RTW Collection were whimsical, feminine knitwear pieces with satin ribbons woven and braided throughout.


Within weeks of appearing on the runway, many Japanese clothing brands picked up on the design, re-interpreting the idea and selling them en masse to a demanding public, creating a micro-trend stat.

In the U.S. I haven’t seen any clothing brands create their own version of this – which is just begging to be DIY’d! (Check out Outsapop and A Pair and a Spare for their coverage of this idea; and The Hearabouts’ DIY version.) It’s amazingly simple, and the best part is that next year when fashion marches on…you can just pull out the ribbon, fluff out the yarns in your sweater, and nothing’s the worse for wear. The only thing that’s better than a DIY is a DIY that is only permanent as long as you need it to be!
Difficulty: (Easy/Beginner)
You Need:

*chunky-knit sweater (I chose one with cabling, from YesStyle.com. If you can find something with mohair or angora blended in, it adds a soft femininity to the piece.)
*double-face satin ribbon (I chose 1.5″ wide)
*tape
And…

*scissors
*measuring tape
*hand-sewing needle & matching thread (not pictured)
How To:

1. First, even before buying your ribbon, you need to measure your sweater to find out how much you will need. Use a flexible measuring tape and, starting at the bottom of the sweater, start measuring upwards, zigzagging the tape back and forth to mimic how the ribbon will cross over once woven.

At the top of the track of weaving, note the measurement on the tape. Double it to get the full length of ribbon for the weaving part.

If you are going to create bows at the bottom of the weaving track, create a bow in the measuring tape and add that length to the total length of the track. That is the entire length of ribbon you will need for one woven area. I chose 2 areas of ribbon; thus I doubled the measurement for the total amount of ribbon I needed to buy. (But since I’ll be doing two rows, I’ll need 2 continuous lengths for each track – something to keep in mind when you’re doing your calculations.)

2. Cut your ribbon into the length you need for one row of weaving (+ a little more if you can). Wrap a piece of tape around both cut ends tightly, into a cone shape. This should work in place of a needle for your ribbon (though you can use a large-eye needle, yarn needle, or a safety-pin for your ribbon if you want).

3. Start at the top of the woven row, in the center of one of the cables, from the back of the sweater. Poke a small hole between the knit on either side of the cable, and bring the ends of the ribbon to the front of the sweater.

4. Poke a small hole at the bottom of the first cable knot, in the center. Bring both the ribbon ends into the hole and to the inside of the sweater.

5. Repeat to create a ladder of “V’s”, made in ribbon, down the front of the sweater. As you go, fluff out the ribbon that shows on the front periodically, and flatten the sweater so that you aren’t “scrunching” the cable too much.

6. At the bottom of the row, tie ribbon into a bow.


7. Repeat for the other side.

8. Try your piece on, and eyeball where you want the ribbon ends to fall. Cut, and then seal the cut ends with a flame.


9. To make the bows more permanent, hand-sew a couple stitches into the backs of the bows so they don’t loosen on you as you wear it. Hand-wash and lay flat to dry when it’s time for the laundry.;-)

Pretty easy, right?
Let me know if you try this out…I’d love to see your version!
Happy DIY’ing!
xoxox
Carly


