Sep 18, 2014 | DIY
 This DIY tutorial has likely been done already hundreds of times in the aftermath of Tom Binns releasing his neon cameo collection in Spring 2012 – but what’s once more? I love the juxtaposition of elegant, old-world cameos harkening back to the times of daguerrotypes and intaglio portraits…rendered in full-on neon for the modern age. You can make your own easily, with some paint, rhinestone chain, and a soft embossing metal as backing – with no one the wiser as to how your unique creation came about. Here’s how:
Materials:
1 cameo (and this place has the best selection!) / rhinestone cup chain / gold embossing metal / scissors / jump ring / pliers / wire-cutting pliers / jewelry glue (not pictured) / pin or awl (not pictured) / paint in 2 neon colors / primer or white paint / pen / paintbrush / matte sealant (optional, not pictured)
How To: 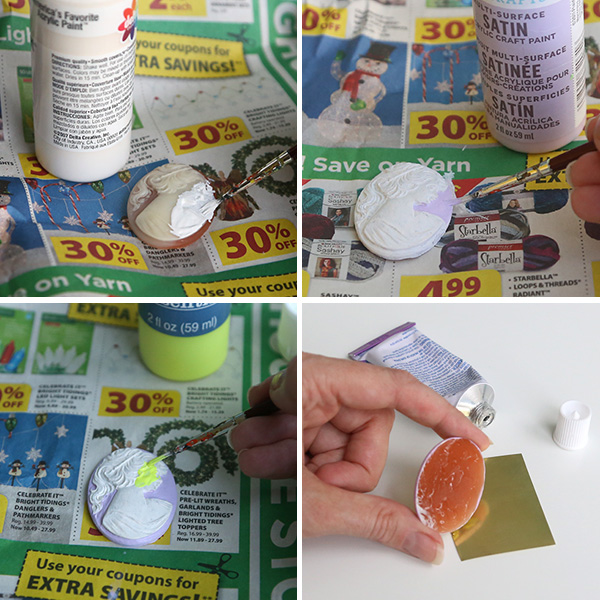 1. Since cameo colors are usually fairly opaque, you may want to prime your cameo first with a coat of primer, or just a coat of white paint. Allow to dry.
2. Paint the cameo. Usually it’s easiest to paint the lighter color first, than the brighter or darker color next. You may have to do a couple coats of each color to fully hide the color of the original cameo.
3. (optional) Paint a coat of sealant on he cameo to hide brushstrokes and prevent paint chipping. Allow to dry.
4. Glue the cameo onto a small piece of embossing metal.
5. Place the rhinestone chain around the cameo, and cut to desired length.
 6. Spread glue on the back of the rhinestone chain, and glue to the metal backing around the cameo.
7. When dry, poke a hole in the embossing metal with a pin or awl.
8. Trim the metal close around the chain, and use the side of the scissors to fold it to cup the chain so no sharp edges stick out.
 9. Thread a jumping through the hole you made, onto a necklace.
And you’re done!

Wear with something dark and modern for contrast, or pair with a pastel frilly corset for your best Marie Antoinette impression!
 Happy DIY’ing!
xo
Carly
Save
Leave Comment
Sep 12, 2009 | DIY
Tom Binns is one haute designer who’s been refashioning the way we look at “precious jewelry.” Pieces from his safety pin collection from last year popped up in just about every fashion mag on the planet – and there’s been some cool DIY tutorials for his safety pin necklace (bracelet, in the case of this tute) but earrings there have not been. In fact, the Tom Binns earrings from this collection were notoriously difficult to buy anywhere…leading me to DIY my own. (Well, I would have DIY’d them anyway, since I’m such a cheapskate and like to put my own stamp on things…)
Here’s how (for my version):
You need:
-med-size or small-sized safety pins (I used black)
-pearls (faux, of course!)
-silvertone eyepins
-8″ rhinestone chain (med size rhinestones) (you can scavenge this from a piece of jewelry you already have, or something found at a thrift store, Forever21, or even by the yard from Joann Fabrics)
-8″ rhinestone chain (small size rhinestones)
-oversized rhinestone post earrings with drops below them (scavenged from an ugly pair of F21 earrings)…I know, the original earrings use french hooks, but I wanted a more glitzy, drippy effect to mine
-silvertone jumprings
1. Remove the dangly earring part from your rhinestone earring posts, since we’ll only be using the top.
2. Cut each of your rhinestone chains in half.
3. Pair up one med rhinestone chain length and one small. Thread halfway through a silver jumpring, and attach the jumpring to the earring post drop loop. Each chain will sort of dribble on either side of the jumpring as your earring dangles.

4. Using pliers, thread an eyepin through a pearl, cut, bend and loop around the end so the pearl is suspended between two loops. Repeat for each pearl.
5. Using small jumprings, connect the pearl eyepin loops you just made, creating a teardrop shape.
6. Attach teardrop of pearls to main jumpring from Step #3.
7. Randomly pin safety pins throughout the cascade of pearls and rhinestone chain, making sure that the pins will prevent the rhinestone chains from slithering up through the large main jumpring and falling out of your earring.
As you can see, my earrings a bit heavy, so I’ll probably switch out the backs to the comfort acrylic backs that have a larger pad to prevent the whole thing ripping from my earlobe because of the huge weight of them. I also haven’t snipped off the ends of the rhinestone chain where the connector loops were – I’m that lazy!
I feel like a punky Russian princess! Thank you Mr. Binns for such great inspiration!
Happy DIY’ing!
xoxox
Carly
Save
Leave Comment


