Jul 12, 2014 | DIY, Score!
 The brand-new Canadian line, TRENDiY Art, was recently kind enough to send me one of their fun DIY kits to review.
TRENDiY Art is a new line of art and craft activities for tweens and teens, and is all about making cool jewelry and fashionable accessories. They provide not only all the materials to make these projects in the kits, but also a full-length fashion magazine with styling ideas and DIY possibilities. 


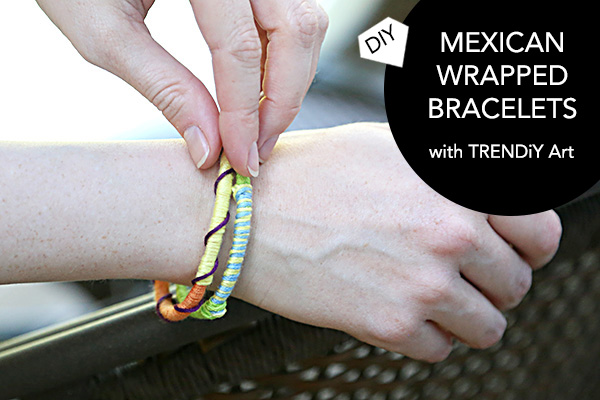
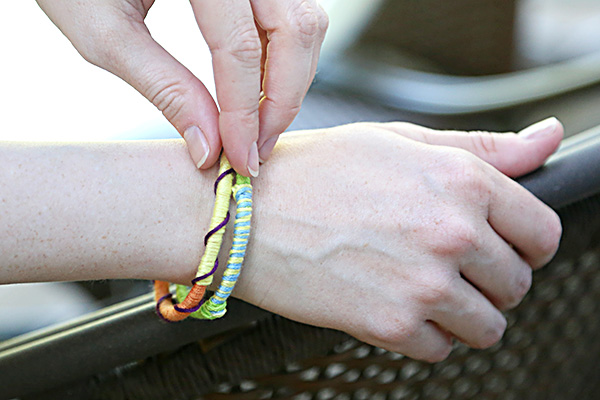
 I decided to open up the Mexican Bracelets kit and try my hand at some embroidery thread-wrapped bracelets.
  They were super-easy to make and a cute, colorful addition to my stack of arm adornment. Here’s how to make them:
You Need:
 TRENDiY Art Mexican Bracelets Kit / scissors
How To:

 1. Start by double-knotting one thread around your bangle.
2. Wrap the thread around multiple times.
 3. Change color by tying a new thread to the old one with a double knot, then cutting off the old thread.
4. Wrap the second color around, covering up the end of the old color and the end of the new color.
5. Continue all the way around, until you reach the beginning of your wrapping.
6. Add a third contrasting color wrapped around your base colors for texture.
7. When done, tie your final thread to the tail of the thread you tied on in the beginning, and snip all extra ends.
 You can use 2 or 3 different colors rolled together for different looks, switch up the colors frequently, or tie many colors loosely around (even finishing your bracelet with a handmade tassel!) Plus you can hand-sew on some crystals, or even thread on some beads as you wrap for a totally different look.
 Make it your own, make it colorful, and make it fun!

These kits make it very easy to create your own DIY projects since they come pre-stocked with everything you need. Totally on-trend and fun, TRENDiY Art kits are a great gift or engaging activity for any avid DIY’er in your life.
Currently only available in the UK, you can get your hands on 3 of these exclusive kits by entering the giveaway below!
Giveaway
One lucky reader will win 3 TRENDiY Art Kits! Enter using the Rafflecopter widget below:
a Rafflecopter giveaway
Good luck!
xo
Carly
FTC Disclosure: I was sent 4 DIY kits to review from TRENDiY Art. I have received no other compensation for this post. The above opinions are my own. To read my full Disclosure Policy, click here.
Save
Leave Comment
Jul 3, 2014 | DIY
 Tassels, tassels, everywhere! I officially declare 2014 the Year of the Tassel. They’ve been having a HUGE moment again, and I love their undone, boho-chic feel. Casual and cool at the same time. It’s very easy to make your own tassels – or even better yet, make your own fun colorblocked tassel NECKLACE (just like this $128 Anthro Fanned Botanique Necklace [no longer available]). Here’s how:
You Need:
 embroidery thread in 4 colors (I chose cobalt blue, navy blue, goldenrod, and metallic gold) / 3/8″ diameter natural rope, 1 yard long / 1 1/4″ goldtone D-ring / scissors / tape / glue / toothpick (optional)
How To:  1. Start wrapping the embroidery thread around the bottom of the D-ring, using 2 fingers to create the right length. Wrap around many times until you get a thick bundle.
2. Slide your fingers out from the bundle.
3. Snip a short piece of thread and tie around the bundle, close to the D-ring.
 4. Wrap both ends of the thread multiple times around where you tied, and tie the ends together with a double knot. Leave the ends loose for now.
5. Use scissors to trim the bottom of the tassel flat.
 6. Fluff out the threads in the bottom of the tassel.
7. Repeat Steps 1-6 for 2 more tassels in your first color. Repeat for 3 tassels in your second color. Repeat for 3 tassels in your third color. For the third tassel in that color, I made it using half metallic threads (since the metallic thread frays easily but isn’t as “fluffy” as the regular embroidery thread).
8. Use a dab of glue on each double knot you made in Step 4.
 9. Snip off the ends of the threads close to those knots once dry.
10. Place the D-ring with the tassels in the center of your rope piece.
11. Use the metallic thread to wrap around each side of the straight part of the D-ring, many times, to secure the ring to the rope.
 12. Finish each wrap by double-knotting the thread at the back. Dab with glue, and snip off the ends.
13. Try on the necklace and decide how long you want it. Use a piece of tape wrapped around the rope pieces to secure it to the length you like.
14. Cut off the excess rope.
15. Use a contrasting thread color to wrap around the rope ends and completely conceal them. End using a double knot, dab on glue, and cut the threads.
 You’re done! A bright, bold accessory for breezy tops and easy dresses this season is only a couple wraps and snips away. You can you any combination of fun colors, and totally switch up the look of the piece by adding pompons, charms, or other accoutrements to make it all your own!


How will YOU wear your Colorful Tassel Necklace?
 Happy DIY’ing!
xo
Carly
Save
Leave Comment
Aug 15, 2013 | DIY
 Hello lovely readers!
Today all the DIY projects I created for M&J Trimming’s Third Annual DIY Challenge are now live on their blog. Please click on over to check them out!
Thanks so much to the team at M&J Trimming – I had a blast working with all your wonderful supplies!
xo
Carly
FTC Disclosure: I received a box of trims and supplies courtesy of M&J Trimming, to create step-by-step DIY tutorials for their DIY Challenge. I have received a $100 M&J Trimming Gift Card as compensation for my submissions. My official Disclosure Policy is here.
Save
Leave Comment


