Feb 11, 2017 | DIY

In the past couple days I’ve shared some fun projects with Paper Mart and I wanted to combine them all into one round-up in case you missed any. Instead of the typical candy or chocolates, use your creativity and surprise your honey (or make some pretty decor!) with these ideas:

DIY Valentine’s Day Jeweled Wreath
DIY Valentine’s Day Labeled Glass Bottles

DIY Valentine’s Day Crepe Paper Peony Flowers
Thank you to Paper Mart for supplying the materials to make these projects!
Happy DIY’ing – and Happy Valentine’s Day!
xo
Carly
Leave Comment
Feb 10, 2017 | DIY

This project is in collaboration with
Paper Mart. I was provided supplies to create a Valentine’s Day tutorial. All opinions are my own. My full Disclosure Policy is
here.
No matter how beautiful real flowers are…sometimes you want something that can last forever…and can be the exact colors and style you’re looking for. I understand. We all want this.
Enter the DIY floral craft: the crepe paper peony, a pretty layered flower that can be any beautiful color scheme you wish…and will last no matter the occasion. For this tutorial I’ve teamed up with Paper Mart again to bring you a fun DIY right in time for Valentine’s Day. Here’s how to make it:
How to Make Your Own DIY Paper Flowers (Crepe Paper Peonies)
You Need:

choose your favorite colors: ivory crepe paper / rose crepe paper / pink crepe paper / hot pink crepe paper / light green cloth-wrapped floral stem wire / round ball or ornament / scissors / hot glue & glue gun
How To:

1. Tear a long strip of crepe paper (perpendiular to the grain) along the top edge of one of the colored rolls of crepe paper. Tear another similar length from the white crepe paper.


2. Start rolling up the crepe paper into a bundle, folding back on itself and crumpling the folds here and there for a more natural look.

3. Use hot glue to glue down the folds into a roll.

4. Keep adding layers of white and colored crepe paper ripped edges until you have built up a nice thick roll.
5. Use scissors to snip the top edges and distress them.
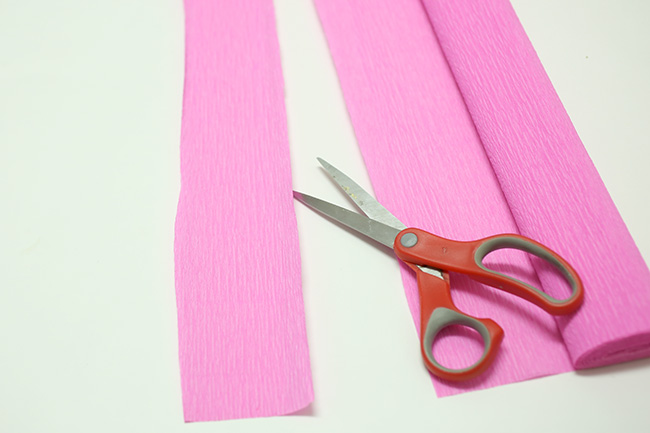
6. Cut a long piece of colored crepe paper about 2″ wide, parallel to the grain.

7. Fold the paper on itself to create a stacked accordion.

8. Cut a petal shape in the stack, with the bottom of the petal at where the folds are in the stack.

9. Separate and spread each petal pair over a round ball, stretching and shaping the paper to the ball.


10. Glue the center roll to the middle of one of the rounded petal pairs you just made.

11. Glue another petal pair onto the bottom of that, at a 90-degree angle to the previous petals, and fold the petals up around the center, cupping it.

12. Keep gluing on more petals, making more from different colors of paper, and cupping around the center as you go.

13. For a more rounded shape, overlap slightly and glue the edges of petals together.
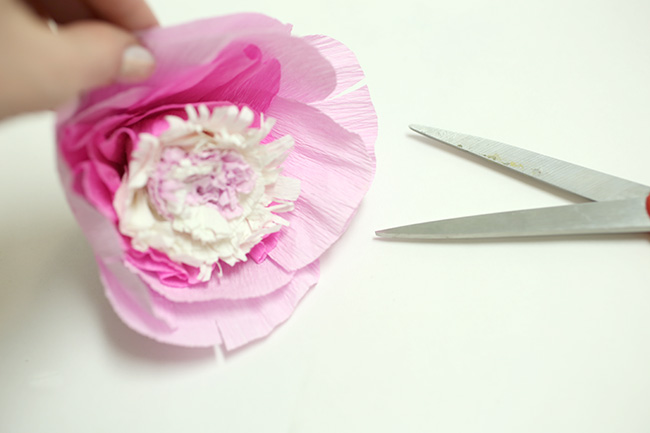
14. Cut small notches in the edges of the large petals to look like a real peony.

15. Cut a 1.5″ wide piece from the white crepe paper (parallel to the grain) like in Step 6, accordion fold it, and cut joined leaf-like shapes from it.
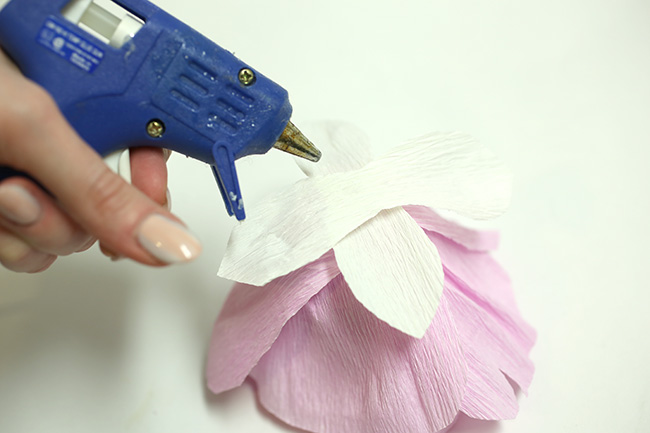
16. Glue the white leaf-like shapes in an X to the bottom of the flower.
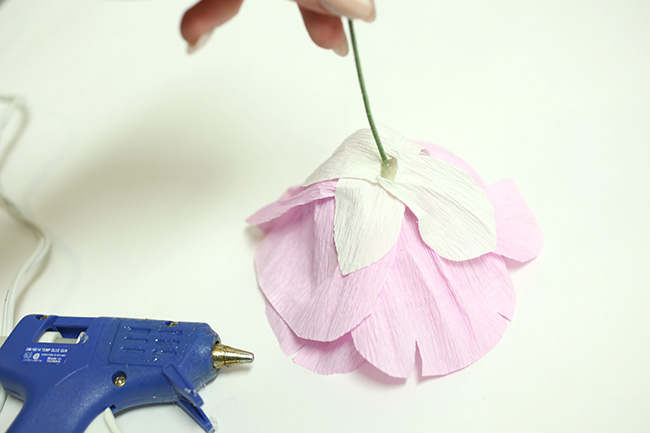
17. Stab the floral wire into the center of the X, pushing through several layers deep into the flower center. Hot glue around the hole in the bottom to secure.
And you’re done!
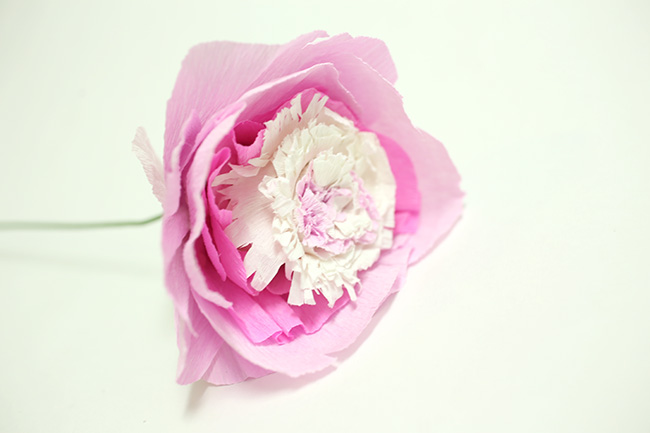
These flowers are kind of fiddly to make, so I recommend having something to watch on TV whilst doing it…but the results are so satisfyingly worth it!
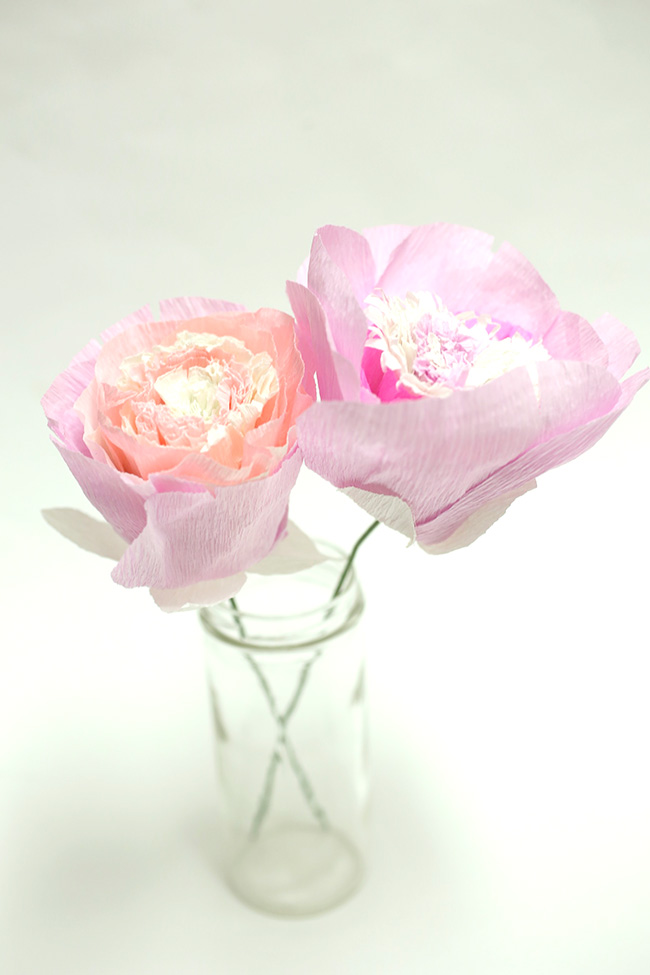

Pretty, unique to you, and everlasting…what’s not to love?
So some of you may also be wondering…why are we using crepe paper for this when regular paper could work just fine too?åÊ Well here’s why…
Why You Should Use Crepe Paper for Floral Crafts and Flower DIYs

Crepe paper lends itself really well to creating petals and leaves, because of its natural texture. If you look closely, although the petals of some flowers may appear smooth, many have a slightly wrinkled or puckered texture that is well-mimicked by the crinkles in crepe paper. Got a leaf or a petal with a a veiny, ribbed texture you want to recreate in a realistic floral craft? It’s very easy to duplicate using crepe paper…whereas a regular un-textured paper will look flat and unnatural compared to the real thing. The problem is that crepe paper can be too crinkly overall, so stretching the crepe paper out when making flower petals will produce a texture that is smooth, curved, and stretched out in one area, and tapering down to an area that is crinkled and puckered. This looks very realistic! (This technique works great for roses, plumeria, or peonies that have smoother petals, whereas stretching may not be necessary for daisies, cosmos, zinnias, or other varieties.) Try it sometime to see how much more realistic your fake flowers look when you use crepe paper for your floral crafts!
 Happy DIY’ing!
xo
Carly
Save
Save
Save
Leave Comment
Feb 7, 2017 | DIY

This project is in collaboration with Paper Mart. I was provided supplies to create a Valentine’s Day tutorial. All opinions are my own. My full Disclosure Policy is
here.
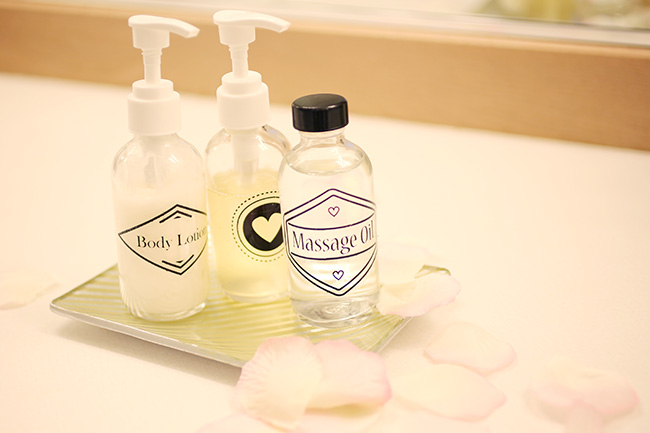
There’s something about a suite of matching, pretty labels on all your toiletries…something high-end and chic-looking about lovely bottles all in a row. I’m a big fan of decanting product since it creates a consistent look and feel. Yet this was the first time I was using printable clear stickers in my inkjet printer…so I had a bit of a learning curve. In collaboration with Paper Mart, here’s how to make your own pretty bath product labels (for a Valentine’s Day gift or just for yourself!) with some printable adhesive sticker paper and a printer:
How to Make Your Own Valentine’s Day Printed Toiletry Bath Product Labels
You Need:

glass bottles (these are a smaller size, good for gifts) bottle caps or dispenser pumps scissors printable clear sticker paper white eraser (not pictured) Krylon Preserve It! spray (not pictured) old newspapers or something to protect your surface (not pictured)
label template piece of plain paper (not pictured, optional) tape (not pictured, optional) rubbing alcohol and paper towels (not pictured) small funnel (not pictured)
How To:
1. Create your labels on the computer. I used these original templates from Creative Market, and customized them for this project. You can download the labels I created here – or use this version where you can type your own product names in Acrobat, Photoshop, or another graphics program.

2. Print out your labels on your inkjet printer. I found that my printer had A LOT of trouble feeding the clear sticker sheet through. I got past that by taping a piece of regular 8.5″ x 11″ printer paper to the back of the sticker sheet with a couple pieces of tape, and then the printer was able to grab it and feed it through. HOWEVER printing labels on an inkjet printer I found requires sealing the labels, or else the ink will run when it gets wet. More below. (You could also use this brand on a laser printer down at the print shop to get around this…or use this waterproof label paper here.)

3. I found that my inkjet had smeared the ink a little bit. I was able to clean that up with a white eraser, and scrubbing at the ink blots before the ink was completely dry.
4. At this point if you opted for printing in your inkjet printer, you will have to seal the labels so you can use the bottles in the bathroom (where they are bound to come in contact with moisture). Here is a tutorial for sealing with clear crayon, but I prefer to use Krylon Preserve It! spray. Lay the sticker paper, right side up, on some newspapers and give it a good spray according to the directions and allow to dry.

4. Cut out your labels, leaving a small amount of sticker sheet around the label edge.

5. Remove the sticker sheet backing. Clean the bottle surface with rubbing alcohol if you need to. Making sure your bottles are clean and dry, apply the labels to the front of the bottles.

6. If you purchase the dispenser pumps through Paper Mart, you’ll find they are a bit long for these bottles. Cut the straw shorter at a length that is long enough to touch the bottom of the bottle. (I made my straws long enough so they would be pushed up against the bottle bottom, and be slightly curved in order to fit.) Cut the straw on an angle, and round out the cut edges.
7. Pour your product into the bottles (you may need a small funnel) – and enjoy!

And that’s it!

These are super-cute as a gift (think a coordinating product suite, themed gift or spa basket, or even bottles for homemade body products!). Plus, they look great on the bathroom counter.

Oh, FYI – the rose petals are from here.


Happy DIY’ing – and Happy Valentine’s Day!
xo
Carly
Save
Leave Comment
Feb 2, 2017 | DIY

This project is in collaboration with Paper Mart. I was provided supplies to create a Valentine’s Day tutorial. All opinions are my own. My full Disclosure Policy is
here.
Most of the year I have a seasonal wreath hanging on my door…but realized that for Valentine’s Day I’ve never made anything appropriate for the holiday. My initial thoughts were to just do something easy peasy (and a little cheesy 😉 : gluing foam cut-out hearts to a wreath ring and call it that. Then I decided I wanted to take things up a notch and make something sparkly, chic, and not so obviously Valentine’s Day…and Paper Mart came to my rescue. (And let me preface this by saying this project is as easy as gluing stuff onto a wreath form!!) Here’s how you can make your own bejeweled beautiful sophisticated wreath – not just for Valentine’s Day but for any day of the year:
How to Make a Jeweled Valentine’s Day Wreath
You Need:

16″ wreath frame / 1+ pack of pink round acrylic jewels / 1+ pack of 20mm crystals / 1+ pack of 12mm crystals / silver wired lame ribbon / jewel placement tool (optional) / slow-drying clear glue (recommended: Dazzle Tac) / scissors / glue gun
How To:

1. Start wrapping the end of your ribbon to the top of the frame (I didn’t even need a glue gun to secure because the wire inside of the ribbon will hold it down!).

2. Wrap ribbon around the entire frame to make a gluable ribbon base, overlapping the ribbon slightly.

3. Cut the ribbon once you meet the beginning of it again, fold over the cut edge slightly, and glue down the end to cover up the other ribbon end.

4.Now make a bow for your wreath. Here’s how:
How to Make the Perfect Bow (gluing wired ribbon)

Cut 3 pieces of ribbon. For 1.5″ wide ribbons like this, the measurements I used were:
5.Take the middle length of ribbon and hot glue the ends overlapping (about 1/2″) to make a loop.
6. Press the loop down in the middle and glue the inner center of the loop at the overlapping area to the other side of the loop on the inside. This now creates 2 loops: the loops of the bow.
7. Glue the center of the longest piece to the back of the loop you created at the overlap, right sides together.
8. Place the shortest piece on top of the bundle at the center front of the two loop piece and glue down.
9. Pull the ends of the shortest ribbon piece to the back of the bundle, scrunching in at its sides, and glue at the back, the ends slightly overlapping.
10. Fluff out your ribbon by making the loops large and round, and fold the long ribbon piece down so it’s visible behind the loops. Add some waviness to the longer ribbon ends.
11. Cut the long ribbon ends at an angle.
12. Top off your wreath by hot-gluing on a bow made from the wired ribbon.

13. Now it’s time to have some fun! Spread slow-drying glue onto the back of a large gemstone, and place onto the wreath. (I know it shows E6000 glue in the photo, but I quickly found that Dazzle Tac was much better.) I chose an evenly-spaced placement.


14. Then repeat for the medium-sized jewels (these too I opted for an evenly-spaced placement around the wreath).

15. Repeat the process for the smallest rhinestones. You could use a jewel placement tool to help place gems quickly, but you can also use tweezers or even your fingers depending on how much precision you want. It’s always helpful to take a step back and assess your work. I chose to create a cluster with the smaller pink jewels near the bottom of the wreath; you can add more or less depending on what look you like.
And that’s it!


Allow to dry, then hang on your door – or wall – or use as a centerpiece for your delicious Valentine’s Day dinner. Sparkle – ribbon – jewels – beautiful!

Happy DIY’ing!
xo
Carly
Save
Leave Comment


