Jan 20, 2015 | DIY
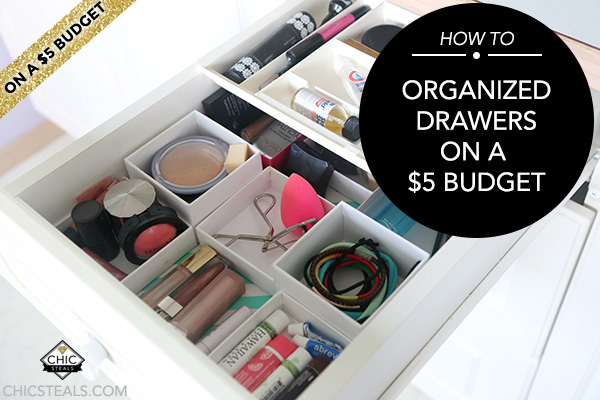 I love love love organized drawers. When you open them, every item in its proper place, catalogued and corralled, and I just can’t help but smile. Who wouldn’t love to be able to find everything you need, right at your fingertips? And don’t get me started on the kind of heaven that The Container Store is for me. Yup, I love organized drawers – but doing so can be kind of pricey if you spring for brand-new containers and liners and the like. With a little bit of planning ahead, you can clean up all your dirty secrets – for around $5. Here’s how:

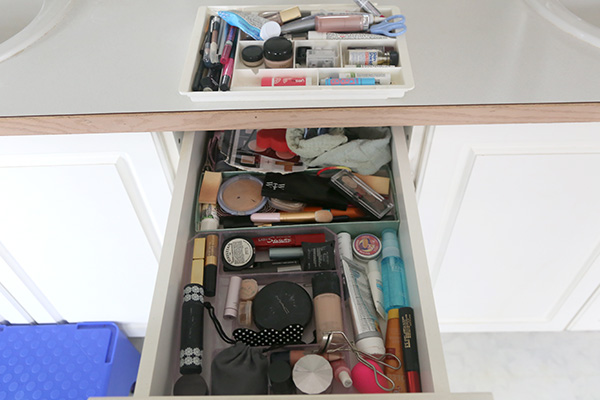
Before: Quelle horreur!
You Need: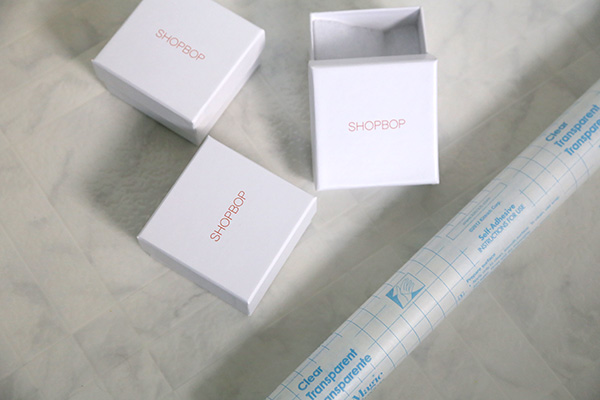
clear adhesive Con-Tact Shelf Liner * / your favorite wrapping paper* / measuring tape / double-sided tape / scissors / pen / extra jewelry boxes, shipping boxes, or other small boxes
How To:
*You could always skip using these two items and just purchase a 2-for-1 like Chic Shelf Paper. They have a lot of great designs, plus they have a waterproof option for the linings of bathroom or kitchen cabinets, which need to withstand moisture on a daily basis. It is a little pricey, so I went with some wrapping paper I liked (which affords you endless possibilities) from Target (Spritz, in teal chevron) and Con-Tact paper, which is cheaper.
1. Remove all your stuff from the drawers and lay it out. Purge ruthlessly! Pile stuff into a pile of things you need every day and need immediately at hand.
2. Clean out the drawer by wiping it down of debris and dust. Makeup remover and nailpolish remover can be godsends to get crusty makeup spills out of the bottom.
3. Measure inside of drawer and cut a piece of wrapping paper the size to fit.
4. Peel the backing off the Con-Tact paper and place it sticky side up on a flat surface. Adhere the wrapping paper piece to it carefully by turning it upside down, so the patterned side is stuck to the sticky side of the Con-Tact paper. Smooth out any bubbles.
5. Trim the Con-Tact paper to the same size as the wrapping paper piece.
6. Place in the drawer, securing with double-stick tape to the inside of the drawer.
7. Try your jewelry boxes (and lids!) in different configurations until you find something you like. You could optionally spray paint the insides a contrasting color (or add some glitter – woohoo!) but I preferred the white.
8. Use double-stick tape to secure each box down to the Con-Tact sheet, and to each other (where needed). I decided to let some spaces in between the boxes so I could see the Con-Tact paper showing through.
9. Re-fill your now sectioned and organized drawer, paying attention to how you use it and what you need to grab immediately (which would go in the front or top – the easiest-to-reach places).
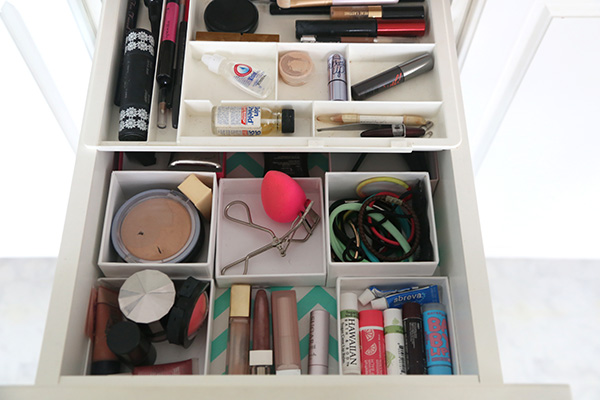 You’re done! Revel in your newly-organized drawer, and breathe a sigh of happiness every time you open it.
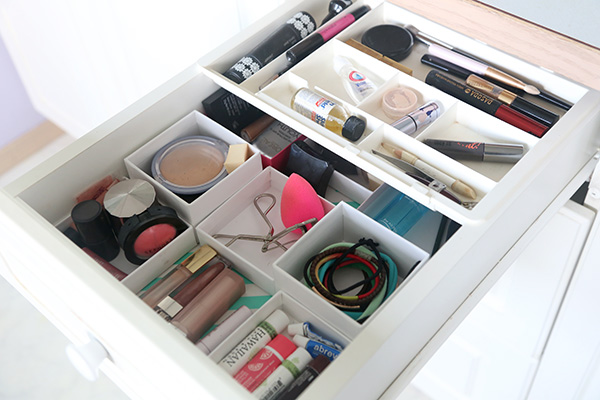


From the above…

To THIS!!
And one more time, a side-by-side Before and After…
Happy Organizing!
xo
Carly
Did you like my $5 Budget tip? Leave your ideas for another one you’d like to see DIY’d in the comments!
Save
Leave Comment
Feb 18, 2013 | Fashion
 I’m in the middle of a huge (and hugely stressful!) home office makeover.
Since leaving my job in late January to focus more on my blog and other projects I’m working on, for the first time in 7 months I am now spending the majority of my time at home. For the first time in my I am lucky enough to live in a home that has an extra bedroom – which my husband and I have turned into our shared home office. (Up until we moved here I’ve been using my computer on tiny desks, shared desks, even the corner of my bed because there was no space for it. I was thrilled to have found a house that had an extra bedroom where I could finally have a dedicated space to work!)
My husband watches Stargate re-runs and plays marathon sessions of Warcraft there. And once every couple months dabbles on his flight simulator. [He is a pilot instructor, so it’s not an entirely random pursuit.]
I work. It’s where I blog, DIY, photograph projects, sew and mend, and think up new ideas. To me, it’s the hub of everything I do.
Whilst working at my job I had to bring my laptop into work constantly, so I would come home with it and simply put it on the dining room table to work, then pack it up and get ready to take it away again. Now that I am working out of home again, I don’t need to take my laptop anywhere – and we need our dining room table back. So I went to move it back into the office…and had a bit of a mini-meltdown last month.

Where I’ve had my laptop for years. Pretty horrible, right?
I’ve always hated how our home office looks. The walls are brown…a horrible pinky-brown that reminds me of cat puke. And it’s crammed with stuff! I can’t focus. There’s no space to work. I’ve neglected cleaning up and organizing it for months, even leaving some boxes in the same state they were when we moved in: full of jumbled, unsorted contents. There’s no color scheme or place for your eyes to land. And in a jumbled up, scattered place like this, I can’t be creative or think up anything new. It’s all my fault for just throwing stuff in there as I go. So I had a meltdown, refused to enter the room, and spent about 3 hours staring at it from the hallway, trying to figure out what to do.
(Plus, I can’t work facing the same way as World of Warcraft. I can’t tell my husband this – but there’s nothing more distracting than trying to update this blog and out of the corner of my eye seeing a bunch of warlocks gang up on the undead, beating them to a pulp. Or catching some flight training video of a crash re-enactment with a plane full of screaming people hurtling towards the alligator-infested Florida swamps. Nosiree, there’s no way I can get anything done in this current setup.)
But what makes a good office design? And what to do about my mess? I’ve been searching online, and analyzing tons of photos for weeks to find out the answers to this. And here’s what I’ve discovered are the keys to making your own space beautiful, calming, and inspiring: (more…)
Leave Comment
Dec 28, 2011 | Life

From a recent Container Store flyer. Click on any photo to enlarge.
As the year draws to close, I attempt what I always do every year-end…a major closet cleanout.
 From the same flyer…and no, this isn’t my closet!!! I wish!
This year I’m being particularly ruthless about it, and really taking a long and hard look at what takes up my most precious closet real-estate, and getting rid of things that I don’t wear, will not wear, and that just aren’t who I am anymore.

From a Spring 2011 Spiegel catalog.
 From Lucky Magazine April (I think?) 2011.
I’m almost embarrassed to admit to the sheer amount of stuff that I’ve been hoarding for years, and never once wore. I have to finally come to terms with the fact that these pieces were never really “me,” and I was trying to embrace a trend I could never figure out how to style properly in any other way. My Keep It or Toss It Rules?
Keep It or Toss It? 7 Ways to Create a Curated Closet
{And when I write TOSS, I mean sell, exchange, or donate! Or upcycle with some DIY only if you will wear it after its makeover…}
1. Keep only ONE item that is a certain shape, style and color, unless this one item is your signature piece.** (More on “signature pieces” below.) If you never wear capes, how many gray capes do you need? KEEP one, TOSS the others.
2. TOSS all your “skinny clothes” except for ONE or TWO pieces that you love and you want to keep as a goal. (If you end up getting down to that size again in the future, you’ll want to buy all new things then in order to show the new you off!!) In the same vein, TOSS all your fat clothes, except ONE to remind you of how far you’ve come. Put both the fat and the skinny clothes in a box, out of sight…unless you want a daily reminder hitting you in the face every time you open your closet. (Could be useful for inspiration…?)
3. TOSS all the clothes that are more than 2 sizes bigger or smaller than what you are now. Or have them altered so you can still wear them.
4. KEEP basics, as long as they aren’t ripped or stained. Ripped – TOSS! Stained – re-purpose as workout clothes, DIY, or TOSS. Try to pare down your basics to ONE or TWO of each kind (TWO white tight-fitting t-shirts, ONE white loose-fitting t-shirt etc.)
5. For every single piece in your closet, you must be able to visualize at least 3 different ways to style it (that you would actually wear!) If you’re having trouble coming up with different ways to wear it, then you should probably TOSS it.
6. Make sure that every piece you KEEP is special in some way…either it has a little detail, or a pretty print, or color that looks fabulous on you. The stuff that you don’t love to death but has a special story behind it and you just can’t bear to part with it? …Box it with your skinny clothes.
7. Stand back often and assess what’s left in your wardrobe. Sometimes it helps to pull everything out and only put back items you love…but for me, there was just too much stuff! Standing back from everything gives me a little perspective.


**And finally, to create your own identity within a mass of clothes and other items…
Develop your signature: a piece of clothing, jewelry, or accessory that is something you love and is uniquely YOU. Though I have a ton of earrings, I always wear a bunch of mismatched gemstone studs in different colors and sizes. It’s just something I’ve been doing this year that I’ve really begun to like, and if I lose one…hey! I have a whole bunch more that I can replace it with.
Also: a valet bar is a must! Some people call them an “edit bar,” but even a hook will suffice. Just somewhere you can stick clothes to put together outfits before putting everything on. It seriously saves time!
Since I have limited space, I actually hang vests and button-front shirts on the same hangers as dresses and blouses! Each item on a shirt hanger in my closet also gets a necklace, because I have a huge necklace collection and always forget what I own. I have to see it or I will forget about it completely.
I’m currently being inspired by well-organized closets (cue Ikea and The Container Store catalogs), and beautiful photos of airy, dreamy spaces to house all one’s accoutrements.

From the Ikea.com US website.
A Pair and a Spare has a great series on paring down (see what I did there?;-) your own wardrobe to pieces that you love, and maybe, as FashionISing wrote, the current covetable closet is a well-edited and curated one?
I’m still working on that, but I’ll be at least a couple steps closer come this New Year.
xoxox
Carly
~If you liked this post, please share it!~
Leave Comment
Aug 16, 2011 | Fashion
 PurseN, the handbag organizer insert company, has started a unique and captivating video contest on YouTube: the Messiest Handbag Contest.
Show them how much you’re in need of handbag organization with a photo or video of your messy handbag – to win a bunch of cool prizes, like a Louis Vuitton handbag and a PurseN organizer collection!
To Enter: (choose 1 of 3 ways)
1. Make a video showing why you need a PurseN handbag makeover, post it to YouTube, and copy the video URL to PurseN’s Facebook Page.
2. “Like” PurseN on Facebook and post a photo of your messy handbag on their wall, along with the code word PurseNized.
3. Tweet a photo of your messy handbag on Twitter along with hashtag #PurseNized
Prizes:

Also, PurseN is providing a special 15% off discount on any purchase from their site by entering THANKYOU15 at checkout.
By the way…
- Contest starts August 15th to September 23rd. The winners will be announced on September 30th.
- All the winners are required to send their “After” video or photo of their handbag once organized with their PurseN.
- No purchase necessary to enter the contest.
- One entry per person per household.
- All entries can be used in any social media sites or print.
- All entries are subject to the rules and regulations.
Good luck!
xoxox
Carly
~If you liked this post, please share it!~
Leave Comment
May 16, 2011 | Life
So this now closes my Rings Week series – it actually ended up being TWO weeks as I’ve gotten so behind on things. This is how I store my rings in my closet: right below my clothing, on top of my tights drawer.
Storing rings (or just about anything) I’ve always found a challenge – because the more you have, the harder it is to make the storage look “neat” and “organized.” My solution is to store my rings with thin bands in a velour-lined case, bought from a jewelry supply shop; it keeps them visible, neat, and looks a little luxurious. (This is a tufted ring display, similar to this one here.) (I stack another box and 3 layers below this one that hold small stud earrings, chain necklaces, and larger necklaces. Similar flocked inserts are sold here, and the trays are sold here.) But lately I’ve acquired a number of rings that have very thick shanks or wide bands or large, wide stones in them, and have had trouble figuring out how to store/display them. (For me, if I don’t have it on display in front of my face, I completely forget that it’s in my closet.;-) At first I tried compartmentalized boxes, but I own such a range of sizes and widths that I was still left with rings that didn’t fit in the boxes, or tiny, delicate rings that were just left swimming in their compartments. So I now keep my larger rings all jumbled together (they’re costume jewelry anyway) in wide, cotton-lined jewelry gift boxes that have come with one purchase or another at some time.
  You can see some of the ring shanks are wrapped with moleskin to prevent them slipping off my fingers.
Right now this is what’s working best for me.
If you like displaying and storing your jewelry in a professional manner, you can certainly just use what jewelry stores do: velour, denim, plastic, or leather stands and cases are all surprisingly affordable and chic. Some people also like buying tiny busts or miniature mannequins to display their favorite pieces, on top of a dresser or armoire for easy access. You can pile all your rings on long spikes (like those desk accessories that you stab finished receipts onto from old film noir movies) for a long n clustered look.
Brass Desk Spike Paperweight from Amazon.com : a DIY Ring Holder?
 If you like the idea of a ring tray, Smart N Snazzy has a great DIY for making your own, lined in satin. It gives the standard jewelry tray and utterly regal feel.
 The ubiquitous hand-holder. (img src)
Some people choose to display their rings on a branched holder; I’ve seen one shaped like deer antlers or trees; some use real sticks and branches to give their collection an earthy, bohemian feel.
 Deer from Urban Outfitters; no longer available.:-(
 The uber-talented duo from Dismount Creative DIY’d another Urban Outfitters piece: this one, white dollhouse chairs in a tower-cum-jewelry-organizer (which is also a great option if you like the “branch” setup and like to keep things on display). What an inspiring project!
Do you have any ring storage solutions or ideas that work for you? Please let me know in the comments!
Well this Week of Rings has been fun! Hopefully there’s been some info in there that has been inspiring or useful – and helped us all look at those little decorations for our fingers just the slightest bit differently. Thanks for reading along!
xoxo
Carly
~If you liked this post, please share it!~
Leave Comment


