Mar 1, 2012 | Beauty
 I’ve been enjoying Sally Hansen Salon Effects Nail Polish Strips for awhile (mostly in the pretty glitters they offer!) – and was pleased to see that they’ve come up with some great new patterns, just in time for Spring!
I picked up the pink polka dot pattern (“Pink-A-Dot“) the other day – and as soon as my fluorescent yellow mani needs replacing, I’ll be trying this one out! (which will probably be soon…ahem)

photo from my January review last year
The review I posted of them when the original colors came out last year garnered a lot of interest; if you’d like to check out the post to see the step-by-step, you’ll find it here!
What do you guys think? Any pattern/color strike your fancy?
…And if you’re looking to buy them, you can find them at Walgreens, Target, CVS, and other drugstores nationwide…as well as online at Ulta.com!
xoxox
Carly
flower texture source; product collage by me.
~If you liked this post, please share it!~
Leave Comment
Dec 14, 2011 | DIY
 I don’t know about you, but I have a lot of trouble drawing straight lines with my non-dominant hand. Whenever I attempt some nail art with straight lines, my efforts on one hand turn out perfect, and the other hand looks all wonky and wiggly. I figured a template or stencil would be the best way to combat this – so I thought why not DIY? These candy cane striped nails are actually a cinch to do, and if you’re using sticky color dots (found at any office supply store), they’re also cheap! No striper brushes or special nail polish required. Here’s how:
You Need:
*sticky dots (or you can using sticky labels, or even tape…anything that will stick to your nails will work)
*base nail polish color (I’m using Essie’s Russian Roulette from my Secret Santa Miranda from the Portland Blogger Meetup)
*contrast nail polish color (I’m using white, from a Rimmel French Nail Polish Set)
*glitter nail polish/topcoat (I’m using Sally Hansen Hard as Nails in Disco Ball , which contains little holographic flecks)
And…
*scissors
How-To:
1. Paint the base color onto your nails. I had to do two coats to achieve uniform coverage. Allow to dry completely before going on to Step 3). (I couldn’t wait, so ended up making things a bit messy.)
2. Remove 5 dot stickers from the package. Cut each of them into a fringe, stopping the cuts before the edge of the circle.  Fold every other fringe strip under itself…this will become the stripe stencil for your nails.
3. After your base color is completely dry, place the dots onto your nails, positioning the stripes how you like. For my shorter nails I made my stripes diagonal, like a candy cane, and for my longer nails I used an uncut dot to create the curve of the tip, and then placed the cut dot with the stripes going up-and-down on the tips only. Have fun with it and mix it up!
4. Use your contrasting color of nail polish to paint the stripes. You may have to do two coats for complete coverage. Make sure the stripes are strongly stuck onto your nails or else you’ll get leakage around the edges!
5. After the polish is dry, remove the stencils and finish with a swipe of glitter.

Now if only I had peppermint-scented nail polish…
 Happy Holidays, everyone!
xoxox
Carly
~If you liked this post, please share it!~
Save
Leave Comment
Oct 31, 2011 | Beauty
 In honor of Halloween, I tried out my new Mia Secret Crackle Nail Polish in black
 , over a coat of a light baby blue (Sally Hansen). The effect reminds me of a turquoise snakeskin…or black spiderweb netting over my nails. MIA Secret is a lot cheaper than OPI, too – at around $4 for the polish + shipping from Amazon.com. I think the crackle effect would be different if I stroked the polish from side-to-side over the nail too!
 I totally love this effect!
Happy Halloween to everyone! Hope it’s a great one~
xoxox
Carly
~If you liked this post, please share it!~
Leave Comment
Sep 15, 2011 | DIY
 I’ve been utterly exhausted this week since it’s Lil Tot’s first full week of school, and driving him to and picking him up from requires a total daily commitment of about 3 hours from me. Three hours in the car, every.day. This means that although I do have a block of time uninterrupted at home, I now am spending so much time behind the wheel I’ve found I’ve had to skimp on time spent elsewhere. And what’s first to go when I get busy? DIY’ing. Then updating my blog. It’s unfortunate, but I have to figure out some compromise here.
This week I managed to do a mini-DIY with my nails. Sally Hansen Chrome Nail Makeup in Pure Chrome (Sally Hansen Titanium Chrome is similar), with Essie’ Chinchilly dotted on. Finished up with some messy splotches with Sally Hansen Nail Art Pen in Black, and a clear topcoat (because this nail art pen’s doodles come off fast if not sealed with a topcoat). Of course you could always use Sally Hansen Salon Effects in Kitty, but I wanted a silvery manicure anyway.
 Now off to pick Lil Tot up from school! Just how does one deal with school commutes when there is no bus and no public transport??
Hope everyone’s having a great week!
xoxox
Carly
~If you liked this post, please share it!~
Leave Comment
Jan 16, 2011 | DIY
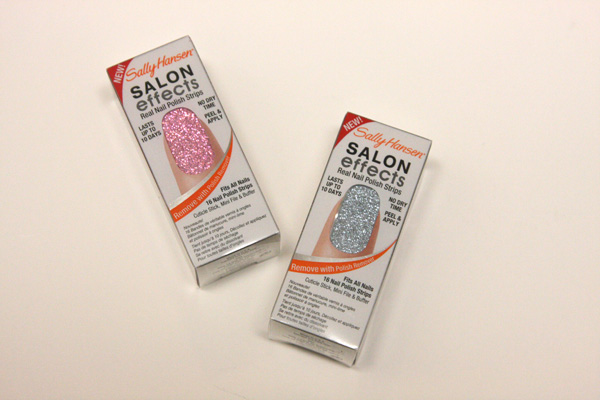
I spied this in the store the other day and promptly snapped up 2 to try!
I’ve bought the Nail Rocks nail sheets (that need to be set with the heat of a dryer, which I haven’t experimented with just yet), and tried out the Incoco-brand Color Enamel Strips in the past, which I enjoyed but were a bit tough to apply.
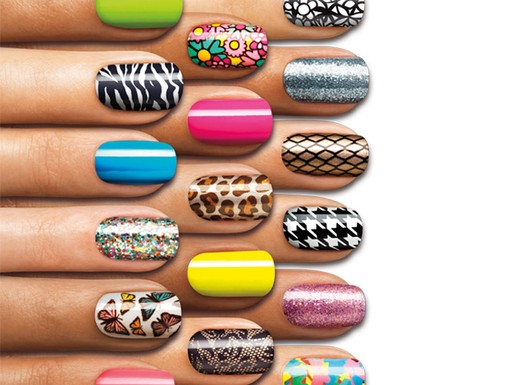
Look at all the beautiful colors and patterns the Salon Effects come in!
The Sally Hansen version of this idea takes the difficult application inherent with other brands and makes it super-easy, with an orange stick and nail file included in each set. And what I haven’t seen before with these stick-on nailpolish sheets is the amazing range of colors: Sally Hansen is offering glitter, photo-realistic effects, fun patterns, and bright colors. And they’re super-easy to use!
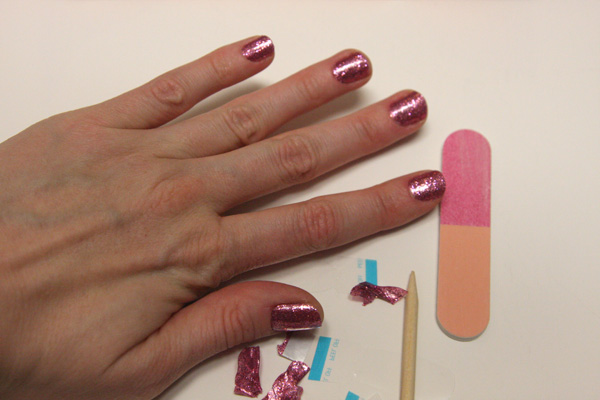
There are 16 sheets in a packet (and though you could probably use a single sheet for 2 nails if you were super-careful and enterprising); they’re meant to be used one sticker = one nail. You need to find stickers that approximate the shape of your nail bed, peel off the protective coat, peel off the back, snap off the paper tip (I found it easier to do the last two steps in reverse order), and place onto your nail.
You use an orange stick (included in the set) to press down the edges, and then the included nail file to crease the sticker sharply at the nail tip, and the sticker rips off.
Pros: Easy to use, fast (once you get the hang of it), brilliant colors and effects, long-lasting (I hope – the package says 10 days!), no drying time required, no need for other things to buy to do your manicure (topcoat, base coat, etc), no bumpiness to the glitter; DBP, toluene and formaldehyde-free.
Cons: A little smelly (like real nailpolish), packs come vacuum-sealed so they’re kind of hard to rip into, stickers prone to ripping if you press too hard with the orange stick, difficulty in finding a shape match to your nail bed, waste of sticker part that you rip off, a little pricey.
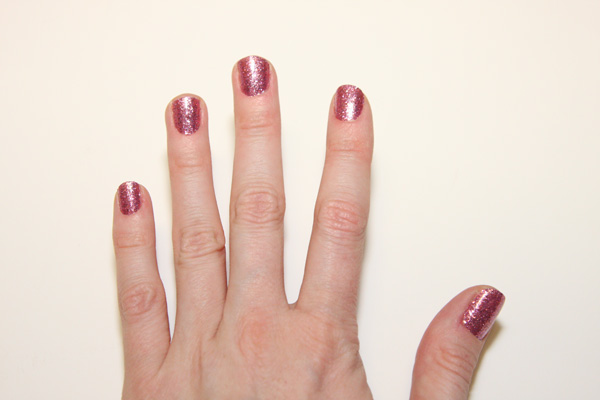
At about $9.99 a pack they’re a little more expensive than your average nailpolish, and they’re only single-use, so once they’re done, they’re done. But the effects are amazingly bright, pure color, with a streak-free and consistent finish, and the tops are smooth without the need for a topcoat!
Right now I’m trying out the pink glitter (“Bling It On”) and the blue glitter (“Blue Ice”) is next on my list!
Already in stores like Walgreen, Target, and CVS, this product is supposed to be available throughout drugstores in the U.S. by February 2011.
What do you guys think? Something cool you’d like to try? Or a little too pricey and bothersome to mess around with?
xoxox
Carly
~If you liked this post, please share it!~
Save
Leave Comment