Mar 11, 2013 | DIY
 For Spring 2013 Chanel showed a number of butterfly motifs on their accessories: and this sweet quilted leather bag was no exception.
  From the Pick Your DIY pinboard that we set up for the Pick Your DIY Bloggers Collaboration Week, the Chanel butterfly bag image (pictured above) received a ton of likes and repins. So here is how to make an approximation of it:
You Need: (more…)
Leave Comment
Sep 2, 2011 | DIY

Nude shoe + Leather paint = Colorblock Pump
(photo: ASOS PATCHI Cylindrical Heel Platform High Shoe)


90’s-style clunky boots + Belts (glued on with Loctite Vinyl, Fabric and Plastic Glue = Motorcycle Boots
(photo: Balenciaga Cut-Out Flat Boots)

White blouse (back cut away) + Lace curtain (thrifted) = Lace-Backed Blouse
(photo: PUFFY Roll-Up Sleeve Lace Back Shirt)

Shirt collar (cut off a white shirt) + Scrapbooking stickers (fixed with Aleene’s Glitter and Gem Glue) = Embellished Collar
(photo: TopShop Cream Mixed Stone Collar)

Sweatshirt + Chiffon (hand-stitched to seams, laid over front) = Mixed-Media Sweatshirt
(photo: Alexander Wang Silk-Chiffon Paneled Sweatshirt)

Black cord + Brooch (pinned in center) = Bolo Tie Necklace
(photo: Vintage Zuni Thunderbird Bolo Necklace)

Embroidery thread + Grosgrain ribbon + Bangles = Colorful Wrapped Bangles
(photo: JewelMint Garden Patch Trio)

T-strap sandal + Glitter (adhered with Mod Podge or Tulip Fashion Glitter Bond = Glittery Sandals
(photo: Jeffrey Campbell Foxy Glitter Sandal)
Happy DIY’ing!
xoxox
Carly
~If you liked this post, please share it!~
Leave Comment
Oct 29, 2009 | DIY


So, were you watching the last Sex and the City movie close enough to notice those adorable half-gloves Carrie was wearing while using a pay phone in one scene?
Such a subtle difference to the regular wrist-length leather glove…but oh so cute. The gloves were actually from Ines Gloves, available for $147.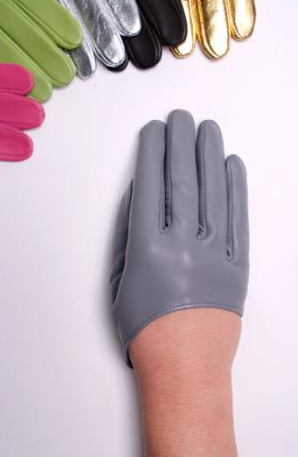
Ines gloves…so cute…but oh so expensive too. Why does this hand model lady have such hairy arms? This confuses me…and dissuades me from wanting to spend that $147 for some reason.
But we wouldn’t think of paying that much for such a simple accessory, now would we?
So why buy when you can D.I.Y.?!
 Enter a typical pair of wrist-length leather gloves (mine I got at the Buffalo Exchange for $8). Wish that they were gray or brown…but c’est la vie. (I didn’t want to go through the whole rigmarole of painting them with leather paint…or worse yet, attempting to dye them. I don’t even know if that would be possible with black gloves. In any case.)
By using the photos on the website as reference, I sketched the scoop shape using an eraseable fabric pen onto the gloves. 
You can see the white lines on the gloves…I tried a couple variations before deciding on the shape. Always make sure your pencil comes off of leather BEFORE you draw all over your gloves!
Add 1/4″ seam allowance below the line, and cut with a pair of sharp shears. Behold the scoop shape! Cut with a pair of sharp shears. I don’t have leather scissors, for some insane reason. Oh yes, because they’re ridiculously expensive and I just squandered my available funds on some new sewing scissors.
Using Loctite Vinyl, Fabric, and Plastic Glue, turn under that 1/4″ seam allowance and secure it to the underside of the glove. (Barge cement is a be-otch to work with since you have to wait 15 minutes after applying it before sticking your surfaces together…a total hang-up for a DIY’er in a rush like me…) ‘Tis necessary to glue the seam allowance since leather gloves are usually made from a thin and soft lambskin…which rolls and shifts uncontrollably as you sew it on a home sewing machine…unless you’re an all-star with sewing lightweight leathers, I’d recommend gluing it down to get that clean seam first!
The seam allowance glued (for the most part) down to the inside.
Then, using a leather needle (medium-weight leather, since we’re going through two thicknesses + two thicknesses of the lining), edge-stitch about 1/8″ from the edge of your gloves to secure that hem. (sorry no photo of the stitching…couldn’t work with the sewing of something black, with black thread, in a might-as-well-be-pitch-black poorly-lit sewing room.)
You’re done! Step back and admire.

LEATHER-SEWING TIPS:
Use a longer stitch than you normally would when it comes to leather…and a good tip when sewing leather is to crank the needle forward manually so that it has pierced the leather completely…BEFORE pressing with the presser foot of the machine to sew your line of stitching. Start sewing with the needle already in the leather to say it another way. Also, you can’t go super-fast or super-slow…there’s a happy medium where your machine’s feed dogs advance the leather at the right speed, the needle punches through the leather without jarring and hitting the needle plate, and the needle goes in vertically and doesn’t hit the bobbin case. Too fast and the aforementioned problems will crop up; too slow and the needle won’t punch through the leather. It’s different for every machine – just something you need to experiment with. (Of course, if you’re using a heavy-duty/industrial machine for sewing leather, you can completely ignore what I’ve just written.:-)
When starting your line of sewing, DO NOT BACKSTITCH. Go all the way around the edge, then back into the first ONE or TWO stitches you did at the beginning of the line. Backstitch ONCE. This will create a nice, professional look to your stitching.
Also, do not start stitching directly on a seamline. This will usually cause the needle to jar and hit your presser foot/needle plate/bobbin case. Sewing machine needles for leather (for the home sewing machine) are pieces of s$#@. They will snap willfully at ANY irregularity of thicknesses in your material; or bend and not punch the leather vertically at certain speeds…ugh. Buy more needles than you think you need!
Can’t wait to work these in a new outfit…the leather glove is THE must-have accessory this Fall, so rock it while you can!
Happy DIY’ing!
xoxo
Carly
Save
Leave Comment


