Nov 21, 2013 | DIY
 So next week is the big turkey day – and if you’re spending it at someone else’s home sometimes you want to bring along something to thank your hosts. Since you’ll be saving all that time not having to make the dinner itself, why not create a lovely gift that shows both your creativity and your appreciation for the holiday? Here are some ideas for some great DIY gifts to bring with you to the Thanksgiving dinner:
DIY DECORATED STORAGE BOXES

Everyone could always use more storage, and beautifully-decorated boxes show your thoughtfulness. Left to right, clockwise: Decorative Boxes, Fabric-Covered Boxes, Faux Malachite Boxes
DIY SUCCULENTS AND PLANTERS

Succulents are a low-maintenance plant that look adorable presented in groups. Left to right, clockwise: Tiny Pinch Pots for Kids, DIY Terrarium, Gold Succulents in Origami Geometric Planters
DIY MINI CANDLES
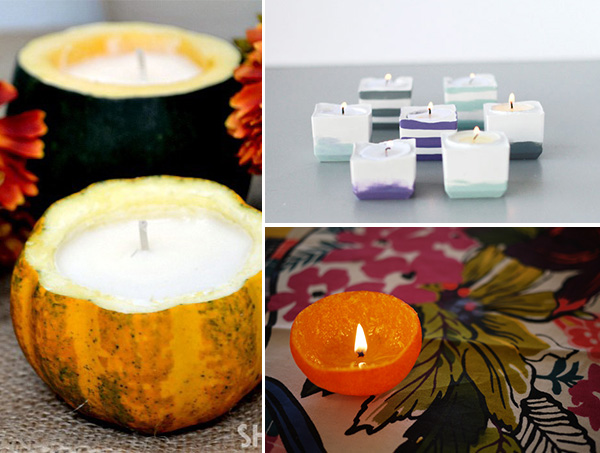 Candles are a welcome addition to any home, especially ones that smell delicious or look beautiful. Left to right, clockwise: DIY Mini Pumpkin Candles, Modern DIY Candle Votives, DIY Satsuma Candle
DIY TABLE LINENS

Handmade table linens are a unique representation of one’s unique style – and you can use a variety of objects as stamps. Left to right, clockwise: Potato Stamped Napkins, Stamped Table Runner, Apple Stamped Napkins
DIY DRINK COASTERS

To add to a festive table, you could make some coasters – adding paint or decoupaged photographs for a personal touch. Left to right, clockwise: DIY Photo Coasters, Personalized Coasters, DIY Leather & Cork Coasters
DIY SERVING TRAYS

For a perfect presentation, a serving tray is just the ticket. Touches of gold or punched cork make these look especially chic. Left to right, clockwise: DIY Painted Tray, Punched Cork Serving Tray, DIY Metallic Gold Leaf Tray
DIY DRY BAKING MIXES

Any cook would love a starter mix for some favorite recipes, and these are all fabulous ideas to add to a well-stocked kitchen. Left to right, clockwise: DIY Whole Food Dry Mix Recipes, DIY Spice Mixes, DIY Hot Cocoa Mix and Homemade Marshmallows
DIY PAINTED UTENSILS

Painting plain wooden utensils and bowls is so hot right now – and it adds a pop of pretty color to the table and kitchen. Left to right, clockwise: Painted Neon Utensils, Neon Spoons, Dipped Bowls
DIY FLAVORED ALCOHOL
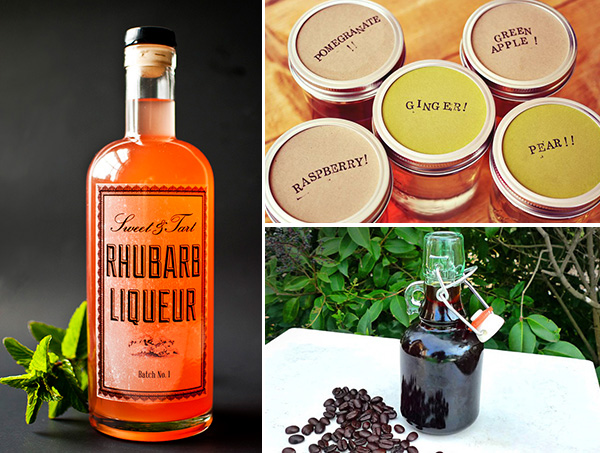
If your hosts enjoy a little drink from time to time, it might be superb to gift them with a delicious flavor of homemade spirits. Left to right, clockwise: DIY Rhubarb Liqueur, Infused Vodkas, DIY Coffee Liqueur
DIY WINE BAGS
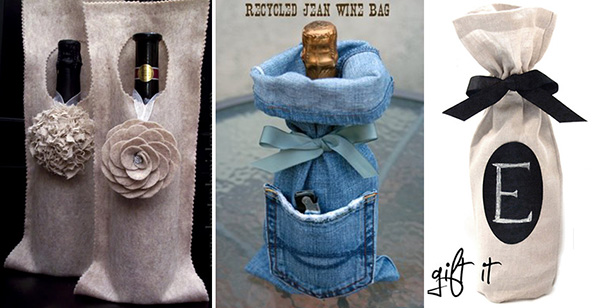
To present your thoughtful bottle of homemade alcohol (or high-end wine!) to your hosts, package it in your own homemade wine bag. Left to right: No Sew Felt Wine Bag Tutorial, Recycled Jean Wine Bag, C Wonder DIY Kit
Also! Use the many lovely labels from Lia Griffith for your packaging and tagging for all your gifts – and watch your hostesses’ faces light up with joy upon receiving your gifts!
Do you have any go-to hostess gifts that you always give during the holidays? Please share in the comments below!
xo
Carly
Leave Comment
Sep 4, 2013 | Fashion, Life, Score!
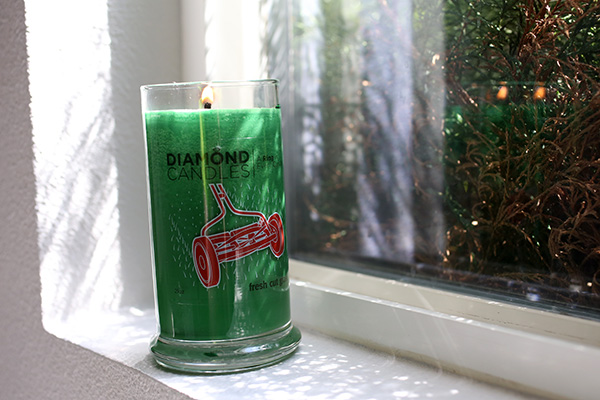
 Candles are a great way to brighten up and add some glamour to any living space. Diamond Candles takes it a step further by including a surprise in each and every soy-based candle: a $10, $100, or $1000 ring! They have some really fun scents, too, like Caribbean Dream, Cupcake, Sweety Pea, Ocean Mist, Chocolate Truffle, Vanilla Lime (yum!).
I was sent a complimentary candle to try out, and I chose the Fresh Grass scent (now sold out, unfortunately:-(
 Indeed, just as the reviews say, it does smell like a hint of grass, with a fresh laundry smell, and a slightly sweet undertone. It is reminiscent of waterfalls, lush, mossy areas, and sweet, wet grass – a very pleasant and clean smell. The scent lasts awhile, lingering in the air for hours after burning, which is a huge plus (compared to candles whose smell just fades away once extinguished!) And I would definitely order it again if they re-stock it.
 But of course the real draw was the hidden ring inside the candle: what would it look like? Was it real? How much would it be worth? It was sort of a treasure hunt inside a candle. You can tell where the ring is embedded from the outside: just a few inches below the top of the wax, so at least I knew what I was aiming for.
 It took about 6-8+ hours to burn the candle enough to where the wax was soft enough to remove the ring. (Use a skewer or toothpick to remove, place on a paper towel, and allow to cool before handling!) Then, carefully peel off the surrounding foil and plastic packaging, making sure the wax is hard before you do so. (I was too eager and some of the molten wax got on my ring, which is proving truly difficult to remove!)
 When I got my ring out I was very pleased to see that the quality of the ring was very good – in that it was an excellent piece of costume jewelry. Though I could tell almost immediately that my ring was not worth $100, let alone $1000, it was still a decent piece of jewelry, with precise settings and a pretty piece of yellow glass in the center. It could pass for an actual wedding or engagement ring, since the stone had a sparkle to it and the setting did look expensive.
But if you’re wondering if your ring is the real deal (and one of the rare rings worth $100 or $1000, as Diamond Candles says), here’s how to find out:
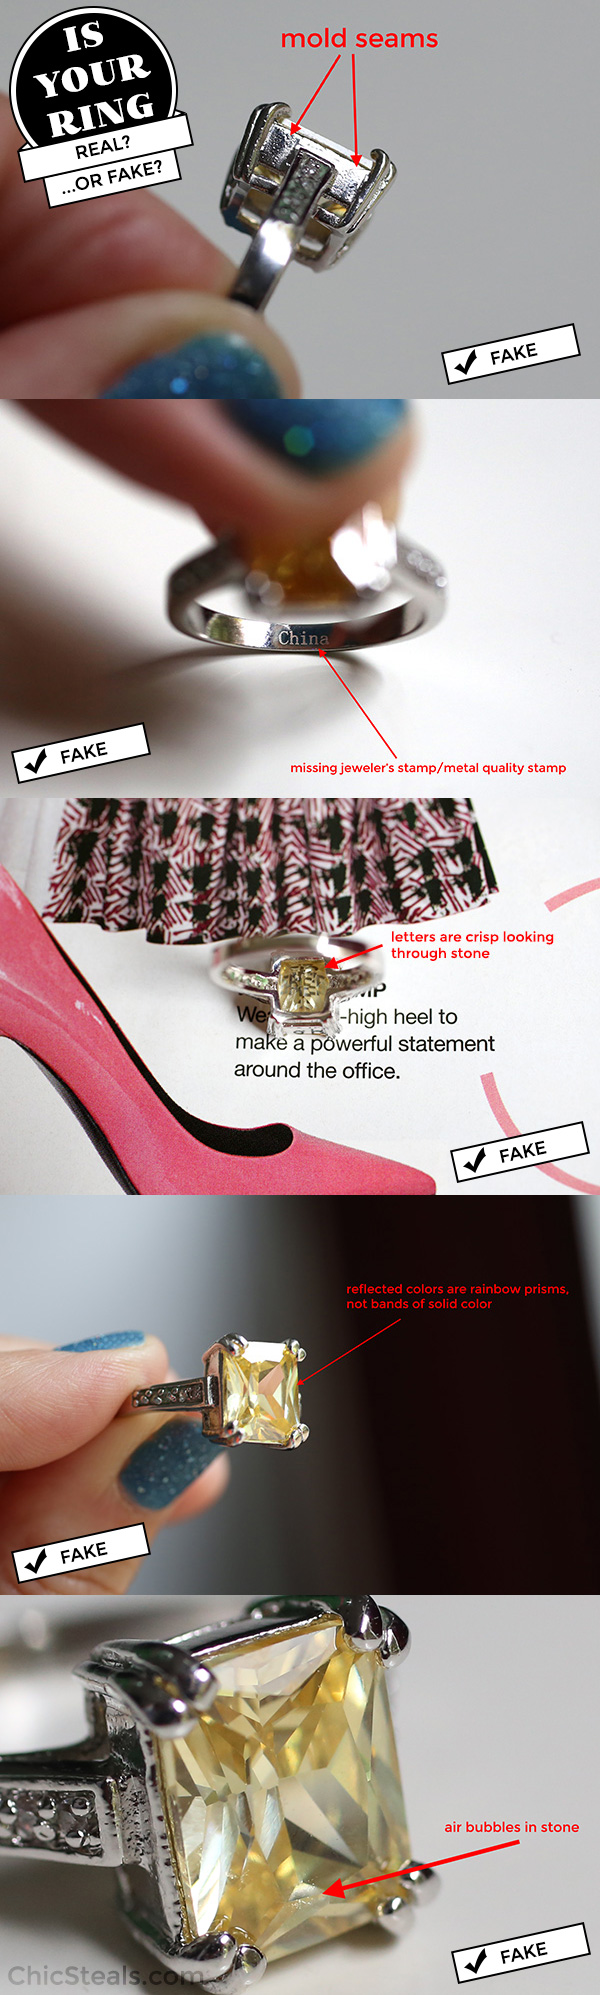
5 Ways to Tell if Your Diamond Candles Ring is Real (as in, Worth $100+)
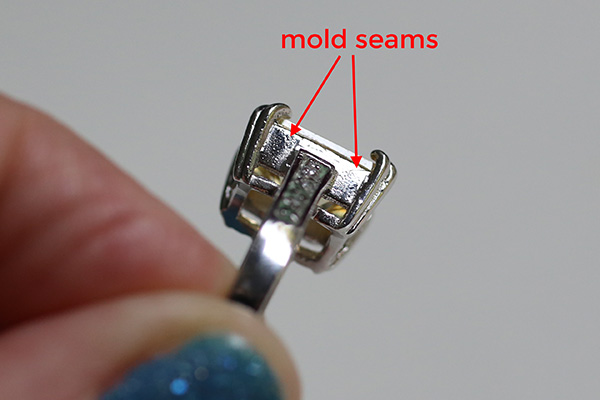 1. Look at the quality of the setting and ring shank. Do you see any lines or obvious seams? If so, the setting and/or shank was created in a 2-part mold, rather than fabricated out of precious metal wire and sheet. Lines or seams in central areas of the setting and/or shank indicate the ring was cheaply made.
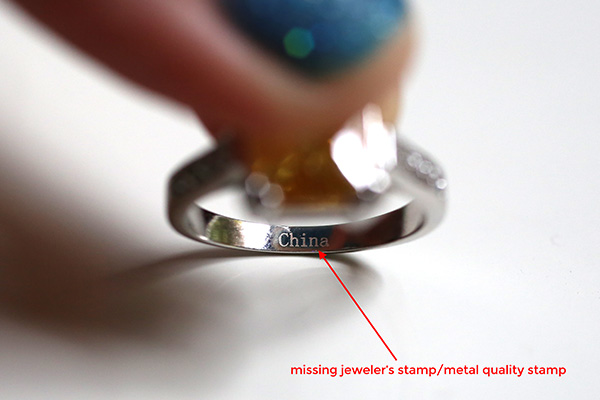 2. Look inside the ring shank for a stamp. Any stamp that says something like 10K, 14K, 18K, 585, 750, 900, 950, PT, Plat…or a jeweler’s name or brand name indicates the ring is made of precious metal. If there is no stamp or signature, or if like my ring, yours says “China,” then the shank is likely made of cheap, base metal.
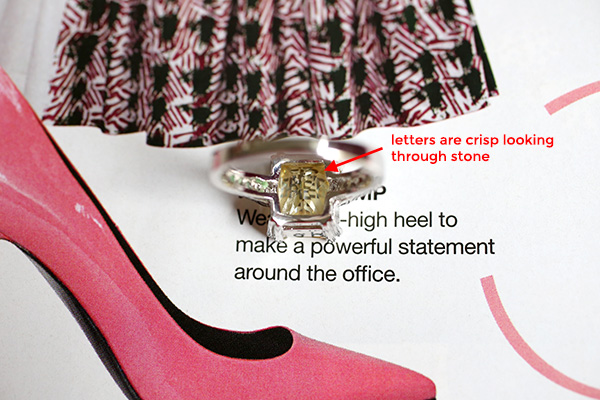 3. Look at the stone, and turn it upside-down on a piece of newsprint or a magazine. If it is a diamond, you should not be able to read anything through the stone; if it is glass, you will be able to. A real diamond has a high refractive index and will distort type.

4. Look carefully at the sides of the stone. When you rock the ring from side to side, do you see any flashes of extra colors – like bright orange or bright green? If yes, then you may be dealing with a real diamond or citrine. Also, any colors visible in the flashes appear as in distinct bands or solid areas. Glass stones (or low-quality diamonds) will often show a full rainbow spectrum in their facets, with colors not distinct from one another.
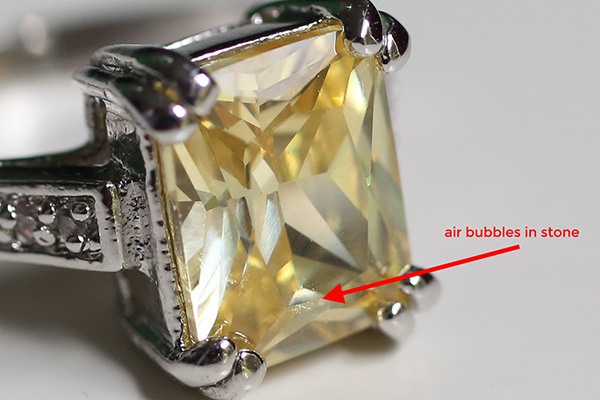
5. Look at the inside of the stone. In glass stones, you will often see air bubbles trapped in the glass. Real gemstones may have inclusions, but not perfectly-round air bubbles. (This is something apparent upon magnification.)
Source 1 ; Source 2
This is not just a useful rule of thumb for evaluating your Diamond Candle ring…you can also use it to check out rings when buying vintage pieces or evaluating heirlooms in your collection. (Of course, a jeweler will be able to do the best job in distinguishing fake from real – but you might be able to save yourself the money by looking closely and at least eliminating pieces that are obviously not expensive items.)
So, are you ready to embark on your very own treasure hunt with Diamond Candles?
You Could Win:
a Rafflecopter giveaway

Good luck to everyone!
xo
Carly
FTC Disclosure: I was sent one Diamond Candle for review purposes (ARV: $25). I was not compensated in any way for this post. The opinions above are my own. One candle will be provided to the winner of this giveaway courtesy of Diamond Candles. To read my full Disclosure Policy, click here.
Leave Comment
Aug 29, 2013 | DIY
 Hello all! I am so thrilled to be guest posting today over on Domestic Slice. As you may have seen, Kate from Domestic Slice kindly contributed a guest tutorial for a DIY Raffia Wrapped Necklace here on Chic Steals while I was in Tokyo for a month, and I’m reciprocating today. My tutorial is for a (faux) gold-leafed succulent in a handmade origami planter – kind of no-fuss gardening meets home decor.
And please let me know what you think!
 xo
xo
Carly
Leave Comment
Apr 15, 2013 | Life

Just Be Cool (source unknown)
I’m finally nearing the end of my personal Iliad [my home office makeover] and am now beginning to think of what I want on my newly-painted, white white walls. I’ve gone with a white-gold-birch theme to the room, so am currently inspired by slick gold typography (to match with my DIY Glittery Gold Nugget Geometric Pushpins).

FontCrafts I Love Fonts Canvas

PrintandBeMerry Bronze Motivational Typography

LettersfromAtoZ Gold Glitter 2013 Stand-Up Decorative Numbers

Kyle & Courtney Harmon’s Beer Typography

Peter Tarka’s Look at Me Now Cinema4D Typography Tutorial

MadebyGirl Love Candy Metallic Gold

55His Stay Gold Typography Card

Jon Ovander’s Gold Inset Type on Book Graphic

Turn Lead Into Gold (source unknown)

Roald Dahl Quote in Foil Print
I just love the Roald Dahl quote above.
Any of these quotes appeal to you?
xo
Carly
Leave Comment
Dec 28, 2011 | Life

From a recent Container Store flyer. Click on any photo to enlarge.
As the year draws to close, I attempt what I always do every year-end…a major closet cleanout.
 From the same flyer…and no, this isn’t my closet!!! I wish!
This year I’m being particularly ruthless about it, and really taking a long and hard look at what takes up my most precious closet real-estate, and getting rid of things that I don’t wear, will not wear, and that just aren’t who I am anymore.

From a Spring 2011 Spiegel catalog.
 From Lucky Magazine April (I think?) 2011.
I’m almost embarrassed to admit to the sheer amount of stuff that I’ve been hoarding for years, and never once wore. I have to finally come to terms with the fact that these pieces were never really “me,” and I was trying to embrace a trend I could never figure out how to style properly in any other way. My Keep It or Toss It Rules?
Keep It or Toss It? 7 Ways to Create a Curated Closet
{And when I write TOSS, I mean sell, exchange, or donate! Or upcycle with some DIY only if you will wear it after its makeover…}
1. Keep only ONE item that is a certain shape, style and color, unless this one item is your signature piece.** (More on “signature pieces” below.) If you never wear capes, how many gray capes do you need? KEEP one, TOSS the others.
2. TOSS all your “skinny clothes” except for ONE or TWO pieces that you love and you want to keep as a goal. (If you end up getting down to that size again in the future, you’ll want to buy all new things then in order to show the new you off!!) In the same vein, TOSS all your fat clothes, except ONE to remind you of how far you’ve come. Put both the fat and the skinny clothes in a box, out of sight…unless you want a daily reminder hitting you in the face every time you open your closet. (Could be useful for inspiration…?)
3. TOSS all the clothes that are more than 2 sizes bigger or smaller than what you are now. Or have them altered so you can still wear them.
4. KEEP basics, as long as they aren’t ripped or stained. Ripped – TOSS! Stained – re-purpose as workout clothes, DIY, or TOSS. Try to pare down your basics to ONE or TWO of each kind (TWO white tight-fitting t-shirts, ONE white loose-fitting t-shirt etc.)
5. For every single piece in your closet, you must be able to visualize at least 3 different ways to style it (that you would actually wear!) If you’re having trouble coming up with different ways to wear it, then you should probably TOSS it.
6. Make sure that every piece you KEEP is special in some way…either it has a little detail, or a pretty print, or color that looks fabulous on you. The stuff that you don’t love to death but has a special story behind it and you just can’t bear to part with it? …Box it with your skinny clothes.
7. Stand back often and assess what’s left in your wardrobe. Sometimes it helps to pull everything out and only put back items you love…but for me, there was just too much stuff! Standing back from everything gives me a little perspective.


**And finally, to create your own identity within a mass of clothes and other items…
Develop your signature: a piece of clothing, jewelry, or accessory that is something you love and is uniquely YOU. Though I have a ton of earrings, I always wear a bunch of mismatched gemstone studs in different colors and sizes. It’s just something I’ve been doing this year that I’ve really begun to like, and if I lose one…hey! I have a whole bunch more that I can replace it with.
Also: a valet bar is a must! Some people call them an “edit bar,” but even a hook will suffice. Just somewhere you can stick clothes to put together outfits before putting everything on. It seriously saves time!
Since I have limited space, I actually hang vests and button-front shirts on the same hangers as dresses and blouses! Each item on a shirt hanger in my closet also gets a necklace, because I have a huge necklace collection and always forget what I own. I have to see it or I will forget about it completely.
I’m currently being inspired by well-organized closets (cue Ikea and The Container Store catalogs), and beautiful photos of airy, dreamy spaces to house all one’s accoutrements.

From the Ikea.com US website.
A Pair and a Spare has a great series on paring down (see what I did there?;-) your own wardrobe to pieces that you love, and maybe, as FashionISing wrote, the current covetable closet is a well-edited and curated one?
I’m still working on that, but I’ll be at least a couple steps closer come this New Year.
xoxox
Carly
~If you liked this post, please share it!~
Leave Comment


