Dec 17, 2013 | DIY
 Hello lovelies!
Today I am over on We Heart This, posting my DIY tutorial for how to make your own Mercedes Salazar-inspired DIY Friendship Bangle Bracelets. They are a super-chic adult update to the typical friendship bracelet – and look fabulous stacked together on your wrist! (A last-minute holiday gift, anyone?) Click on over to see the full tutorial!
xo
Carly
Save
Leave Comment
Aug 29, 2013 | DIY
 Hello all! I am so thrilled to be guest posting today over on Domestic Slice. As you may have seen, Kate from Domestic Slice kindly contributed a guest tutorial for a DIY Raffia Wrapped Necklace here on Chic Steals while I was in Tokyo for a month, and I’m reciprocating today. My tutorial is for a (faux) gold-leafed succulent in a handmade origami planter – kind of no-fuss gardening meets home decor.
And please let me know what you think!
 xo
xo
Carly
Leave Comment
Aug 15, 2013 | DIY
 Hello lovely readers!
Today all the DIY projects I created for M&J Trimming’s Third Annual DIY Challenge are now live on their blog. Please click on over to check them out!
Thanks so much to the team at M&J Trimming – I had a blast working with all your wonderful supplies!
xo
Carly
FTC Disclosure: I received a box of trims and supplies courtesy of M&J Trimming, to create step-by-step DIY tutorials for their DIY Challenge. I have received a $100 M&J Trimming Gift Card as compensation for my submissions. My official Disclosure Policy is here.
Save
Leave Comment
Jul 2, 2013 | DIY
 Domestic Slice is an amazing blog founded by Dottie Zimmerman, Kate Snyder and Katie Wittenauer. Sharing recipes, crafts, ideas, and tips for the home, the site is all about bringing fun and loveliness to one’s domestic life. Co-founder Kate Snyder also runs the public relations firm Piper & Gold, and posts about crafts, home+garden, and style on Domestic Slice. She is here today to share a quick makeover tip for old, tarnished chain jewelry. Take it away, Kate!
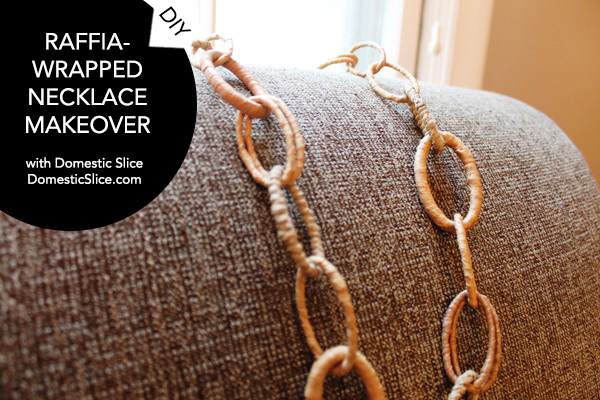
Hi y’all! I’m so excited to be guest writing here at Chic Steals. I adore accessories (the DIY Gold Leaf Head Chain... I die) and simple and quick DIY projects, so I wanted to share with you a recent project that was both. 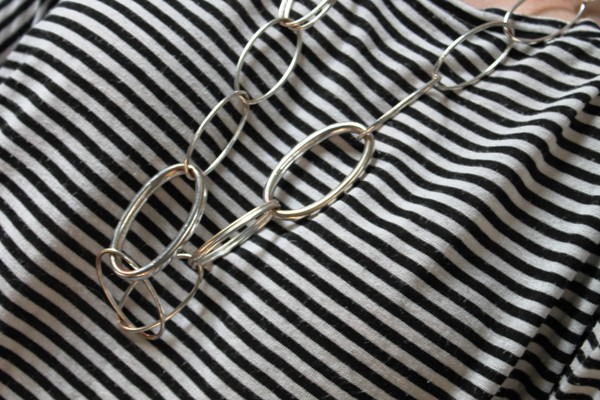 Five or six years ago, I got this great necklace with big metal links. It was right as long necklaces were becoming all the rage and I loved the statement of it. But as styles evolved, and wear and tear tarnished it, it got a little stale. So I decided to give it new, natural life by bringing raffia onto the scene.
Raffia Wrapped Necklace Makeover
 Supplies: Assortment of Raffia Ribbon, Twine and Other Wrapping Materials / Old Necklace in Need of a Makeover / Tacky Glue / Scissors
A Little Tip: I had several raffia ribbons and twine already but I picked up a couple more varieties in the gift wrap section of my local craft store. I also got some floral raffia, but it was too brittle and didn’t wrap nicely, so stick to the ribbons and twines!
1.) Clip a 5″ to 6″ strand of one of the ribbons.
2.) Using tacky glue, affix the end of the ribbon to one of the chain links.
3.) Apply a 1/2″ or so strip of glue to the chain link.

4.) Start wrapping the ribbon around the chain link, pressing it into the glue as you go.
5.) Reapply glue and keep wrapping until the link is covered.
6.) Trim excess ribbon and glue down the end.
Repeat for each link, varying the type of raffia ribbon or twine you use until each link is wrapped!
 You could make so many variations of this necklace, from using different colored raffia to only using one color, to using all twine. Have fun with it. I’d love to see your pictures when you’re done!

~Kate
 Kate Snyder is a co-founder of the blog Domestic Slice where she shares her take on crafts, home+garden and style. She got her first Martha Stewart Living subscription at age 11 and has been a lover of all things home since she was a child, leading her to pursue a minor in Interior Design from Michigan State University. She also owns Piper & Gold Public Relations, a traditional public relations boutique with a digital twist. She lives, blogs and works in Lansing, Michigan.
Domestic Slice: Facebook / Twitter / Pinterest
Piper & Gold: Twitter / Pinterest / Instagram
Leave Comment
Jun 30, 2013 | DIY
 Aiko Miyako started her blog Hapy Friends Shoppe last year, sharing DIY tutorials for adorable plushies and sweet, lacy pieces that look so pretty paired with pastels and structured blazers. Today she is joining us to share her DIY for a Laced-up Sunday Tee here on Chic Steals. It’s a great project to breathe life into an old T-shirt or tanktop and give it a bit of feminine flair. Take it away, Aiko!

Before and After of the T-Shirt
Why hello there everyone! My name is Aiko and I am going to share a simple DIY project perfect for Sundays! We will be making this sweet looking laced up T-Shirt. This is a simple project and is a great way to recycle old pieces and turn them into something new. Lace is a beautiful accessory to add to your plain T-shirts and dresses as it gives a romantic, vintage feel which I absolutely adore. This method can be re-created on longer T-shirts depending on preference.
Difficulty level: Intermediate
Things you will need: Old T-Shirt (short or long) / Scrap lace / Scissors / Needle / Thread in the similar colors to your fabric / Pearl beads
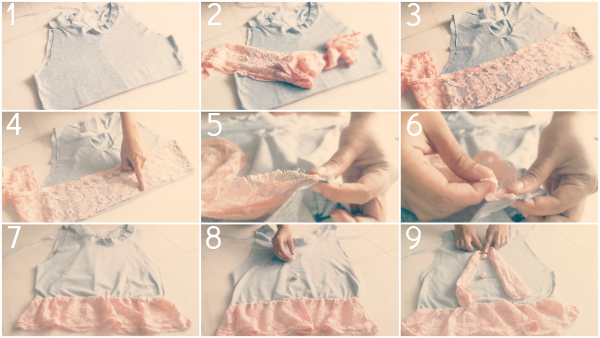 1.) Prepare any kind of T-shirt preferably a plain one. I used an old cropped tee I had lying around. Straighten the T-shirt out, leaving it flat on the floor.
2.) Prepare some scrap lace. In my case, I used scrap lace I had from a previous project. You will want to measure out the lace slightly more than the width of your T-shirt.
3.) Leave your shirt right side up and we are ready to start sewing.
4.) Line the lace parallel with the bottom of your T-shirt and sew 2cm (about 3/4″) above the bottom. Remember to hem the edges so that you have a neat line. (sewing machine only)
5.) If you are hand-sewing the lace on, grab both ends as shown in picture 5. Sew right at the bottom, using blanket stitching. This is a simple and fast method of hand sewing two pieces together and it creates a sturdy finish.
6.) Now let’s create some pretty pleats. Depending on how intricate you want your pleats to be, space them out and start folding the lace as shown in the picture. Sew onto the fold and you are done! Make sure you snip off any excess and hem the edges of the lace.
7.) This is what you should have once you are done with the lace. I only sewed lace on the front side of the T-shirt to give it some edge and left the back bare.
8.) Let’s pretty up this T-shirt. I used pearl beads to create fake buttons and sewed them on by hand using a back-stitch.
9.) Finally, I took some remaining scrap lace, folded it in half, and placed it at the top of the T-shirt. Sew it on using a back stitch and voila! You are done.
 Pair this blouse with a pair of distressed jeans shorts for some edge, slap on a straw hat and be on your way to a perfect Sunday picnic by the lake!
Thank you so much gorgeous people for having me here! It has been a blast!
Xoxo
Aiko
 Aiko Miyako has been blogging and sharing videos on Youtube for a little over a year now under the name Hapy Friends Shoppe. Her blog is built around fashion and craft, starting off with sharing little plush projects on her blog and YouTube channel. Once that took off, she decided to add more content to her blog by posting outfits inspired by the things around her. She adores fashion and DIY projects because she is able to share the things that she loves in hopes to inspire others.
Blog / Youtube / Facebook / Twitter / Instagram / Chictopia
Leave Comment


